Monday, May 1st, 2017
I’ve just released v1.3 of Scriptform.
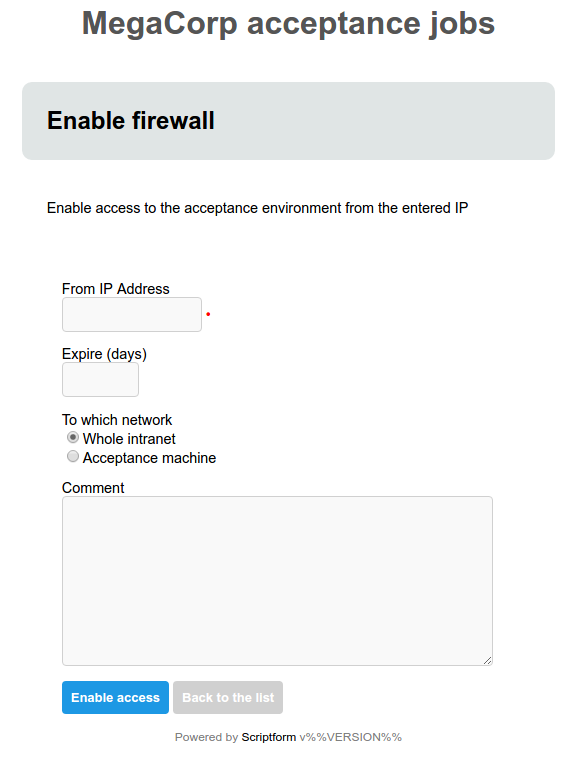
ScriptForm is a stand-alone webserver that automatically generates forms from JSON to serve as frontends to scripts. It takes a JSON file which contains form definitions, constructs web forms from this JSON and serves these to users over HTTP. The user can select a form and fill it out. When the user submits the form, it is validated and the associated script is called. Data entered in the form is passed to the script through the environment.
You can get the new release from the Releases page.
More information, including screenshots, can be found on the Github page.
Wednesday, March 1st, 2017
Getting HTTP error 429 when trying to call Reddit APIs or .json endpoints? Try changing your User Agent header to something else. Reddit bans based on user agent.
Thursday, February 23rd, 2017
I generate release packages for my software with Alien, which amongst other things converts .deb packages to .rpm.
On Fedora 24 however, the generated RPMs cause a small problem when installed with Yum:
Transaction check error:
  file / from install of cfgtrack-1.0-2.noarch conflicts with file from package filesystem-3.2-20.el7.x86_64
  file /usr/bin from install of cfgtrack-1.0-2.noarch conflicts with file from package filesystem-3.2-20.el7.x86_64
There’s a bit of info to be found on the internet about this problem, with most of the posts suggesting using rpmrebuild to fix it. Unfortunately, it looks like rpmrebuild actually requires the package to be installed, and since I don’t actually use a RPM-based system, that was a bit of a no-go.
So here’s how to fix those packages manually:
First, use Alient to generate a RPM package folder from a Debian package, but don’t generate the actual package yet. You can do so with the -g switch:
alien -r -g -v myproject-1.0.deb
This generates a myproject-1.0 directory containing the root fs for the package as well as a myproject-1.0-2.spec file. This spec file is the actual problem. It defines directories for paths such as / and /usr/bin. But those are already provided by the filesystem package, so we shouldn’t include them.
You can remove them from a script using sed:
sed -i 's#%dir "/"##' myproject-1.0/myproject-1.0-2.spec
sed -i 's#%dir "/usr/bin/"##' myproject-1.0/myproject-1.0-2.spec
This edits the spec file in-place and replaces the following lines with empty lines:
%dir "/"
%dir "/usr/bin/"
The regular expressions look somewhat different than usual, because I’m using the pound (#) sign as a reg marker instead of “/”.
Finally, we can recreate the package using rpmbuild:
cd myproject-1.0
rpmbuild --target=noarch --buildroot /full/path/to/myproject-1.0/ \
         -bb cfgtrack-$(REL_VERSION)-2.spec
The resulting package should install without errors or warnings now.
Monday, February 20th, 2017
I was looking for a message queue that could reliably handle messages in such a way that I was guaranteed never to miss one, even if the consumer is offline or crashes. Mosquitto (MQTT) comes very close to that goal. However, it wasn’t directly obvious how to configure it to be as reliable as possible So this post describes how to use Mosquitto to ensure the most reliable delivery it can handle.
TL;DR: You can’t
If you want to do reliable message handling with Mosquitto, the short answer is: You can’t. For the long answer, read the rest of the article. Or if you’re lazy and stubborn, read the “Limitations” section further down. ;-)
Anyway, let’s get on with the show and see how close Mosquitto can get.
Quick overview of Mosquitto
Here’s a quick schematic of Mosquitto components:
+----------+     +--------+     +----------+
| producer |---->| broker |---->| consumer |
+----------+     +--------+     +----------+
The producer sends messages to a topic on the broker. The broker maintains an internal state of topics and which consumers are interested in which topics. It also maintains a queue of messages which still need to be sent to each consumer. How the broker decided what / when to send to which consumer depends on settings such as the QoS (Quality of Service) and what kind of session the consumer is opening.
Producer and consumer settings
Here’s a quick overview of settings that ensure the highest available quality of delivery of messages with Mosquitto. When creating a consumer or producer, ensure you set these settings properly:
- quality-of-service must be
2.
- The consumer must send a client_id.
- clean_session on the consumer must be
False.
These are the base requirements to ensure that each consumer will receive messages exactly once, even if they’ve been offline for a while. The quality-of-service setting of 2 ensures that the broker requires acknowledgement from the consumer that a message has been received properly. Only then does the broker update its internal state to advance the consumer to the next message in the queue. If the client crashes before acknowledging the message, it’ll be resent the next time.
The client_id gives the broker a unique name under which to store session state information such as the last message the consumer has properly acknowledged. Without a client_id, the broker cannot do this.
The clean_session setting lets the consumer inform the broker about whether it wants its session state remembered. Without it, the broker assumes the broker assumes the consumer does not care about past messages and such. It will only receive any new messages that are produced after the consumer has connected to the broker.
Together these settings ensure that messages are reliably delivered from the producer to the broker and to the consumer, even if the consumer has been disconnected for a while or crashes while receiving the message.
Broker settings
The following settings are relevant configuration options on the broker. You can generally find these settings in/etc/mosquitto/mosquitto.conf.
- The broker must have persistence set to
True in the broker configuration.
- You may want to set max_inflight_messages to 1 in the broker configuration to ensure correct ordering of messages.
- Configure max_queued_messsages to the maximum number of messages to retain in a queue.
- Tweak autosave_interval to how often you want the broker to write the in-memory database to disk.
The persistence setting informs the broker that you’d like session state and message queues written to disk. If the broker for some reason, the messages will (mostly) still be there.
You can ensure that messages are sent to consumers in the same order as they were sent to the broker by the producers by setting the max_inflight_messages setting to 1. This will probably severely limit the throughput speed of messages.
The max_queued_messsages determines how many unconfirmed messages should maximally be retained in queues. This should basically be the product of the maximum number of messages per second and the maximum time a consumer might be offline. Say we’re processing 1 message per second and we want the consumer to be able to be offline for 2 hours (= 7200 seconds), then the max_queued_messsages setting should be 1 * 7200 = 7200.
The autosave_interval determines how often you want the broker to write the in-memory database to disk. I suspect that setting this to a very low level will cause severe Disk I/O activity.
Examples
Here’s an example of a producer and consumer:
producer.py:
import paho.mqtt.client as paho
import time

client = paho.Client(protocol=paho.MQTTv31)
client.connect("localhost", 1883)
client.loop_start()
client.publish("mytesttopic", str("foo"), qos=2)
time.sleep(1)  # Give the client loop time to proess the message
consumer.py:
import paho.mqtt.client as paho

def on_message(client, userdata, msg):
    print(msg.topic+" "+str(msg.qos)+" "+str(msg.payload))

client = paho.Client("testclient", clean_session=False, protocol=paho.MQTTv31)
client.on_message = on_message
client.connect("localhost", 1883)
client.subscribe("mytesttopic", qos=2)
client.loop_forever()
Pitfalls
There are a few pitfalls I ran into when using Mosquitto:
- If the broker or one of the clients doesn’t support the
MQTTv32 protocol, things will fail silently. So I specify MQTTv31 manually.
- The
client loop needs some time to process the sending and receiving of messages. If you send a single message and exit your program right away, the loop doesn’t have time to actually send the message.
- The
subscriber must have already run once before the broker will start keeping messages for it. Otherwise, the broker has no idea that a consumer with QoS=2 is interested in messages (and would have to keep messages for ever). So register your consumer once by just running it, before the producer runs.
Limitations
Although the settings above make exchanging messages with Mosquitto more reliable, there are still some downsides:
- Exchanging messages in this way is obviously slower than having no consistency checks in place.
- Since the Mosquitto broker only writes the in-memory database to disk every X (where X is configurable) seconds, you may lose data if the broker crashes.
- On the consumer side, it is the MQTT library that confirms the receipt of the message. However, as far as I can tell, there is no way to manually confirm the receipt of a message. So if your client crashes while handling a message, rather than while it is receiving a message, you may still lose the message. If you wish to handle this case, you can store the message on the client as soon as possible. This is, however, not much more reliable. The only other way is to implement some manual protocol via the exchange of messages where the original publisher retains a message and resends it unless its been acknowledged by the consumer.
Conclusion
In other words, as far as I can see, you cannot do reliable message handling with Mosquitto. If your broker crashes or your client crashes, Mosquitto will lose your messages. Other than that, if all you require is reliable delivery of messages to the client, you’re good to go.
So what are the alternatives? At this point, I have to honest and say: I don’t know yet. I’m personally looking for a lightweight solution, and it seems none of the lightweight Message Queues do reliable message handling (as opposed to reliable messagedelivery, which most do just fine).
When I find an answer, I’ll let you know here.
Monday, February 13th, 2017
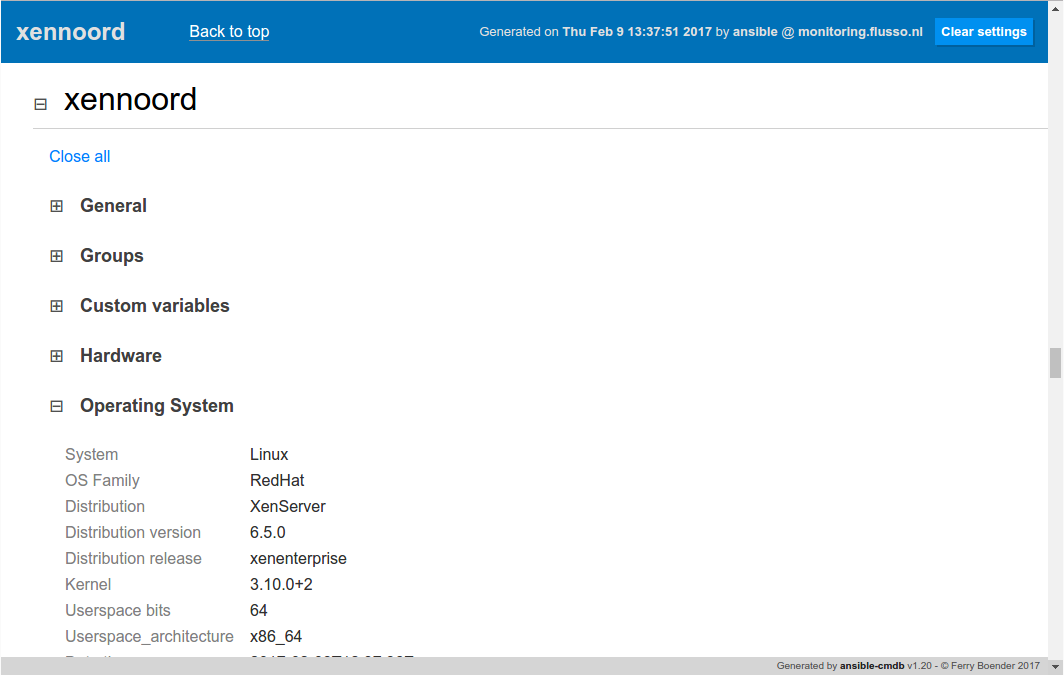
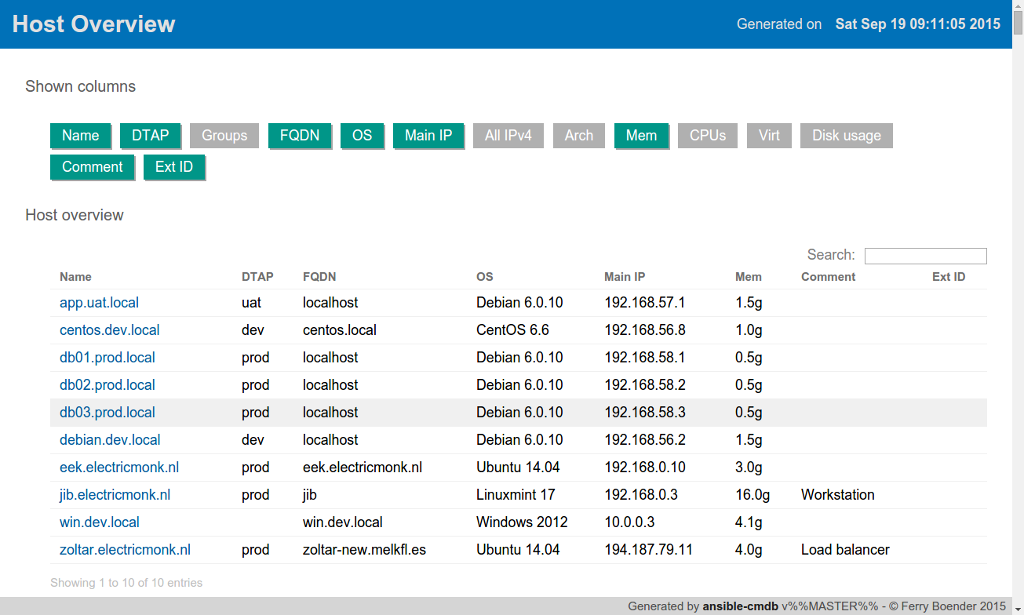
I’ve just released ansible-cmdb v1.20. Ansible-cmdb takes the output of Ansible’s fact gathering and converts it into a static HTML overview page containing system configuration information. It supports multiple templates (fancy html, txt, markdown, json and sql) and extending information gathered by Ansible with custom data.
This release includes the following changes:
- Support for installation in a VirtualEnv.
- New columns in the html_fancy template for the number of network interfaces and physical disk sizes.
- Improved error reporting.
- Added a “Reset settings” button to the html_fancy template that resets localStorage
- The user that generated the overview and the host it was generated on are now shown in the html_fancy output.
- Various minor cosmetic changes to the html_fancy template.
- Work properly with disk sizes of 0 bytes.
- Host detail information in the html_fancy template can now be collapsed. Use the -p collapse=1 flag to automatically collapse all sections..
As always, packages are available for Debian, Ubuntu, Redhat, Centos and other systems. Get the new release from the Github releases page.
Here’s a screenshot of the collapsing host details:
Monday, February 6th, 2017
ScriptForm is a stand-alone webserver that automatically generates forms from JSON to serve as frontends to scripts. It takes a JSON file which contains form definitions, constructs web forms from this JSON and serves these to users over HTTP. The user can select a form and fill it out. When the user submits the form, it is validated and the associated script is called. Data entered in the form is passed to the script through the environment.
Some links for further information:
Github repository / source: https://github.com/fboender/scriptform
Download releases: https://github.com/fboender/scriptform/releases, packages are available for Debian, Redhat and other Linux-bases systems.
Screenshots: https://github.com/fboender/scriptform/tree/master/doc/screenshots
Tutorial: https://github.com/fboender/scriptform/blob/master/doc/MANUAL.md#tutorial
Manual: https://github.com/fboender/scriptform/blob/master/doc/MANUAL.md
This release (v1.1) features the following changes:
- Improved form configuration loading error messages.
- Passwords containing a ‘:’ caused problems.
- When incorrect redirects were done, or if the user specified an URL starting with two slashes, Scriptform would show a 500 error.
- When stopping or restarting Scriptform, a harmless error about missing arguments to _cleanup() would be shown in the log file.
- Various updates to the documentation and examples.
Monday, January 9th, 2017
I’ve just released ansible-cmdb v1.19. Ansible-cmdb takes the output of Ansible’s fact gathering and converts it into a static HTML overview page containing system configuration information. It supports multiple templates (fancy html, txt, markdown, json and sql) and extending information gathered by Ansible with custom data.
This release includes the following bugfixes;:
- Always show stack trace on error and include class name.
- Exit with proper exit codes.
- Exclude certain file extensions from consideration as inventories.
- Improved error reporting and lookups of templates.
- Improved error reporting when specifying inventories.
As always, packages are available for Debian, Ubuntu, Redhat, Centos and other systems. Get the new release from the Github releases page.
Monday, January 9th, 2017
After almost a year of no releases, I’ve made a new release of Bexec today. It’s a minor feature release that brings a new setting to Bexec: bexec_splitsize. This settings controls the default size of the output window. You can set it in your .vimrc as follows:
let g:bexec_splitsize=20
This will always make the output window 20 lines high.
It’s been almost exactly ten years since the first version of Bexec was released. Version 0.1 was uploaded to vim.org on Januari 30th of 2007. That makes about one release per year on average for Bexec ;-) Perhaps it’s time for v1.0 after all this time…
Tuesday, December 6th, 2016
I’ve got a whole bunch of Git repositories in my ~/Projects/ directory. All of those may have unstaged, uncommitted or unpushed changes. I find this hard to keep track of properly, so I wrote a script to do this for me. The output looks like this:
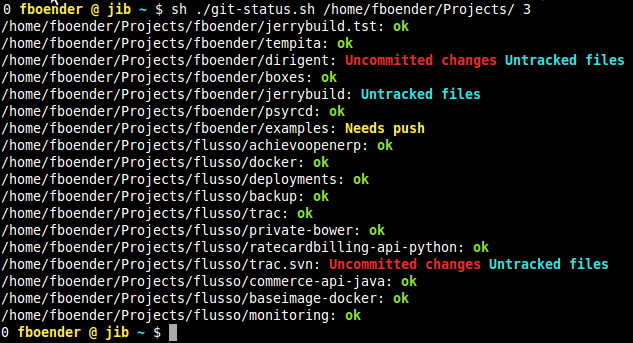
As you can see, it shows:
- Untracked files: File that are new, are unknown to git and have not been ignored.
- Uncommitted changes: Files that are known to git and have changes which are not committed.
- Needs push: New local commits which have not been pushed to the remove origin.
The script scans for .git directories under the given path. It will only scan a certain level deep. The default for this is 2, which means “all directories directly under this directory”. A value of ‘3’ would scan two directories deep.
Full usage:
Usage: git-status.sh <DIR> [DEPTH=2]
Scan for .git dirs under DIR (up to DEPTH dirs deep) and show git status
Get it from the Github project page.
Tuesday, December 6th, 2016
I bought an Intel NUC Kit NUC5CPYH as a replacement for my Raspberry Pi 2b media center and file server. One of the main advantages of the NUC over the Raspberry is that it has USB v3 ports, which greatly increases the throughput speeds to the external USB disks and doesn’t require me to have external power on some of them.
I use a radio-controlled keyboard as my remote control my media center. When I plugged it into the NUC, I suddenly found the range of the keyboard greatly reduced. Even when I placed it in exactly the same place as the Raspberry Pi, the range was still horrible further than about 1.5 meters.
Turns out USB 3.x ports interfere with 2.4 GHz devices, which the radio-controlled wireless keyboard operates on.
The solution was to plug in a USB extension cord and putting the RC receiver in that and placing it about 30 cm from the NUC.
On a side-note: Disable UEFI boot if you can’t seem to install any Linux distro on your NUC.
The text of all posts on this blog, unless specificly mentioned otherwise, are licensed under this license.
