Umatrix is a content blocker and filter plugin for Firefox, Chrome and Opera. It gives the user fine-grained control over blocking and allowing of cookies, CSS, images, media, scripts, XHR, frames and other requests done by the browser. Think of it as a firewall for your browser. Effectively, it replaces cookie blockers, ad blockers and script blockers, as well as all privacy enhancing extensions such as Privacy Badger.
Because umatrix blocks everything by default, you always remain in control of exactly what each website is allowed to do. Many sites will of course break, but umatrix makes it easy to unblock things either by default or on a site-by-site basis.
Umatrix is an extremely powerful tool and unfortunately that means it comes with a bit of a learning curve. This tutorial tries to make that learning curve a little less steep.
The first step is to install the plugin for your browser:
In this tutorial I’ll be using the Chrome version of umatrix. Other browsers should work similar.
After installation, an icon will be added to the extensions area:
Whenever you visit a site, the icon will change to show what’s being blocked and what is being allowed. Clicking on the icon brings up the filtering interface for that website.
For this tutorial I’ll use the first article I found on reddit’s front page as the site which we’ll be blocking and allowing content on.
If we click the umatrix icon, the main interface pops up:
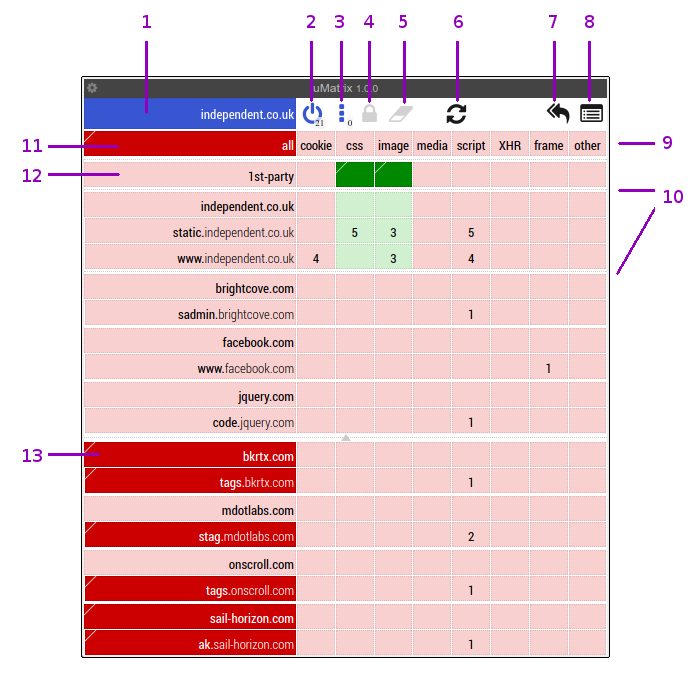
The interface is a matrix (hence the name) of rows and columns that let you selectively block and unblock what you want. Let’s go through the interface. I’ve labeled each element with a number. Here’s what those numbers mean:
Like all matrices, or tables if you will, umatrix consists of rows, columns and cells. Each can be clicked in the top and bottom part of the cell. The top of the cell unblocks that resource and the bottom of the cell blocks it:
Umatrix shows cells with different colors:
The columns in the “All” row block or unblock that resource for all rows:

We can see that clicking the top part unblocks (allows) media all the rows / domains. The entire column turns green. The bottom part blocks it again. Since the default was already to block it (light red background), the column does not turn bright red, but just reverts to the default. When we try to block all images, nothing appears to happen. This is because the “1st party” (and thus the domains under “independent.co.uk”) have been manually set to allow. This overrides the “All” setting.
We can also see that the “Save” and “Revert” icons become active. If we choose to save our current changes, umatrix will use those settings on our next visit to this page / scope. Otherwise, on a next visit, the default settings will be used again.
Each cell shows the number of requests made for the current website. If we wanted to selectively allow scripts from “static.independent.co.uk” and “www.independent.co.uk”, we can click in the top part of those cells and hit reload to refresh the current page.
We can also enable whole sections at once by clicking the top of the cell in the first row of a section:

After reloading, you may notice new rows appearing in the matrix. Scripts may try to load additional resources, which may be blocked by umatrix. Once we are satisfied with our changes, we can click the “Save” icon to save those changes for next time we visit this website.
You may have noticed the tiny little triangle in the top-left corner of each cell. That triangle indicates the default value for that cell. If you click the Revert button (the little eraser), the cell will revert to the color in this little corner.
The blue cell in the top left corner is the scope selector. It determines on what level blocking and unblocking elements has an effect. Clicking it brings up a pop-up:
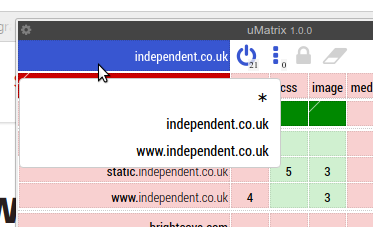
As you can see there are three scopes: “*” is the global scope, “independent.co.uk” is the 1st-party scope (domain) and “www.independent.co.uk” is the current site scope.
The scope determines to which site the blocks and unblocks in the matrix apply, while the various domain rows determines which domains the site may make requests to.
Say we start with all resources blocked for everything. Now, we want to enable the loading of images and CSS, but only for 1st party domains. So if we visit https://www.reddit.com, we want CSS and images loaded from https://reddit.com, https://www.reddit.com and maybe something like https://images.reddit.com, but not from https://www.imgur.com or https://www.evil-ads.com.
We can do so by changing the scope to “*”, enabling the CSS and Images column for the 1st party row, saving our changes and then switch back to the normal scope:
We see that the images and CSS are now enabled for *.independent.co.uk. If we browse to a different site, such as github.com, we’d see that images and CSS are allowed for *.github.com.
If we want to allow CSS and image loading for every domain, regardless of whether it’s a first party domain:
A few more examples:
www.independent.co.uk. On scope www.independent.co.uk we unblock media for the independent.co.uk domain / row. www.independent.co.uk may now load media from independent.co.uk. However, independent.co.uk’s blocks and unblocks have not changed, so if we were to visit independent.co.uk, it will not have any new rights.www.independent.co.uk. On scope independent.co.uk we unblock media for the independent.co.uk domain / row. We see that this also enabled media for all other domains under independent.co.uk as multiple rows turn green. Now site independent.co.uk as well as any other site under it may load media from any other domain under independent.co.uk.*”, we unblock CSS for the 1st-party row. Now any site may request any CSS from any of the other sites in that domain. For example, www.independent.co.uk may request CSS from independent.co.uk or from css.independent.co.uk.*”, we unblock scripts for cdn.coolscripts.com. Any site can now request and run scripts from cdn.coolscripts.com.I suggest blocking everything by default and only enabling CSS and images for first-party sites by default (the “*” scope). This will break a fair amount of sites. You could chose to allow CSS and images from all sites. This will make many sites work a lot better, but you can still be tracked by all those sites. Umatrix puts the amount of convenience you’re willing to sacrifice for security and privacy entirely in your own hands.
You should now have a decent idea on how to use umatrix:
*” scope, save your changes and switch back to the default scope.Within a few hours of browsing, most of your regular sites will work properly.
Don’t forget that once you’re used to umatrix, you don’t need any other blocking extensions anymore! You can get rid of ublock origin, privacy badger, noscript, and any other extension you may have installed to protect you.
One tip before this article ends: You may want to install the Mercury Reader plugin for Chrome. It lets you view articles without all the clutter. It works great in combination with umatrix.