Sunday, February 17th, 2008
For some reason Ubuntu 7.10 has an ancient version of Transmission. Version 0.74 or somesuch. Unfortunately, that version of Transmission contained some bugs so it’s blocked by certain bittorrent trackers. In order to install a more recent version:
You can download a more recent version from the gutsy backports package pool.
- Uninstall transmission:
sudo aptitude purge transmission transmission-gtk
- Download transmission-common 1.04
- Download transmission-gtk 1.04
- Install the packages:
sudo dpkg -i "transmission-common_1.04-0ubuntu1~gutsy1_all.deb"
sudo dpkg -i "transmission-gtk_1.04-0ubuntu1~gutsy1_i386.deb"
And you’ll have a more recent version of Transmission.
Saturday, February 16th, 2008
VirtualBox has been getting more and more attention as of late. It is vastly superior to other virtualization programs due to the simple fact that it actually runs on my system. All the others either don’t install (VMWare), crash (QEMU), or are a real bitch to set up properly (Xen). VirtualBox is Open Source, easy to install, fast, runs on Linux and Windows and it has both a very nice GUI and a very decent commandline interface. VirtualBox is what VMWare (for Linux) could have been, but better.
Now, WMWare has pre-built images online at their Appliances site. Qemu has the Free OS Zoo. Now there’s one for VirtualBox too:
veeDee-Eyes.com:
The VirtualBox “Virtual Disk Image” Index
VDI images of pre-installed “Open Source” Operating System distros.
It’s a computer inside your computer.
-Instantly run another operation system on your desktop in a window, on almost any computer.
-Implement full Linux functionality on an existing Windows Desktop or server.
I’ve been looking for this for a while. All it’s currently missing are OpenSolaris and various BSD images. I’m sure these will be added rather quickly.
PS: It appears Innotek, the creators of VirtualBox, have been acquired by Sun. I’m not sure yet whether Sun’s acquiring of Open Source companies is a good or bad thing. Guess we’ll have to see where it goes. Perhaps they should get the benefit of the doubt since they did free the source of StarOffice (Open Office), Java (in part) and Solaris (in part). I’m just not sure whether Sun understands the Open Source philosophy and community.
Thursday, February 14th, 2008
In anticipation of my new phone (a Sony Ericsson W910i), I decided to spend some time finding various Java Midlets which I need for the phone. I was looking for a decent calculator, translator, dictionary and a E-book reader. I wanted to try the applications, but since I don’t have the new phone yet, I thought “Why not find an emulator on which to run them?”. In this post I’ll detail my journey into the crazy world of J2EE, Midlets, CLDC, MIDP, J2RE and various other weird mobile Java stuff, and show you how I got the emulator and Midlets to run on my Unix (Ubuntu) machine.
Prerequisites
To be able to emulate anything at all, you’ll need to have the J2RE installed. That’s the Java 2 Runtime Environment; the basic stuff you need to run Java programs. Under Ubuntu, it’s as easy as:
sudo aptitude install sun-java6-jre
Get Sun Java Wireless Toolkit
Next you’ll need to fetch and install the Sun Java Wireless Toolkit (S2WTK2, previously known as J2ME: Java Micro Edition). You can download it from:
http://java.sun.com/products/sjwtoolkit/download.html.
(Registration not required, amazingly enough). Scroll down on the page until you see the ‘Download’ button. That’ll take you to the download page where you must accept the license and download the toolkit for your platform.
Automatic installation
To install it, you can try the installer:
sh ./sun_java_wireless_toolkit-2_5_2-linux.bin

-- LICENSE --
Do you agree to the above license terms? [yes or no] yes

Testing /usr/bin/X11/java...

A suitable Java interpreter was detected

0) Use /usr/bin/X11/
1) Specify a path to a Java interpreter directory.
2) Cancel this installation.
Select a choice [0-2]:
The installer detected the wrong path, so you’ll have to find out where your actual JRE resides on your disk. Under Ubuntu, this is: /usr/lib/jvm/java-6-sun/jre/bin, so we enter that instead of the detected path:
0) Use /usr/bin/X11/
1) Specify a path to a Java interpreter directory.
2) Cancel this installation.
Select a choice [0-2]: 1

Enter a path to the Java 2 SDK: /usr/lib/jvm/java-6-sun/jre/bin/
/usr/lib/jvm/java-6-sun/jre/bin//java
Testing /usr/lib/jvm/java-6-sun/jre/bin//java...

Please enter a directory into which you would like to install the Sun Java(TM) Wireless Toolkit, 2.5.2 for CLDC.

-- Blah blah blah -- follow the instructions --
Please choose one of the following options:
0) Begin copying files if you are satisfied with the settings  .
1) Cancel the installation.
Select a choice [0-1]: 0
Checksumming...

Extracting the installation files...
./sun_java_wireless_toolkit-2_5_2-linux.bin: 466: /usr/lib/jvm/java-6-sun/jre/bin/jar: not found
Failed to extract files. Installation will stop now.
Please try to install Sun Java(TM) Wireless Toolkit again, or contact wtk-comments@sun.com for assistance.
Manual installation
Chances are, however, that it won’t work because it can’t find the jar binary:
./sun_java_wireless_toolkit-2_5_2-linux.bin: 466: /usr/lib/jvm/java-6-sun/jre/bin/jar: not found
Failed to extract files. Installation will stop now.
If this happens with you, there’s another way to install it:
- The .bin file is nothing more than a shell script (the automatic installer) with an .zip file attached to it. We’ll have to remove the shell script header so we can unzip the file.
- Open the sun_java_wireless_toolkit-2_5_2-linux.bin in a text-editor which can edit binary files without screwing things up. Vim works nicely.
- Remove the shellscript in the beginning of the file. Keep all the binary stuff
- Save the file
- Create a new directory and cd into it: mkdir jwt; cd jwt;
- Unpack the .bin file: unzip ../sun_java_wireless_toolkit-2_5_2-linux.bin
- You can now run stuff from the Wiress Toolkit in the current dir or move it somewhere on your hard disk (i.e. /opt/j2me )
Now try the Wireless toolkit out to see if it works:
~$ /opt/j2me/bin/ktoolbar
You can try out an example Midlet game by running:
~$ /opt/j2me/bin/runmidlet /opt/j2me/apps/Games/bin/Games.jad
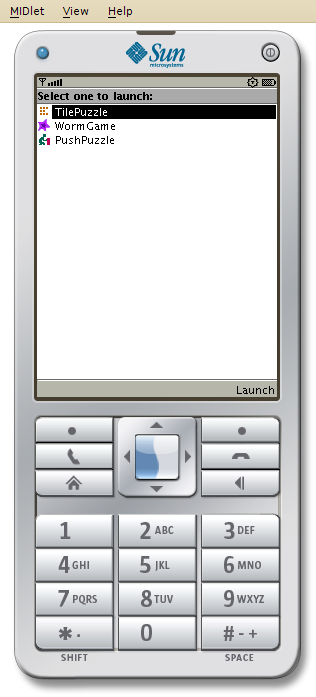
The Emulated Phone

The Phone emulator should pop up with some options for games which can be run. You can control the emulator with the mouse, or with the keyboard: F1, F2 are the Left and Right soft keys. Normal arrow keys on your keyboard correspond to the arrows of the phone. Enter emulates the middle button.
You can configure the emulated phone by with the /opt/j2me/bin/prefs program. Here you can change things such as the type of phone emulated, etc.
Put files on the phone
Sometimes you’ll want to put files on the phone. For instance, an mp3 or whatever. You can do this by copying files to the j2mewtk/2.5.2/appdb/DefaultColorPhone/filesystem/root1/ directory in your home directory. This directory is automatically created when you run the Phone emulator.
Running midlets
Running Midlets on the phone is harder then it should be. In order for the emulator to be able to run Midlets, it needs both a .jar and a .jad file. The Jar file contains the actual application and the Jad file contains a definition file so that the emulator knows how to run the Midlet. Most Midlets only come with a Jar file and not a Jad file however. Fortunately it’s quite easy to create one yourself. Here’s a script which you can use to automatically create a .jad file from a .jar file:
#!/bin/sh

while [ -n "$1" ]; do
        JAR=$1
        JAD="`basename \"$JAR\" .jar`.jad"
        JAR_SIZE=`du -b "$1" | cut -f1`

        echo -n "Generating \"$JAD\" from \"$JAR\".. "
        unzip -p -x "$1" META-INF/MANIFEST.MF > "$JAD"
        echo "" >> "$JAD"
        echo "MIDlet-Jar-URL: $1" >> "$JAD"
        echo "MIDlet-Jar-Size: $JAR_SIZE" >> "$JAD"
        echo "Done."

        shift
done
Copy-paste the file above into a file named jar2jad.sh and make it executable: chmod 755 ./jar2jad.sh. You can now run:
~$ ./jar2jad.sh foo.jar
In order to create a corresponding .jad file. Now you can run the Midlet by executing:
~$ /opt/j2me/bin/runmidlet ./foo.jad
You can now download .jar midlets and test them out on your PC before actually running them on your phone. Not all midlets will work on the emulator though, since some of them depend on phone specific Java libraries. Some phone manufacturers give out SDK’s (System Development Kits) for their phones which you can download and install so you can test Midlets which are specific for certain phones. This will be left as an exercise for the reader though.
Monday, February 11th, 2008
I do a lot of remote UNIX administration on various servers and even some desktop machines. This usually means that I’m doing a lot of SSHing into machines, often opening multiple sessions to the same machine at the same time. It quickly becomes tedious to keep having to type ‘ssh fboender@some.machine.com‘ four times in order to get four sessions.
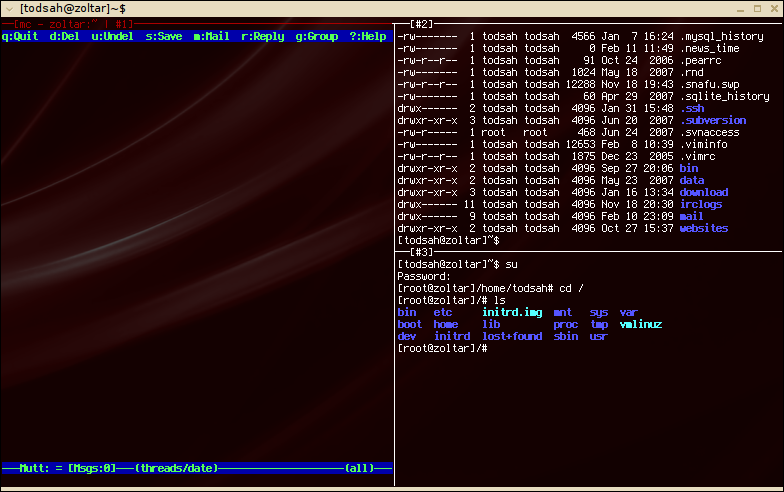
Of course there is Screen, but Screen’s split screen abilities are very limited and don’t really work for me. While scanning Freshmeat.net, I found a tool called DVTM: dynamic virtual terminal manager.
DVTM is a kind of window manager for the console (or xterm) which allows you to quite easily split your terminal into multiple split screens.
DVTM has some limitations though:
- Configuration is done using C code. (Though you’ll probably never need to change anything; the defaults are quite sane)
- It doesn’t seem to support ANSI colouring. I use a red background at my prompt when I’m root, which I now have to miss.
- It also doesn’t seem to support line-drawing. This probably has something to do with the terminal type.
- DVTM has no internal support for detaching and reattaching to running DVTM instances like Screen can. (But see the Tips and tricks section on the homepage).
- There are a couple of small bugs, one of which is a problem with repeating keys when switching between split windows with the mouse.
But make no mistake: despite these shortcomings, DVTM is an absolutely fantastic tool. Some of the neat stuff it supports is:
- Mouse support for switching between split windows / maximizing and unmaximizing, etc.
- Maximize/unmaximize the currently active window (Default: Ctrl-g m / Ctrl-g g)
- Various window layouts (you can probably add your own by hacking the source code)
- Almost no dependencies except for ncurses.
The only thing I’d really like to see changed about DVTM are custom run-time splitting (for instance, Ctrl-g-MINUS to split the current window horizontally and Ctrl-g-PIPE to split the window vertically) and detaching/reattaching.
All in all, DVTM is an awesome tool. Go download it if you do a lot of remote administration.
Update: There also appear to be two bugs:
- On the latest Ubuntu: Sometimes when exiting DVTM, it will hang for a while, and the cursor will blink like mad. An strace shows that IO Errors are occuring on file descriptor 3. I’ve filed a bug report with the author. This bug doesn’t appear on Debian stable.
- When using DVTM in combination with dtach, reattaching doesn’t redraw the screen. This appears to be a problem with DVTM, but it would probably be easier to solve in dtach (which could just signal a screen resize event without actually resizing the screen). This is also the workaround for this bug: just resize the window. I’ll see if I can file a bug report with either DVTM’s author or dtach’s author.
Update II: Here’s a little patch/workaround for the first bug (exiting DVTM hangs for a while):
--- dvtm.c      2008-02-06 17:30:25.000000000 +0100
+++ ../dvtm-0.4/dvtm.c  2008-02-11 23:33:45.000000000 +0100
@@ -896,6 +896,7 @@
                Client *c;
                int r, nfds = 0;
                fd_set rd;
+               struct timeval tv;

                if(need_screen_resize)
                        resize_screen();
@@ -996,6 +997,13 @@
                        wnoutrefresh(sel->window);
                }
                doupdate();
+
+               // One microsecond delay so this loop doesn't hang context-switching
+               // when the last child dies and the SIGCHLD signal is prevented from
+               // being caught on time.
+               tv.tv_sec = 0;
+               tv.tv_usec = 1;
+               select(0, NULL, NULL, NULL, &tv);
        }

        cleanup();
Save to ~/patch.diff and in the dvtm-0.4 directory run:
~/dvtm-0.4$ patch -p0 < ~/patch.diff
Update III:
I was incorrect in stating that dvtm doesn't support ANSI coloring. It's just the bash prompt which doesn't work. Perhaps because there is a Xterm-styled window title ANSI sequence in there. Will update when I know more.
Update IV:
Marginally better patch:
diff -Naur ./dvtm.c ../dvtm-0.4/dvtm.c
--- ./dvtm.c	2008-02-06 17:30:25.000000000 +0100
+++ ../dvtm-0.4/dvtm.c	2008-02-12 22:08:54.000000000 +0100
@@ -982,7 +982,10 @@

 		for(c = clients; c; c = c->next){
 			if(FD_ISSET(c->pty, &rd)){
-				madtty_process(c->term);
+				if (madtty_process(c->term) < 0 && errno == EIO) {
+					/* client probably terminated */
+					client_killed = c;
+				}
 				if(c != sel){
 					draw_content(c);
 					if(!isarrange(fullscreen))
Tuesday, January 22nd, 2008
In the post SQL: Find duplicate rows I explained how you can find duplicate rows in a table. However, if you want to delete them, you’ll run into a little problem as you have to delete all the duplicate rows except for one. Lots of solutions are floating around on the Internet, but most either don’t work at all or don’t work with MySQL.
Temporary table
One solution that works with MySQL is to create a temporary table to hold the data without duplicates and using the SELECT described in the post mentioned above (without the HAVING clause) and then dropping the original table and recreating it.
Suppose we have a table ‘Foo’ with three columns:
Foo:
id int(8) auto_increment
field1 int(8)
field2 int(8)
‘field1’ and ‘field2’ don’t have a unique constraint, so they might contain duplicates. To remove these duplicates, we do:
CREATE TEMPORARY TABLE tmp
  SELECT min(id) as min, field1, field2
  FROM Foo
  GROUP BY Foo.field1, Foo.field2;

DROP TABLE Foo;

CREATE TABLE Foo
  SELECT * FROM tmp;
This will fill the ‘tmp’ table with unique rows from table ‘Foo’, and uses the lowest ‘id’ value for each row. So if we have two rows:
id  field1  field2
------------------
1   hi      bye
2   hey     see ya
3   hello   goodbye
4   hi      bye
We will end up with:
id  field1  field2
------------------
1   hi      bye
2   hey     see ya
3   hello   goodbye
In place
The above solution works well, but for some reason I don’t like it. I don’t like making temporary tables. I want to do it with a single query, modifying the table in place. You might call it pigheaded, as the solution presented below doesn’t work as well on large datasets as the one above, but still, I found a way.
Another way to remove duplicates in MySQL is by using the following query:
DELETE
  Foo
FROM
  Foo, Foo t2
WHERE
  Foo.field1=t2.field1 AND
  Foo.field2=t2.field2 AND
  Foo.id < t2.id
There we go. Explanation: This first does a Cartesion Join on every row where the two fields 'field1' and 'field2' are the same. So if we start with this data:
1 A B  <- duplicate
2 A B  <- duplicate
3 A C
we get the Cartesian product (all possible combinations) for the 'id' column for every unique set of the 'field1' and 'field2' columns:
1 A B 1 A B
1 A B 2 A B
2 A B 1 A B
2 A B 2 A B
3 A C 3 A C
Next we say 'AND Foo.id < t2.id'. This will leave us with following row, which is the only one where the left id is smaller than the right id:
1 A B 2 A B
It then DELETE's that row from Foo (that is, the row '1 A B' - remember that the two rows with left id '2' are actually one and the same row), leaving:
2 A B
3 A C
There we go. If you want to keep the smallest 'id' for each unique set of 'field1' and 'field2', simple use 'AND Foo.id > t2.id'. It works the same way.
Remember that this is incredibly slow for large tables due to the Cartesion Join, unless you've got indexes on 'field1' and 'field2' and don't have a lot of duplicates. Otherwise, use the temporary table solution above.
Wednesday, January 16th, 2008
Since me and my housemate have been living in our house for nearly one and a half years now, we thought it was high time for a house warming party! But who to invite? “Well”, we thought, “why not invite everybody”?
When?
Friday, 25th of Januari 2008
Party at our place!
The party starts at basically whatever time you’d like to show up. A general guideline would be around 8 o’clock in the evening, but you’re more than welcome earlier. We haven’t set an end time for the party, so we can keep going all night long if need be.
Who’s invited?
Everybody’s invited! You can bring your friends, coworkers, your significant others, your mom, whoever you want. We really don’t mind. The more, the merrier, we always say.
Where
The party will be held at our house. The address is:
Lloyd Webberhof 56
3543 EH
Utrecht
The Netherlands
Directions
Here’s the place on Google Maps.
If you’re coming in by train, there’s a train station (Utrecht Terwijde) quite near our house. Once you disembark from the train, go down the stairs and straight ahead over the old tracks and over the little bridge. Go left, past the bicycle stands, then right (yes, you can walk on that street, no worries). You’ll pass a park on your left. Take the first street on the right and immediately go left, in between the houses and the tall ugly building. Take the first street on the right. This is the Lloyd Webberhof. Number 56 is all the way at the end, on the right – just follow the music ;-).
If you’re coming in by car: From Amersfoort get on the A28 towards Utrecht. From the A28, get on the A27 towards Den Haag/Breda. Take the exit to the A2 towards Utrecht/Amsterdam. On the A2, take exit 7 ‘Oog in al’. Take the second street on the right, BEFORE crossing the bridge. You’ll go all around and over the highway and will end up at a roundabout. Take a left at the roundabout, then take the first street on the right (passing through a tunnel underneath the railway). Out the tunnel, take a left. Take the fifth street on the right. Take the first left, and keep going until you’re almost at the end of the road (which ends in a T-section). Before that T-section, you’ll see parking spaces on your right, where you can park your car. On the other side of the house bordering the car park is the Lloyd Webberhof.
Tha booze and tha food
Since we have absolutely no idea how many people are going to show up, it would be a good idea to bring your own booze and food. Naturally we’ll have some, but we honestly can’t say if it’ll be enough. So, rather safe than sorry, right?
Sleep
If you want to, you can sleep over at our place. There’s plenty of room for people to sleep, but you’d be wise to bring your own sleeping gear (airbed, sleeping bag, pillow), since we don’t have many spare beds. Also, you’ll probably have to share a room with some other people. If this bothers you, bring a tent or something.
Contact
Wanna know more? Can’t find the house on friday? You can send me email and find out my MSN/ICQ address by going to this page: Contact information. In case you need to call me (cause you can’t find the house or whatever), my phone number is: +316********. (Update: Removed after the party for obvious reasons :-P)
Present?
No presents please! Unless it’s booze for yourself.
Thursday, November 29th, 2007
Chkrootkit is a tool that searches for rootkits, trojans and other signs of break-ins on your system. Like most security scanners, it sometimes generates false positives. Chkrootkit doesn’t have a native way to filter those out. From the FAQ:
[Q:] chkrootkit is reporting some files and dirs as suspicious: `.packlist’, `.cvsignore’, etc. These are clearly false positives. Can’t you ignore these?
[A:] Ignoring some files and dirs could impair chkrootkit’s accuracy. An attacker might use this, since he knows that chkrootkit will ignore certain files and dirs.
This is true, but getting an email every day is simply too annoying, and makes me skip chkrootkit generated emails on occasion because “It’s probably a false positive anyway”. So here’s a small guide for setting up a filtering of chkrootkit’s output.
First, we create a file /etc/chkrootkit.ignore which will hold a bunch of regular expressions that will match everything we don’t want to be warned about. For instance, I’ve got a machine that needs to have a dhcp client installed. Chkrootkit keeps on generating emails with these lines:
eth0: PACKET SNIFFER(/sbin/dhclient[346])
eth1: PACKET SNIFFER(/usr/sbin/dhcpd3[1008])
So what we do is create the file /etc/chkrootkit.ignore and put the following in it:
/etc/chkrootkit.ignore
^eth0: PACKET SNIFFER\(/sbin/dhclient\[[0-9]*\])$
^eth1: PACKET SNIFFER\(/usr/sbin/dhcpd3\[[0-9]*\]\)$
In order to test if the rules we created are correct, we put the two lines with false positives in a separate file (/tmp/chkrk-fp.txt) and run the following:
test:
[root@sharky]/etc# cat /tmp/chkrk-fp.txt | grep -f /etc/chkrootkit.ignore
eth0: PACKET SNIFFER(/sbin/dhclient[346])
eth1: PACKET SNIFFER(/usr/sbin/dhcpd3[1008])
The lines that should be filtered out of the chkrootkit output should appear here. If nothing appears, or if not all of the lines that you want to filter appear, there’s a problem. Refine your regular expressions in /etc/chkrootkit.filter until it works.
Now we need to modify the chkrootkit cronjob so that the false positives are filtered. To do this, we edit /etc/cron.daily/chkrootkit. Below is a patch that shows what should be changed. You can apply the patch with the ‘patch‘ command, or you can manually add the lines that start with a ‘+’, replacing the lines with a ‘-‘.
--- /home/root/foo      2007-11-21 11:53:58.532769984 +0100
+++ /etc/cron.daily/chkrootkit  2007-11-21 11:54:00.689442120 +0100
@@ -1,27 +1,28 @@
 #!/bin/sh -e

 CHKROOTKIT=/usr/sbin/chkrootkit
 CF=/etc/chkrootkit.conf
+IGNOREF=/etc/chkrootkit.ignore
 LOG_DIR=/var/cache/chkrootkit

 if [ ! -x $CHKROOTKIT ]; then
   exit 0
 fi

 if [ -f $CF ]; then
     . $CF
 fi

 if [ "$RUN_DAILY" = "true" ]; then
     if [ "$DIFF_MODE" = "true" ]; then
-        $CHKROOTKIT $RUN_DAILY_OPTS > $LOG_DIR/log.new 2>&1
+        $CHKROOTKIT $RUN_DAILY_OPTS | grep -v -f $IGNOREF > $LOG_DIR/log.new 2>&1 || true
         if [ ! -f $LOG_DIR/log.old ] \
            || ! diff -q $LOG_DIR/log.old $LOG_DIR/log.new > /dev/null 2>&1; then
             cat $LOG_DIR/log.new
         fi
         mv $LOG_DIR/log.new $LOG_DIR/log.old
     else
-        $CHKROOTKIT $RUN_DAILY_OPTS
+        $CHKROOTKIT $RUN_DAILY_OPTS | grep -v -f $IGNOREF || true
     fi
 fi
Next, we try running chkrootkit, to see if anything shows up:
[root@sharky]/etc/cron.daily# ./chkrootkit
[root@sharky]/etc/cron.daily#
There is no output, so our false positives are now being ignored.
Monday, November 19th, 2007
I just finished writing an article for my blog. It took me most of the evening. Researching, writing, proof-reading, rewriting, linking to articles, etc. I click save, and only one-third of the article shows up in WordPress. The rest? Gone. Hours of my hard work? Gone. Careful proof-reading, rewriting, analysis, unbiasing, rereading? Gone.
THANK YOU WORDPRESS, YOU PIECE OF SHIT SOFTWARE!
I’m guessing it’s wordpress’ auto-save functionality. This isn’t the first time this has happened (it happened about six times so far, always with articles that I spent the most time on), but it will be the last. This will be the last article I ever write using WordPress. I hate the product, and from now on, I will use every means at my disposal to discredit it as a useful piece of software.
WordPress sucks, and you shouldn’t use it! Spread the word people!!
I’m starting a conversion of my blog to MvBlog tomorrow.
Monday, November 19th, 2007
I was just browsing around on Slashdot a bit, and I found an article on the topic of Token Ring Networks.
We all know that back in the day, Token Ring was considered ‘better’ than Ethernet because Ethernet would start colliding like mad under heavy (60/70% and higher) loads. This was because there was no central authority on who was allowed to send over the wire with Ethernet, so nodes on the network had to duke it out amongst themselves using Carrier Sense Multiple Access with Collision Detection. The more nodes on the network, the more collisions. Token Ring didn’t suffer from the same problem, giving higher possible loads on a network.
But this interesting comment on Slashdot claims something else:
In theory, Ethernet on coax should be stable under heavy load. But in the late 1980s and early 1990s, it wasn’t, due to defective design of some widely used interface chips. Here’s the actual story. See this note by Wes Irish at Xerox PARC [link dead, so not included]
The worst device was the SEEQ 8003 chip, found in some Cisco and SGI devices. Due to an error in the design of its hardware state machine, it would turn on its transmitter for a few nanoseconds in the middle of an interframe gap. This noise caused other machines on the LAN to restart their interframe gap timers and ignore the next packet, if it followed closely enough. This happened even if the SEEQ chip was neither the sender or the receiver of the packets involved. So as soon as you plugged one of these things into a LAN, throughput went down, even if it wasn’t doing anything. A network analyzer wouldn’t even see the false collision; this was at too low a level.
This was tough to find. Wes Irish worked on the problem by arranging for both ends of Xerox PARC’s main coax LAN to terminate in one office. Then he hooked up a LeCroy digital oscilloscope to both ends. Then he tapped into a machine with an Ethernet controller to bring out a signal when the problem was detected and trigger the oscilloscope. Then, when the problem occured, he had a copy of the entire packet as an analog waveform stored in the scope. This could then be printed with a thermal printer and gone over by hand.
Because he had the same signal from both ends of the wire, the wierd SEEQ interference mentioned above appeared time-shifted due to speed of light lag, making it clear that the interference was from a different node than the one that was supposed to be sending. You could measure the time shift and figure out from where on the cable the noise was being inserted. Which he did.
It took some convincing to get manufacturers to admit there was a problem. It helped that Wes was at Xerox PARC, where Ethernet was born. I went up there to see his work, and once I saw the waveforms, I was convinced. There was much faxing of waveform printouts for a few months, and some vendors were rather unhappy, but the problem got fixed.
So that’s why.
I’m not completely convinced that is the real reason why Ethernet didn’t perform well under high loads back in the day (these days, switches take care of the problem of high levels of collisions on Ethernet networks), but it does make for an interesting read.
Monday, November 19th, 2007
Customers (as well as business partners, prospects, etc) are not:
- Aliens
- Humour impaired
- Poisonous
- Unreasonable
- Inhuman
- Somehow invulnerable to the same problems we all face in day to day business.
Even if they’re wearing suits!
The text of all posts on this blog, unless specificly mentioned otherwise, are licensed under this license.