Friday, July 24th, 2015
When creating new credentials on Openvaz (6, 7 and 8), it takes a very long time to store the credentials.
The problem here is that the credentials are stored encrypted, and Openvaz (probably) has to generate a PGP key. This requires lots of random entropy, which is generally not abundantly available on a virtual machine. The solution is to install haveged:
sudo apt-get install haveged
Haveged will securely seed the random pool which will make a lot of random entropy available, even if you have no keyboard, mouse and soundcard attached. Ideal for VPSes.
Monday, July 13th, 2015
I was trying to setup a jail for SSH on Ubuntu 14.04, but it didn’t seem to work. The user I was trying to jail using ChrootDirectory could login with SFTP, but could still see everything. Turns out there were a few issues that were causing this. The summary is:
- All directories to the ChrootDirectory path must be owned by root and must not have world or group writability permissions.
- Ubuntu 14.04 sysv init and upstart scripts don’t actually restart SSH, so changing the config file doesn’t take effect.
- The “Match User XXXX” or “Match Group XXXX” configuration section must be placed at the end of the sshd.config file.
- Also don’t forget to make your user a member of the sftponly group if you’re using “Match Group sftponly”.
All paths to the jail must have correct ownerships and permissions
All directories in the path to the jail must be owned by root. So if you configure the jail as:
ChrootDirectory /home/backup/jail
Than /home, /home/backup/ and /home/backup/jail must be owned by root:<usergroup>:
chown root:root /home
chown root:backup /home/backup
chown root:backup /home/backup/jail
Permissions on at least the home directory and the jail directory must not include world-writability or group-writability:
chmod 750 /home/backup
chmod 750 /home/backup/jail
Ubuntu’s SSH init script sucks
Ubuntu’s SSH init script (both sysv init and upstart) suck. They don’t actually even restart SSH (notice the PID):
# netstat -pant | grep LISTEN | grep sshd
tcp   0   0 0.0.0.0:22   0.0.0.0:*    LISTEN   13838/sshd
# /etc/init.d/ssh restart
[root@eek]~# netstat -pant | grep LISTEN | grep sshd
tcp   0   0 0.0.0.0:22   0.0.0.0:*    LISTEN   13838/sshd
The PID never changes! SSH isn’t actually being restarted! The bug has been reported here: https://bugs.launchpad.net/ubuntu/+source/openssh/+bug/1390012.
To restart it you should use the “service” command, but even then it might not actually restart:
# service ssh restart
ssh stop/waiting
ssh start/running
[root@eek]~# netstat -pant | grep LISTEN | grep sshd
tcp    0   0 0.0.0.0:22   0.0.0.0:*   LISTEN   13838/sshd
This generally happens because you’ve got an error in your ssh configuration file. Naturally they don’t actually bother with telling you as much, and the log file also shows nothing.
The Match section in the SSHd configuration must be placed at the end of the file
When I finally figured out that SSH wasn’t being restarted, I tried starting it by hand. You might run into the following error:
# sshd -d
sshd re-exec requires execution with an absolute path
You should execute it with the full path because SSHd will start new sshd processes for each connection, so it needs to know where it lives:
# /usr/sbin/sshd
Now I finally found out the real problem:
# /usr/sbin/sshd
/etc/ssh/sshd_config line 94: Directive 'UsePAM' is not allowed within a Match block
My config looked like this:
Match User obnam
    ChrootDirectory /home/obnam/jail
    X11Forwarding no
    AllowTcpForwarding no
    ForceCommand internal-sftp
UsePAM yes
UseDNS no
Aparently SSH is too stupid to realize the Match section is indented and thinks it runs until the end of the file. The answer here is to move the section to the end of the file:
UsePAM yes
UseDNS no
Match User obnam
    ChrootDirectory /home/obnam/jail
    X11Forwarding no
    AllowTcpForwarding no
    ForceCommand internal-sftp
This will fix the problem and sftponly should work now.
Monday, June 22nd, 2015
 Many posts have been written on putting your homedir in git. Nearly everyone uses a different method of doing so. I’ve found the method I’m about to describe in this blog post to work the best for me. I’ve been using it for more than a year now, and it hasn’t failed me yet. My method was put together from different sources all over the web; long since gone or untracable. So I’m documenting my setup here.
The features
So, what makes my method better than the rest? What makes it better than the multitude of pre-made tools out there? The answer is: it depends. I’ve simply found that this methods suits me personally because:
- It’s simple to implement, simple to understand and simple to use.
- It gets out of your way. It doesn’t mess with repositories deeper in your home directory, or with any tools looking for a .git directory. In fact, your home directory won’t be a git repository at all.
- It’s simple to see what’s changed since you last committed. It’s a little harder to see new files not yet in your repository . This is because by default everything is ignored unless you specifically add it.
- No special tools required, other than Git itself. A tiny alias in your .profile takes care of all of it.
- No fiddling with symlinks and other nonsense.
How does it work?
It’s simple. We create what is called a “detached working tree“. In a normal git repository, you’ve got your .git dir, which is basically your repository database. When you perform a checkout, the directory containing this .git dir is populated with files from the git database. This is problematic when you want to keep your home directory in Git, since many tools (including git itself) will scan upwards in the directory tree in order to find a .git dir. This creates crazy scenario’s such as Vim’s CtrlP plugin trying to scan your entire home directory for file completions. Not cool. A detached working tree means your .git dir lives somewhere else entirely. Only the actual checkout lives in your home dir. This means no more nasty .git directory.
An alias ‘dgit‘ is added to your .profile that wraps around the git command. It understands this detached working directory and lets you use git like you would normally. The dgit alias looks like this:
alias dgit='git --git-dir ~/.dotfiles/.git --work-tree=$HOME'
Simple enough, isn’t it? We simply tell git that our working tree doesn’t reside in the same directory as the .git dir (~/.dotfiles), but rather it’s our directory. We set the git-dir so git will always know where our actual git repository resides. Otherwise it would scan up from the curent directory your in and won’t find the .git dir, since that’s the whole point of this exercise.
Setting it up
Create a directory to hold your git database (the .git dir):
$ mkdir ~/.dotfiles/
$ cd ~/.dotfiles/
~/.dotfiles$ git init .
Create a .gitifnore file that will ignore everything. You can be more conservative here and only ignore things you don’t want in git. I like to pick and choose exactly which things I’ll add, so I ignore everything by default and then add it later.
~/.dotfiles$ echo "*" > .gitignore
~/.dotfiles$ git add -f .gitignore
~/.dotfiles$ git commit -m "gitignore"
Now we’ve got a repository set up for our files. It’s out of the way of our home directory, so the .git directory won’t cause any conflicts with other repositories in your home directory. Here comes the magic part that lets us use this repository to keep our home directory in. Add the dgit alias to your .bashrc or .profile, whichever you prefer:
~/.dotfiles$ echo "alias dgit='git --git-dir ~/.dotfiles/.git --work-tree=\$HOME'" >> ~/.bashrc
You’ll have to log out and in again, or just copy-paste the alias defnition in your current shell. We can now the repository out in our home directory with the dgit command:
~/.dotfiles$ cd ~
$ dgit reset --hard
HEAD is now at 642d86f gitignore
Now the repository is checked out in our home directory, and it’s ready to have stuff added to it. The dgit reset --hard command might seem spooky (and I do suggest you make a backup before running it), but since we’re ignoring everything, it’ll work just fine.
Using it
Everything we do now, we do with the dgit command instead of normal git. In case you forget to use dgit, it simply won’t work, so don’t worry about that.
A dgit status shows nothing, since we’ve gitignored everything:
$ dgit status
On branch master
nothing to commit, working directory clean
We add things by overriding the ignore with -f:
$ dgit add -f .profile
$ dgit commit -m "Added .profile"
[master f437f9f] Added .profile
 1 file changed, 22 insertions(+)
 create mode 100644 .profile
We can push our configuration files to a remote repository:
$ dgit remote add origin ssh://fboender@git.electricmonk.nl:dotfiles
$ dgit push origin master
 * [new branch]      master -> master
And easily deploy them to a new machine:
$ ssh someothermachine
$ git clone ssh://fboender@git.electricmonk.nl:dotfiles ./.dotfiles
$ alias dgit='git --git-dir ~/.dotfiles/.git --work-tree=$HOME'
$ dgit reset --hard
HEAD is now at f437f9f Added .profile
Please note that any files that exist in your home directory will be overwritten by the files from your repository if they’re present.
Conclusion
This DIY method of keeping your homedir in git should be easy to understand. Although there are tools out there that are easier to use, this method requires no installing other than Git. As I’ve stated in the introduction, I’ve been using this method for more than a year, and have found it to be the best way of keeping my home directory in git.
Tuesday, June 9th, 2015
SquashFS is generally used for LiveCDs or embedded devices to store a compressed read-only version of a file system. This saves space at the expense of slightly slower access times from the media. There’s another use for SquashFS: keeping an easily accessible compressed mounted image available. This is particularly useful for archival purposes such as keeping a full copy of an old server or directory around.
Usage is quite easy under Debian-derived systems. First we install the squashfs-tools package
$ sudo apt-get install squashfs-tools
Create an compressed version of a directory:
$ sudo mksquashfs /home/fboender/old-server_20150608/ old-server_20150608.sqsh
Remove the original archive:
$ sudo rm -rf /home/fboender/old-server_20150608
Finally, mount the compressed archive:
$ sudo mkdir /home/fboender/old-server_2015060
$ sudo mount -t squashfs -o loop old-server_20150608.sqsh /home/fboender/old-server_2015060
Now you can directly access files in the compressed archive:
$ sudo ls /home/fboender/old-server_2015060
home/
usr/
etc/
...
The space savings are considerable too.
$ sudo du -b -s /home/fboender/old-server_2015060
17329519042	/home/fboender/old-server_2015060
$ sudo ls -l old-server_20150608.sqsh
-rw-r--r-- 1 root root 1530535936 Jun  8 12:45
17 Gb for the full uncompressed archive versus only 1.5 Gb for the compressed archive. We just saved 15.5 Gb of diskspace. .
Optionally, you may want to have it mounted automatically at boottime:
$ sudo vi /etc/fstab
/home/fboender/old-server_20150608.sqsh   /home/fboender/old-server_2015060        squashfs        ro,loop 0       0
If the server starts up, the archive directory will be automatically mounted.
Wednesday, June 3rd, 2015
I needed a simple way of being notified when configuration files had been changed on some servers. Nothing fancy. No configuration management, no intrusion detection, no centralised versioning control repositories. Just a simple email saying what’s been changed. I couldn’t find a tool that did just that, and didn’t require massive amounts of configuration, so I wrote one myself.
I’ve just released version 1.0 of the tool, which is available in source, Debian, Redhat and zip packages.
Here’s how simple it is:
$ sudo cfgtrack track /etc/
Now tracking /etc/

# Make some changes in a file

$ sudo cfgtrack -a -m ferry.boender@example.com compare
And I’ll get an email in my mailbox if anything’s been changed since the last time I ran compare. A diff is included to easily spot what has changed.
Add the above to a daily cronjob and you’ll be kept up-to-date about changes to your configuration files. Now you’ll have a heads-up if automatic package upgrades modify configuration files or a co-administrator decided to make some changes.
More information is available on the Github project page.
Friday, April 3rd, 2015
The Chrome debugger is the best tool for locating problematic code in a JavaScript application, but there are times that diving into your code line-by-line isn’t the fastest or most convenient means to that end. We all know about console.log(), but I thought I’d write about a few of its lesser-known cousins that are more refined, and can be a lot more expressive.
Check out the helpful tips on using Chrome’s javascript debugging console.
Sunday, March 15th, 2015
Since a few months I’ve been using the Gmail web interface as my main email client. So far my experience has been pretty good, although it took some getting used to. I’m running it in a separate window instead of my main browser. For this I’m using it as an Application in Chrome (Open Gmail in Chrome and select Menu → Tools → Create Application Shortcut).
Since I’m running it in a separate window, much like a normal desktop email client, I’d like the interface to be as minimal and simple as possible. I don’t use labels; either an email is in my inbox, or it’s archived. Gmail’s search is good enough that I don’t require the use of labels.
I wrote a UserStyles style to remove unneeded elements from the interface. This is what Gmail looked like before:
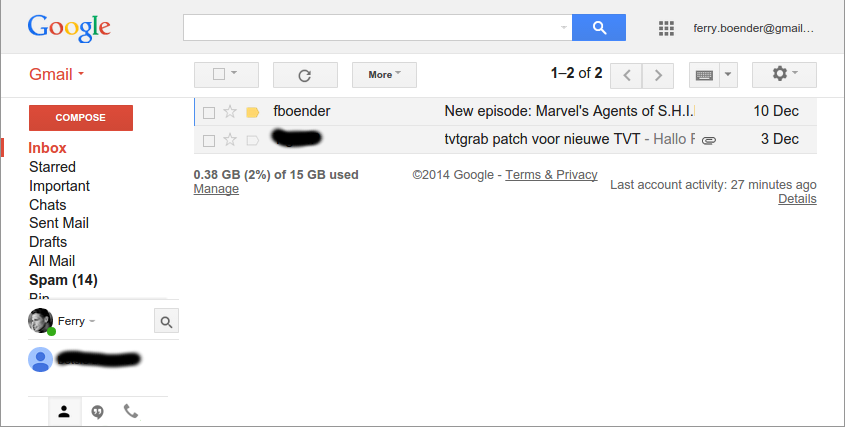
This is what it looks like with my UserStyle active:

If you’d like your gmail interface to look the same:
- Get the Stylish plugin for your browser (Firefox, Chrome)
-
Install the “Gmail minimal” UserStylle
It removes the labels sidebar, so you’ll need to use Gmail a bit differently than you’re used to if you use this style:
-
Instead of pressing the Compose button, press Shift-C. This will open a new window in which you can compose your message. (Press “?” in Gmail to view a list of all shortcuts)
-
Instead of labels, use the search box to find what you need. You can filter on sender by searching for: “from:”. You can view mail with a label by searching for “in:”. For example: “in:spam”, “in:important”, etc.
Friday, March 6th, 2015
 web.py is a lightweight Python web framework that gets out of your way and just let’s you write Python.
Here’s a simple program written in web.py:
import web

class index:
    def GET(self):
        return "Hello, World!`"

urls = (
    '/', 'index',
)

if __name__ == "__main__":
    app = web.application(urls, globals())
    app.run()
I quickly ran into the issue of writing larger well-structured applications in web.py though. If our program becomes bigger, we really want to break up our program into multiple files. This is of course no problem with web.py:
frontpage.py
class index:
    def GET(self):
        return "Hello, World!`"
webapp.py
import web

import frontpage

urls = (
    '/', 'frontpage.index',
)

if __name__ == "__main__":
    app = web.application(urls, globals())
    app.run()
In the example above, we put some of our routes in a seperate file and import it. web.py’s urls definition understands this and happily use the Index class from the module. However, what if we want to pass some application-wide settings to the Index route? web.py’s examples all use globals, but that’s not gonna work if our route lives in another file. Besides, globals are annoying and make unit testing more difficult.
The way to get around this is with a technique called Dependency Injection. I couldn’t find any best practices on how to do this with web.py, so I came up with the following:
frontpage.py
import web

class index:
    def GET(self):
        smtp_server = web.ctx.deps['config']['smtp_server']
        smtp_port = web.ctx.deps['config']['smtp_port']
        return "Sending email via %s:%s" % (smtp_server, smtp_port)
webapp.py
import web
import frontpage


class InjectorClass:
    def __init__(self, deps):
        self.deps = deps

    def __call__(self, handler):
        web.ctx.deps = self.deps
        return handler()

urls = (
    '/', 'frontpage.index',
)

if __name__ == "__main__":
    config = {
        'smtp_server': '127.0.0.1',
        'smtp_port': 25,
    }

    app = web.application(urls, globals())
    app.add_processor(InjectorClass({'config': config}))
    app.run()
If we run the webapp, we’ll see:
Sending email via 127.0.0.1:25
The way this works is that we define an InjectorClass which simply holds a variable for us. In this case a dictionary containing a ‘config’ key with our configuration values. The InjectorClass also defines a __call__ method. This means any instances of the class become executable, as if it was a function. This lets us pass it to web.py as a processor (add_processor()).
Whenever a new request comes in, web.py does some magic with web.ctx (context) to ensure that the values it contains only apply to the current request. No other request sees values of any other request’s web.ctx. For each request, web.py also calls every processor. In our case, that’s an instance of the InjectorClass. When called, the __call__ method is invoked, which adds the dependencies to the web.ctx so the current request can access them.
So now we can pass any value to our InjectorClass on application startup, and it will automatically become available in each request.
You should be careful about what dependencies you inject. Generally, read-only values are fine, but you should realize that injected dependencies are shared among every request and should therefor be threadsafe.
I feel I should also note that we could have gone with a closure, but as I explained in an earlier article, I prefer a class.
Friday, March 6th, 2015

All too often I get asked questions about emails which I can’t answer because I can’t actually see the emails. While mail logging goes a long way, I’d really like to keep an archive of all mails sent via an SMTP server on that machine. Here’s how to do that with Postfix. This was tested on Ubuntu 14.04, but should be applicable to other foonixes without too much trouble. Run all this as the root user.
Add a user to the system so postfix can send BCC’s of all emails to it
adduser --system --home /var/archive/mail/ --no-create-home --disabled-password mailarchive
Next, create the Mailbox layout for the mail archive:
mkdir -p /var/archive/mail/tmp
mkdir -p /var/archive/mail/cur
mkdir -p /var/archive/mail/new
chown -R nobody:nogroup /var/archive
Configure Postfix to always send a copy of any emails sent to the mailarchive user:
postconf -e always_bcc=mailarchive@localhost
Configure the mail storage for the mailacrhive user so it uses the Mailbox format. This makes it easier to delete old emails:
# echo "mailarchive: /var/archive/mail/" >> /etc/aliases
# newaliases
Finally, restart postfix
/etc/init.d/postfix restart
Now to test it send an email through the SMTP server. I’ll do a manual SMTP session here:
telnet localhost 25
HELO localhost
MAIL FROM: fboender@localhost
RCPT TO: ferry.boender@example.com
DATA
Subject: Mail test
Here's some mail.
.
QUIT
We check the /var/archive/mail/new directory:
ls /var/archive/mail/cur/
1425653888.Vfc00I461477M767603.posttest4:2,
And there is our mail.
To easily view the mail in the archive, install mutt:
apt-get install mutt
mutt -f /var/archive/mail/
You should probably write a cronjob that regularly cleans out the old mail, otherwise your filesystem will fill up. The following cronjob will delete all mail older than 30 days
cat /etc/cron.daily/mailarchive_clean
#!/bin/sh
find /var/archive/mail/ -type f -mtime +30 -exec rm "{}" \;
chmod 755 /etc/cron.daily/mailarchive_clean
Good luck!
Edit: Changed postfix configuration addition to postconf -e
Friday, February 27th, 2015
Socks5 proxies are great. They allow you to tunnel all traffic for applications that support Socks proxies through the proxy. One example I frequently use is starting a Chrome window that will do everthing as if it was an a remote machine. This is especially useful to bypass firewalls so you can test websites that are only available on localhost on a remote machine, or sites that can only be accessed if you’re on a remote network. Basically it’s a poor-man’s application-specific VPN over SSH.
Normally I run the following:
ssh -D 8000 -N remote.example.com &
chromium-browser --temp-profile --proxy-server="socks5://localhost:8000"
However that quickly becomes tedious to type, so I wrote a script:
#!/bin/bash
HOST=$1
SITE=$2

if [ -z "$HOST" ]; then
    echo "Usage; $0 <HOST> [SITE]"
    exit 1
fi

while `true`;
do
    PORT=$(expr 8000 + $RANDOM / 32) # random port in range 8000 - 9000
    if [ \! "$(netstat -lnt | awk '$6 == "LISTEN" && $4 ~ ".$PORT"')" ]; then
        # Port not in use
        ssh -D $PORT -N $HOST &
        PID=$!
        chromium-browser --temp-profile --proxy-server="socks5://localhost:$PORT" $SITE
        kill $PID
        exit 0
    fi
done
The script finds a random unused port in the range 8000 – 9000, starts a Socks5 proxy to it and then starts Chromium on that socks proxy.
Together with the excellent Scripts panel plugin for Cinnamon, this makes for a nice menu to easily launch a browser to access remote sites otherwise unreachable:
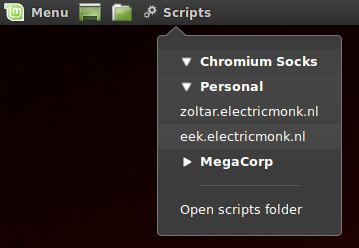
Update: Added a second optional parameter to specify the site you want the browser to connect too, for added convience.
The text of all posts on this blog, unless specificly mentioned otherwise, are licensed under this license.
