Monday, January 26th, 2015
I’ve released v1.4 of BBCloner.
BBCloner (Bitbucket Cloner) creates mirrors of your public and private Bitbucket Git repositories. It also synchronizes already existing mirrors. Initial mirror setup requires you manually enter your username/password. Subsequent synchronization of mirrors is done using Deployment Keys.
This release features a new flag: –tolerant (-t). It prevents bbcloner from complaining about failed repository synchronisation if a repository fails the first time. Only on the second failure to synchronize the same repository does bbcloner send out an email when using the -t switch. This should save on a lot of unwarranted emails, given that Bitbucket quite regularly seems to bork while syncing repositories.
Get the new release from the Downloads page or directly:
Wednesday, January 21st, 2015
UPDATE: I’ve written a fancier version of the above script as a separate project called ansible-cmdb. It uses templates and can generate a feature-laden HTML version and text versions. It also lets you extend the information from your hosts very easily; even adding completely new hosts. Packages are available for Debian, Redhat and other operating systems.
Ansible is a multiplexing configuration orchestrator. It allows you to run commands and configure servers from a central system. For example, to run the uname -a command on servers in the group “intranet”:
[fboender@jib]~/Projects/ansible$ ansible -m shell -a "uname -a" intranet
host001.example.com | success | rc=0 >>
Linux host001.example.com 2.6.32-45-server #102-Ubuntu SMP Wed Jan 2 22:53:00 UTC 2013 x86_64 GNU/Linux

host004.example.com | success | rc=0 >>
Linux vps004c.example.com 2.6.32-55-server #117-Ubuntu SMP Tue Dec 3 17:45:11 UTC 2013 x86_64 GNU/Linux
Ansible can also gather system information using the ‘setup’ module. It returns the information as a JSON structure:
[fboender@jib]~/Projects/ansible$ ansible -m setup intranet
host001.example.com | success >> {
    "ansible_facts": {
        "ansible_all_ipv4_addresses": [
            "182.78.44.33",
            "10.0.0.1"
        ],
        "ansible_architecture": "x86_64",
        "ansible_bios_date": "NA",
        "ansible_bios_version": "NA",
        ... etc
We can use this to display a short tabulated overview of important system information such as the FQDN, configured IPs, Disk and memory information. I wrote a quick script to do this. The result looks like this:
[fboender@jib]~/Projects/ansible$ ./hostinfo intranet
Name                     FQDN                     Datetime                    OS            Arch    Mem              Disk                 Diskfree          IPs
-----------------------  -----------------------  --------------------------  ------------  ------  ---------------  -------------------  ----------------  -------------------------------------------------------------------------
host001                  host001.example.com      2015-01-20 14:37 CET +0100  Ubuntu 12.04  x86_64  4g (free 0.16g)  80g                  40g               182.78.44.33, 10.0.0.1
host002                  host002.example.com      2015-01-20 14:37 CET +0100  Ubuntu 14.04  x86_64  2g (free 1.21g)  40g                  18g               182.78.44.34, 10.0.0.2
xxxxxx.xxxxxx.xx         xxxxxxx.example.com      2015-01-20 13:37 CET +0000  Ubuntu 10.04  x86_64  2g (free 0.04g)  241g                 20g               192.168.0.2, 10.000.0.4
xxxx.xxxxxx.xxx          xxxx.otherdom.com        2015-01-20 14:37 CET +0100  Ubuntu 13.04  x86_64  8g (free 0.14g)  292g, 1877g, 1877g   237g, 583g, 785g  192.168.1.9, 192.168.1.10, 10.0.0.6
xxxxxxxx.xxxxxx.xx       xxxx.otherdom.com        2015-01-20 14:36 CET +0100  Ubuntu 14.04  i386    6g (free 0.25g)  1860g, 1877g, 1877g  960g, 292g, 360g  10.0.0.5, 10.0.0.14, 192.168.1.12
xxxxx.xxxxx.xxx          test.otherdom.com        2015-01-20 14:37 CET +0100  Ubuntu 9.10   x86_64  2g (free 0.28g)  40g                  16g               10.0.0.15, 10.0.0.9
The script:
#!/usr/bin/python
# MIT license

import os
import sys
import shutil
import json
import tabulate
import pprint

host = sys.argv[1]
tmp_dir = 'tmp_fact_col'

try:
    shutil.rmtree(tmp_dir)
except OSError:
    pass
os.mkdir(tmp_dir)
cmd = "ansible -t {} -m setup {} >/dev/null".format(tmp_dir, host)
os.system(cmd)

headers = [
    'Name', 'FQDN', 'Datetime', 'OS', 'Arch', 'Mem', 'Disk', 'Diskfree', 'IPs',
]
d = []

for fname in os.listdir(tmp_dir):
    path = os.path.join(tmp_dir, fname)
    j = json.load(file(path, 'r'))
    if 'failed' in j:
        continue
    d.append(
        (
            fname,
            j['ansible_facts']['ansible_fqdn'],
            "%s %s:%s %s %s" % (
                j['ansible_facts']['ansible_date_time']['date'],
                j['ansible_facts']['ansible_date_time']['hour'],
                j['ansible_facts']['ansible_date_time']['minute'],
                j['ansible_facts']['ansible_date_time']['tz'],
                j['ansible_facts']['ansible_date_time']['tz_offset'],
            ),
            "%s %s" % (
                j['ansible_facts']['ansible_distribution'],
                j['ansible_facts']['ansible_distribution_version'],
            ),
            j['ansible_facts']['ansible_architecture'],
            '%0.fg (free %0.2fg)' % (
                (j['ansible_facts']['ansible_memtotal_mb'] / 1000.0),
                (j['ansible_facts']['ansible_memfree_mb'] / 1000.0)
                ),
            ', '.join([str(i['size_total']/1048576000) + 'g' for i in j['ansible_facts']['ansible_mounts']]),
            ', '.join([str(i['size_available']/1048576000) + 'g' for i in j['ansible_facts']['ansible_mounts']]),
            ', '.join(j['ansible_facts']['ansible_all_ipv4_addresses']),
        )
    )
    os.unlink(path)
shutil.rmtree(tmp_dir)
print tabulate.tabulate(d, headers=headers)
The script requires the Tabulator python library. Put the script in the directory containing your ansible hosts file, and run it.
UPDATE: I’ve written a fancier version of the above script as a separate project called ansible-cmdb. It uses templates and can generate a feature-laden HTML version and text versions. It also lets you extend the information from your hosts very easily; even adding completely new hosts. Packages are available for Debian, Redhat and other operating systems.
Wednesday, January 21st, 2015
I ran into an issue where I couldn’t save an imported OpenVPN (.ovpn) configuration in Network Manager. The “Save” button remains disabled:
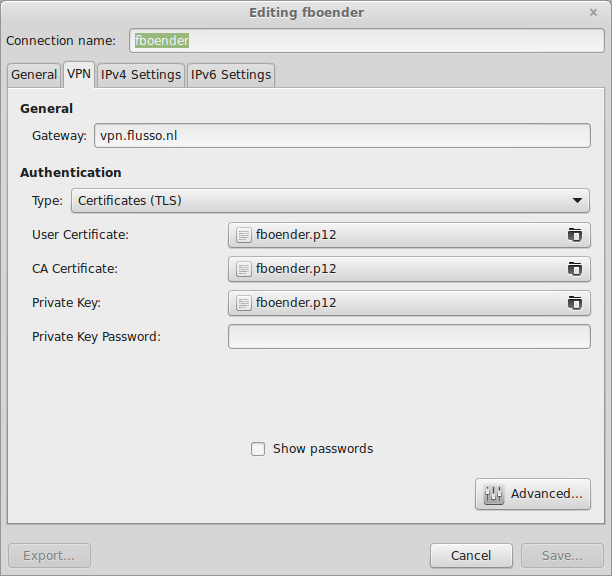
It turns out I need to enter a password for the Private Key. Ofcourse, this particular private key doesn’t have a password, but you can simply enter a single space as your password. After that the “Save” button becomes active.
Sunday, October 19th, 2014
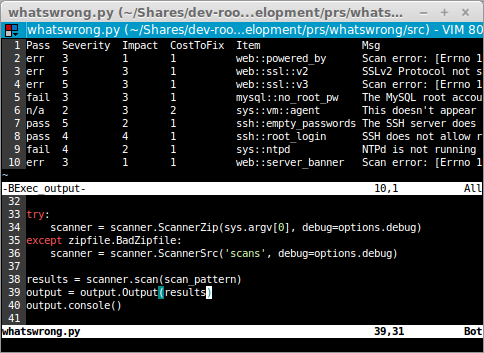
I released v0.8 of my Bexec vim plugin. The Bexec plugin allows the user to execute the current buffer if it contains a script with a shebang (#!/path/to/interpreter) on the first line or if the default interpreter for the script’s type is known by Bexec. The output of the script will be grabbed and displayed in a separate buffer.
New in this release:
- Honor splitbelow and splitright vim setting (patch by Christopher Pease).
Installation instructions:
- Download the Vimball
- Start vim with:
vim bexec-v0.8.vmb
- In Vim, type:
:source %
- Bexec is now installed. Type
:Bexec to run it, or use <MapLeader>bx
Wednesday, October 15th, 2014
Yet Another SSL bug: This time a problem with SSLv3.
Most browsers and web servers support SSLv3. Many don’t use it by default; instead opting for higher versions of SSL such as TLS v1.0+. The problem is that attackers can force a downgrade of the negotiated protocol, which will result in the SSLv3 protocol being used to communicate.
No real fixes are available and vendors will probably not be sending out updates to fix this issue. The recommended method of mitigation is to disable SSLv3 on your servers and your browsers. SSLv3 is old and only the following browsers can’t work with anything better:
- Internet Explorer up to (and including) v6
- Opera v1 t/m 4 (current version is 12)
Other browsers (Firefox, Chrome, etc) have supported TLSv1.0+ from their first release.
To test if you’re vulnerable:
openssl s_client -connect HOSTNAME:443 -ssl3
If you do NOT get a message saying something like “ssl handshake failure”, your server is vulnerable.
A quick test (which I do not garantuee to be correct) is:
openssl s_client -connect 127.0.0.1:443 -ssl3 2>/dev/null | grep "Server certificate"
If this returns “Server certificate”, you’re vulnerable.
To fix this for Apache, edit your SSL module configuration (/etc/apache2/mods-enabled/ssl.conf on Debian-derived systems) and add “-SSLv3” to your protocols to disable SSLv3:
SSLProtocol all -SSLv2 -SSLv3
This disabled SSLv2 and 3, which are both broken. It also means users with Internet Explorer 5 or 6 won’t be able to reach your secure website anymore.
Sunday, October 5th, 2014
I’ve created pydocmd. It generates Python Module / script documentation in the Markdown (md) format. It was written to automatically generate documentation that can be put on Github or Bitbucket.
It is as of yet not very complete and is more of a Proof-of-concept than a fully-fledged tool. Markdown is also a very restricted format and every implementation works subtly, or completely, different. This means output may be different on different converters. The Bitbucket version doesn’t look as nice as the Github version.
Get it from bitbucket.
Example outputs are available:
Tuesday, September 30th, 2014
Here’s a problem I often run into:
- I need to copy files from a remote system to my local system.
- I have root access to the remote system via sudo or su, but not directly via SSH.
- I don’t have enough permissions to read the remote files as a normal user; I need to be root.
- There isn’t enough space to copy the files to a temp dir and change their ownership.
One solution is to use sudo tar remotely and output the tar file on stdout:
fboender@local$ ssh fboender@example.com "sudo tar -vczf - /root/foo" > foo.tar.gz
This relies on the remote host allowing X11 forwarding though, and you have to have an SSH askpass program installed. Half of the time, I can’t get this work properly.
An easier solution is to build a reverse remote tunnel:
fboender@local$ ssh -R 19999:localhost:22 fboender@example.com
This maps the remote port 19999 on example.com to my local port 22. That means I can now access the SSH server running locally from the remote server by SSHing to port 19999. For example:
fboender@example.com$ scp -P 19999 -r /root/foo fboender@127.0.0.1
Password:
There you go. Easy as pie.
Thursday, September 25th, 2014
Like always in a crisis, many things go wrong. Everyobody starts chattering, and start deteriorating the signal-to-noise level. I’ll keep this brief.
There are a bunch of sites out there that are telling you how to test for the Bash Shellshock vulnerability. Many of the tests are WRONG:
# WROOOOOOOOOOOOOOOOONG
$ env x=’() { ;;}; echo vulnerable’ sh -c “echo this is a test”
syntax error near unexpected token `('
Spot the first problem! First off all, this uses the wrong kind of quotes. That syntax error is NOT an indication that your system isn’t vulnerable. It’s an indication that the blog where you copied the instruction from doesn’t understand what ASCII quotes are.
Now, spot the second problem! Which shell is this calling?? Is it bash? No, it’s `sh`. So if `sh` isn’t linked to bash, you get this:
# WROOOOOOOOOOOOOOOOOOOOOOOOOOOOOOONG
$ env x='() { ;;}; echo vulnerable' sh -c “echo this is a test”
sh: x: line 0: syntax error near unexpected token `;;'
sh: x: line 0: `x () { ;;}; echo vulnerable'
sh: error importing function definition for `x'
this: “echo: command not found
“Oh, great, we’re not vulnerable”, you think. But it’s not executing bash at all, it’s executing some other shell. Sloppy work.
Here’s a way to actually test your system. BUT don’t take my word for it, perhaps it is not right either:
# Perhaps correct:
$ env x='() { :;}; echo vulnerable' bash -c 'echo hello'
vulnerable
hello
Wednesday, September 24th, 2014
Just now I tried seting up an SSH tunnel. Something I must have done for at least a few tens of thousands of times in my career. But suddenly, it didn’t work anymore:
$ ssh -L 8080:127.0.0.1:80 dev.local
bind: Cannot assign requested address
After checking that the local port was free, and the remote port had Apache listening on it, and testing some other things, I turned on verbose logging for SSH:
$ ssh -v -L 8080:127.0.0.1:80 dev.local
OpenSSH_6.6.1, OpenSSL 1.0.1f 6 Jan 2014
debug1: Local connections to LOCALHOST:8080 forwarded to remote
        address 127.0.0.1:80
debug1: Local forwarding listening on 127.0.0.1 port 8080.
debug1: channel 0: new [port listener]
debug1: Local forwarding listening on ::1 port 8080.
bind: Cannot assign requested address
The problem becomes obvious. It’s trying to bind on an IPv6 address, not IPv4. And since IPv6 is a flaming heap of shit not production ready yet, it fails miserably.
You can force the use of IPv4 on the commandline with the -4 switch:
$ ssh -4 -L 8080:127.0.0.1:80 dev.local
Linux dev.local 2.6.32-5-amd64 #1 SMP Mon Sep 23 22:14:43 UTC 2013 x86_64
[fboender@dev]~$
To permanently disable IPv6, edit your ~/.ssh/config and add:
$ vi ~/.ssh/config
Host *
    AddressFamily inet
That will make sure SSH never even tries anything with IPv6.
Saturday, July 26th, 2014
 In the spirit of “Automate Everything” I was tasked with scripting some oft needed tasks on Cisco Switches. It’s been a while since I’ve had to do anything even remotely related to switches, so I thought I’d start by googling for some ways to automate tasks on switches. What I found:
Both seemed to be able to get the job done quite well. Unfortunately it turns out that the source for sw_script is actually nowhere to be found and Trigger wouldn’t even install properly, giving me a whole plethora of compiler errors. Since I was rather time constrained, I decided to fall back to good old Expect.
Expect
Expect s a framework to automate interactive applications. Basically what it does is let the user insert text into the input of the program, and then watches the output of the program for specific occurrences of text, hence the name “Expect”. For example, consider a program that requires the user to enter a username and password. It lets the user know this by giving us prompts:
$ ftp host.local
Username:
Password:
We can use Expect to scan the output of the program and respond with the username and password when appropriate:
spawn ftp host.local
expect "Username:"
send "fboender\r"
expect "password:"
send "sUp3rs3creT\r"
It’s a wonderful tool, but error handling can be somewhat tricky, as you’ll see further in this article.
Scripting a Cisco switch
There is an excellent Expect library for Python called Pexpect. Installation on Debian-derived systems is as easy as “aptitude install python-pexpect“.
Here’s an example session on a Cisco switch we’ll automate with Expect in a bit:
$ ssh user@10.0.0.1
Password:
Switch>enable
Password:
Enter configuration commands, one per line.  End with CNTL/Z.
Switch(config)#interface Gi2/0/2
Switch(config-if)#switchport access vlan 300
Switch(config-if)#no shutdown
Switch(config-if)#end
Switch#wr mem
Building configuration...
[OK]
Switch#quit
This is a simple manual session that changes the Vlan of switch port “Gi2/0/2” to Vlan 300. So how do we go about automating this with PExpect?
Logging in
The first step is to log in. This is fairly easy:
import pexpect

switch_ip = "10.0.0.1"
switch_un = "user"
switch_pw = "s3cr3t"
switch_port = "Gi2/0/2"
switch_vlan = 300

child = pexpect.spawn('ssh %s@%s' % (switch_un, switch_ip))
child.logfile = sys.stdout
child.timeout = 4
child.expect('Password:')
child.sendline(switch_pw)
child.expect('>')
First we import the pexpect module. Then we spawn a new process “ssh user@10.0.0.1“. We set the process’ logfile to sys.stdout. This is merely for debugging purposes. It tells PExpect to show all the output it’s receiving on our terminal. The default timeout is set to 4 seconds.
Then comes the first juicy bit. We let Expect know that we expect to see a ‘Password:’ prompt. If something goes wrong, for instance the switch at 10.0.0.1 is down, expect will wait for 4 seconds, looking for the text ‘Password:’ in SSH’s output. Of course, it won’t get that prompt since the switch is down. It will then raise a pexpect.TIMEOUT exception after 4 seconds. If it does detect the ‘Password:’ prompt, it will then send the switch password and wait until it detects the prompt.
Catching errors
If we want to catch errors and show the user somewhat helpful error messages, we can use try/except clauses:
try:
  child.expect('Password:')
except pexpect.TIMEOUT:
  raise OurException("Login prompt not received")
After the password prompt, we send the password. If all goes well, we’ll receive the prompt. Otherwise the switch will ask for the password again. We don’t “expect” this, so PExpect will timeout once again while waiting for the “>” prompt.
try:
  child.sendline(switch_pw)
  child.expect('>')
except pexpect.TIMEOUT:
  raise OurException("Login failed")
Let’s jump ahead a bit and look at the next interesting problem. What if we supply the wrong port? The switch will respond like so:
Switch(config)#interface Gi2/0/2
                         ^
% Invalid input detected at '^' marker.
If, on the other hand, our port is correct, we’ll simply get a prompt:
Switch(config-if)#
So here we have two possible scenario’s. Something goes wrong, or it goes right. How do we detect this? We can tell Expect that we expect two different scenario’s:
o = child.expect(['\(config-if\)#', '% Invalid'])
if o != 0:
  raise OurException("Unknown switch port '%s'" % (port))
The first scenario ‘\(config-if\)#’ is our successful one. The second is when an error occurred. We then simply check that we got the successful one, and otherwise raise an error.
The rest of the script is just straight-forward expects and sendline’s.
The full script
Here’s the full script:
import pexpect

switch_ip = "10.0.0.1"
switch_un = "user"
switch_pw = "s3cr3t"
switch_enable_pw = "m0r3s3cr3t"
port = "Gi2/0/2"
vlan = 300

try:
  try:
    child = pexpect.spawn('ssh %s@%s' % (switch_un, switch_ip))
    if verbose:
        child.logfile = sys.stdout
    child.timeout = 4
    child.expect('Password:')
  except pexpect.TIMEOUT:
    raise OurException("Couldn't log on to the switch")

  child.sendline(switch_pw)
  child.expect('>')
  child.sendline('terminal length 0')
  child.expect('>')
  child.sendline('enable')
  child.expect('Password:')
  child.sendline(switch_enable_pw)
  child.expect('#')
  child.sendline('conf t')
  child.expect('\(config\)#')
  child.sendline('interface %s' % (port))
  o = child.expect(['\(config-if\)#', '% Invalid'])
  if o != 0:
      raise Exception("Unknown switch port '%s'" % (port))
  child.sendline('switchport access vlan %s' % (vlan))
  child.expect('\(config-if\)#')
  child.sendline('no shutdown')
  child.expect('#')
  child.sendline('end')
  child.expect('#')
  child.sendline('wr mem')
  child.expect('[OK]')
  child.expect('#')
  child.sendline('quit')
except (pexpect.EOF, pexpect.TIMEOUT), e:
    error("Error while trying to move the vlan on the switch.")
    raise
Conclusion
It’s too bad that I couldn’t use any of the existing frameworks. I could have tried getting Trigger to compile, but I was time constrained so I didn’t bother. There are other ways of configuring Switches too. SNMP is one way, but it is complex and prone to errors. I believe it’s also possible to retrieve the entire configuration from a switch, modify it and put it back. This is partly what Rancid does. However that would require even more time.
Expect was a good fit in this case. Although it too is rather error prone, it’s fairly easy to catch errors as long as you’re expecting (no pun intended) them. I strongly suggest you give Trigger a try before falling back to Expect. It seems like a very decent tool.
The text of all posts on this blog, unless specificly mentioned otherwise, are licensed under this license.
