Saturday, December 5th, 2015
Bexec is a vim plugin that allows the user to execute the current buffer. Version 0.9 has just been released.
This version changes Bexec so it’s autoloaded on demand, rather than always. This reduces Vim startup times if you’re not going to use Bexec. Many thanks to Lucas Hoffmann for this change.
The new version can be found on the Vim scripts page.
Sunday, November 8th, 2015
I’ve just released ansible-cmdb v1.7. Ansible-cmdb takes the output of Ansible’s fact gathering and converts it into a static HTML overview page containing system configuration information. It supports multiple templates and extending information gathered by Ansible with custom data.
This is a feature and bugfix release, including the following changes:
- Support for showing only specific columns using the -c / –columns commandline argument. This must be supported by the template. Currently html_fancy and txt_table are supported.
- The html_fancy template now properly automatically focusses the search box.
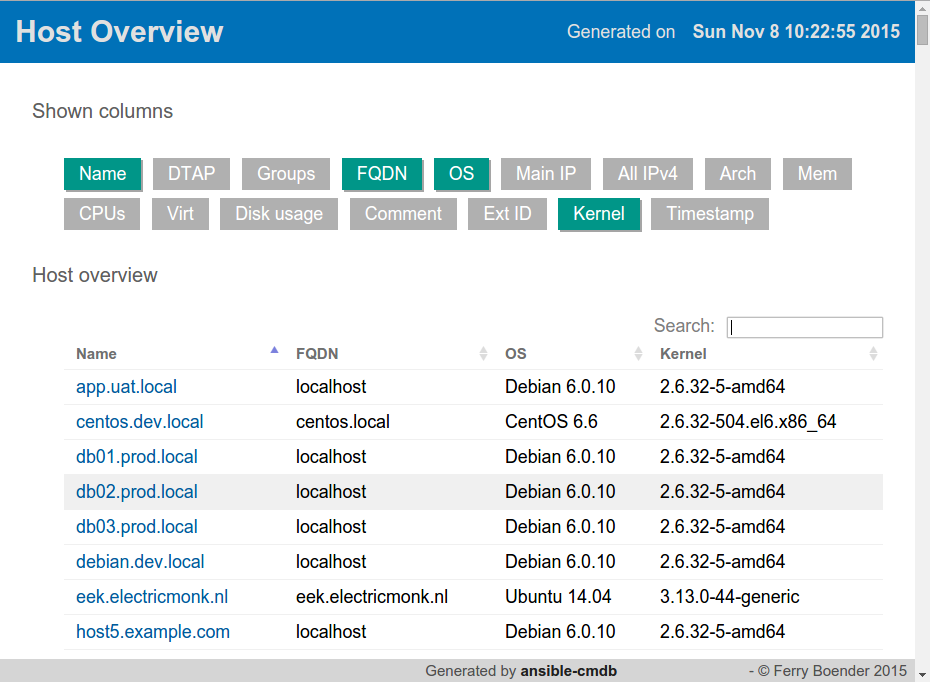
- Two new columns were added to the html_fancy template: kernel and timestamp. (By Rowin Andruscavage)
Get the new release from the Github releases page.
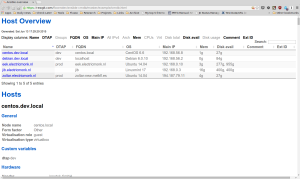
Screenshot showing the output of ansible-cmdb -c name,fqdn,main_ipv4,os,kernel
Sunday, October 4th, 2015
Here’s a bunch of links I found interesting in the last few weeks:
- List of Python Report Generation Tools
- jstat – Java Virtual Machine Statistics Monitoring Tool
- How To Protect WordPress with Fail2Ban on Ubuntu 14.04 | DigitalOcean
- Shiny
Turn your analyses into interactive web applicationsNo HTML, CSS, or JavaScript knowledge required
- logtail(8) – Linux man page
logtail reads a specified file (usually a log file) and writes to the standard output that part of it which has not been read by previous runs of logtail. It prints the appropriate number of bytes from the end of logfile, assuming that all changes that are made to it are to add new characters to it.
- 10 iozone Examples for Disk I/O Performance Measurement on Linux
iozone Examples for Disk I/O Performance Measurement on Linux
- Overview — Urwid 1.3.0
Console user interface library for Python
- Collectl – Utility to collect Linux performance data | Ubuntu Geek
There are a number of times in which you find yourself needing performance data. These can include benchmarking, monitoring a system’s general heath or trying to determine what your system was doing at some time in the past. Sometimes you just want to know what the system is doing right now. Depending on what you’re doing, you often end up using different tools, each designed to for that specific situation.Unlike most monitoring tools that either focus on a small set of statistics, format their output in only one way, run either interactively or as a daemon but not both, collectl tries to do it all. You can choose to monitor any of a broad set of subsystems which currently include buddyinfo, cpu, disk, inodes, infiniband, lustre, memory, network, nfs, processes, quadrics, slabs, sockets and tcp.
- PlantUML : Open-source tool that uses simple textual descriptions to draw UML diagrams.
- Java SE 6 HotSpot[tm] Virtual Machine Garbage Collection Tuning
- Understanding Java Memory Management – Stack Overflow
- One important change in Memory Management in Java 8 | Realize your true potential !
- GNUBatch: An advanced Job schedular with web interfaces.
- From Java code to Java heap
Sunday, October 4th, 2015
A while ago I had to create many new users on a Linux machine. Since I’m lazy, I opted to automate this process. The newusers command combined with pwgen (to generate new passwords) was the solution.
First I installed pwgen, a utility to automatically generate passwords:
$ sudo apt-get install pwgen
I created a file with the new user names to create.
$ cat newusers.txt
jjohnson
ppeterson
ccalrson
A simple shell one-liner generates a new file from this in the right format for the newusers tool:
$ for USER in $(cat newusers.txt); do
  echo "$USER:$(pwgen 12 -n1)::::/home/$USER:/bin/bash" >> newusers.created.txt;
done
Finally, we create the new users:
$ sudo newusers newusers.created.txt
The newusers.created.txt file was handed over to the person in charge of notifying the users about their new account.
Sunday, October 4th, 2015
Althought modern Linux desktops generally automatically mount external USB disks when plugged in, servers usually don’t do this. When I replaced my home server desktop model with a Raspberry Pi 2 (running Raspbian), I wanted it to automatically mount USB drives and, more importantly, make the same USB drive available at the same path at all times.
Enter usbmount:
The USBmount Debian package automatically mounts USB mass storage devices (typically USB pens) when they are plugged in, and unmounts them when they are removed. The mountpoints (/media/usb[0-7] by default), filesystem types to consider, and mount options are configurable. When multiple devices are plugged in, the first available mountpoint is automatically selected. If the device provides a model name, a symlink /var/run/usbmount/MODELNAME pointing to the mountpoint is automatically created.
Just what I needed.
root@rasp# sudo apt-get install usbmount
# Plug in USB drive
root@rasp# ls -la /var/run/usbmount/
total 0
lrwxrwxrwx 1 root root 11 Oct  4 10:30 Seagate_Expansion_1 -> /media/usb0
lrwxrwxrwx 1 root root 11 Oct  4 10:30 ST4000DM_000-1F2168_1 -> /media/usb1
Great. Now I wanted the “Seagate_Expansion_1” disk to always become available at /storage. I could have created a symlink from /storage to /var/run/usbmount/Seagate_Expansion_1, but I ran into a problem with SSHfs when trying to mount a server-side symlink on my client machine:
user@client$ sshfs -o transform_symlinks -o follow_symlinks 192.168.0.16:/storage Shares/timmy-storage/
192.168.0.16:/storage: Not a directory
So a symlink was out of the question. The binding option of ‘mount’ however, worked just fine:
# On the server
root@rasp# rm /storage
root@rasp# mkdir /storage
root@rasp# mount --bind /var/run/usbmount/Seagate_Expansion_1 /storage

# On the client
user@client$ sshfs 192.168.0.16:/storage Shares/timmy-storage/
user@client$ ls -l Shares/timmy-storage
total 72
drwxr-xr-x 1 1002 1003 4096 Sep 17 13:58 apps
drwxr-xr-x 1 root root 4096 Aug 24 09:15 backup
So I modified /etc/usbmount/mount.d/00_create_model_symlink and added the following code:
if [ "$name" = "Seagate_Expansion_1" ]; then
    mount --bind "/var/run/usbmount/$name" /storage
fi
This is not a very clean solution, but it serves its purpose just fine. A nicer implementation would create a new file “01_mount_bind” which reads a config file to determine which model names to mount –bind where. That implementation is left as a reader exercise ;-)
With this setup the /storage path will automatically become available at boot-time or when the correct USB drive is plugged in. I can use SSHfs to mount the remote /storage on my Linux machine. Samba takes care of the Windows users.
Saturday, October 3rd, 2015
I’ve just released ansible-cmdb v1.6. This is a feature release, including the following changes:
- The -i switch now supports reading dynamic inventory scripts.
- host_vars directory now supported (by Malcolm Mallardi)
- Support for multiple inventory sources as per Ansible’s documentation.
- Improved error handling prevents ansible-cmdb from stopping if it encounters non-critical errors (malformed host definitions, etc).
- Improved error reporting.
- html_fancy template column headers are now visually identifiable as being sortable.
Get the new release from the Github released page.
Monday, September 21st, 2015
Ansible-cmdb takes the output of Ansible’s setup module and converts it into a static HTML overview page containing system configuration information.
While the previous generated overview page was functional, it didn’t look very good. So for the v1.5 release (which is now available), I gave it an overhaul. I decided on Material design because it gives a modern, clean look and feel. The host overview page now looks like this:
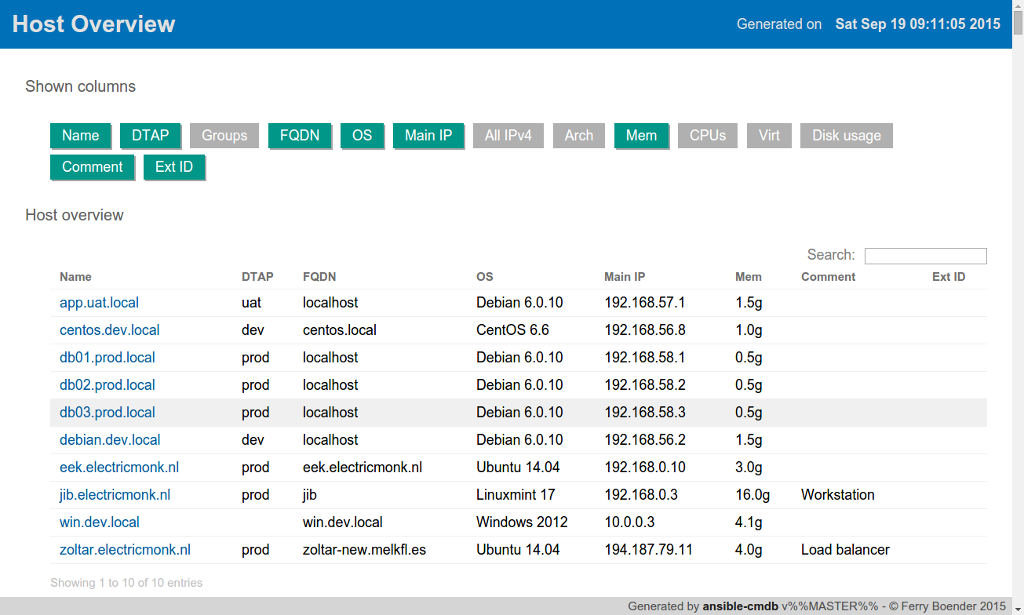
The column toggle buttons are more recognisable as actually being toggles and the table of hosts feels a lot cleaner. The bar at the top stays in view even when scrolling. When viewing a hosts detailed information, the header text changes to the host name, making it easier to recognise which host’s information you’re looking at:
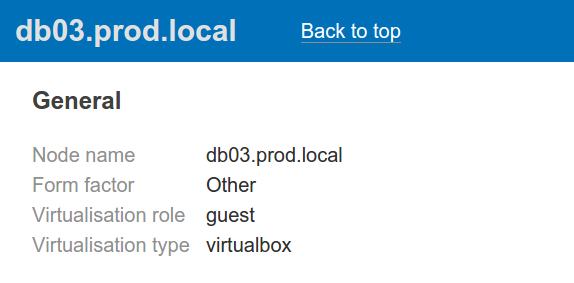
The header bar also includes a link back to the top of the page. This is a big improvement over the previous design, which lacked such a feature.The new design also works better on smaller screens such as tablets or mobiles, although it could still do better.
Other than the new design, the v1.5 release also works when viewing it locally in the browser, without the need to specify the -p local_js option.
You can view a live example or download the new release from the Github releases page.
More information on ansible-cmdb can be found in the README.
Tuesday, September 1st, 2015
Ansible-cmdb takes the output of Ansible’s setup module and converts it into a static HTML overview page containing system configuration information. It supports multiple templates and extending information gathered by Ansible with custom data.
You can visit the Github repo, or view an example output here.
This is the v1.4 release of ansible-cmdb, which brings a bunch of bug fixes and some new features:
- Support for host inventory patterns (e.g. foo[01:04].bar.com)
- Support for ‘vars’ and ‘children’ groups.
- Support passing a directory to the
-i param, in which case all the files in that directory are interpreted as one big hosts file.
- Support for the use of local jquery files instead of via a CDN. Allows you to view the hosts overview in your browser using file://. See README.md for info on how to enable it (hint:
ansible-cmdb -p local_js=1).
- Add -f/–fact-caching flag for compatibility with fact_caching=jsonfile fact dirs (Rowin Andruscavage).
- The search box in the html_fancy template is now automatically focussed.
- Show memory to one decimal to avoid “0g” in low-mem hosts.
- Templates can now receive parameters via the -p option.
- Strip ports from hostnames scanned from the host inventory file.
- Various fixes in the documentation.
- Fixes for Solaris output (memory and disk).
I would like to extend my gratitude to the following contributors:
- Sebastian Gumprich
- Rowin Andruscavage
- Cory Wagner
- Jeff Palmer
- Sven Schliesing
If you’ve got any questions, bug reports or whatever, be sure to open a new issue on Github!
Sunday, August 16th, 2015
A few days ago I released ansible-cmdb. Ansible-cmdb takes the output of Ansible’s setup module and converts it into a static HTML overview page containing system configuration information. It supports multiple templates and extending information gathered by Ansible with custom data.
The tool was positively received and I got lots of good feedback. This has resulted in v1.3 of ansible-cmdb, which you can download from the releases page.
This is a maintenance release that fixes the following issues:
- Generated RPM now installs on operating systems with strict Yum (Fedora 22, Amazon AMI).
- The default templates (html_fancy, txt_table) no longer crash on missing information.
- Python3 compatibility. (by Sven Schliesing).
- Disk total and available columns have been deprecated in favour of adding the information to the Disk Usage columns. (by Sven Schliesing).
- No longer ignore disks smaller than 1Gb, but still ignore disks of total size 0.
- Minor fixes in the documentation (by Sebastian Gumprich, et al).
- Better error reporting.
For more information, see the Github page. Many thanks to the bug reporters and contributors!
Wednesday, August 12th, 2015
For those of you that are using Ansible to manage hosts, you may have noticed you can use the setup module to gather facts about the hosts in your inventory:
$ ansible -m setup --tree out/ all
$ ls out
centos.dev.local     eek.electricmonk.nl zoltar.electricmonk.nl
debian.dev.local     jib.electricmonk.nl
$ head out/debian.dev.local
{
    "ansible_facts": {
        "ansible_all_ipv4_addresses": [
            "192.168.56.2"
        ],
        "ansible_all_ipv6_addresses": [
            "fe80::a00:27ff:fef9:98a7"
        ],
        "ansible_architecture": "x86_64",
        "ansible_bios_date": "12/01/2006",
     ...etc...
The setup module in combination with the --tree option produces a directory of JSON files containing facts about ansible-managed hosts such as hostnames, IP addresses, total available and free memory, and much more.
I wrote ansible-cmdb to take that output and generate an user-friendly host overview / CMDB (Configuration Management Database) HTML page. Usage is simple:
$ ansible -m setup --tree out/ all   # generate JSON output facts
$ ansible-cmdb out/ > cmdb.html      # generate host-overview page
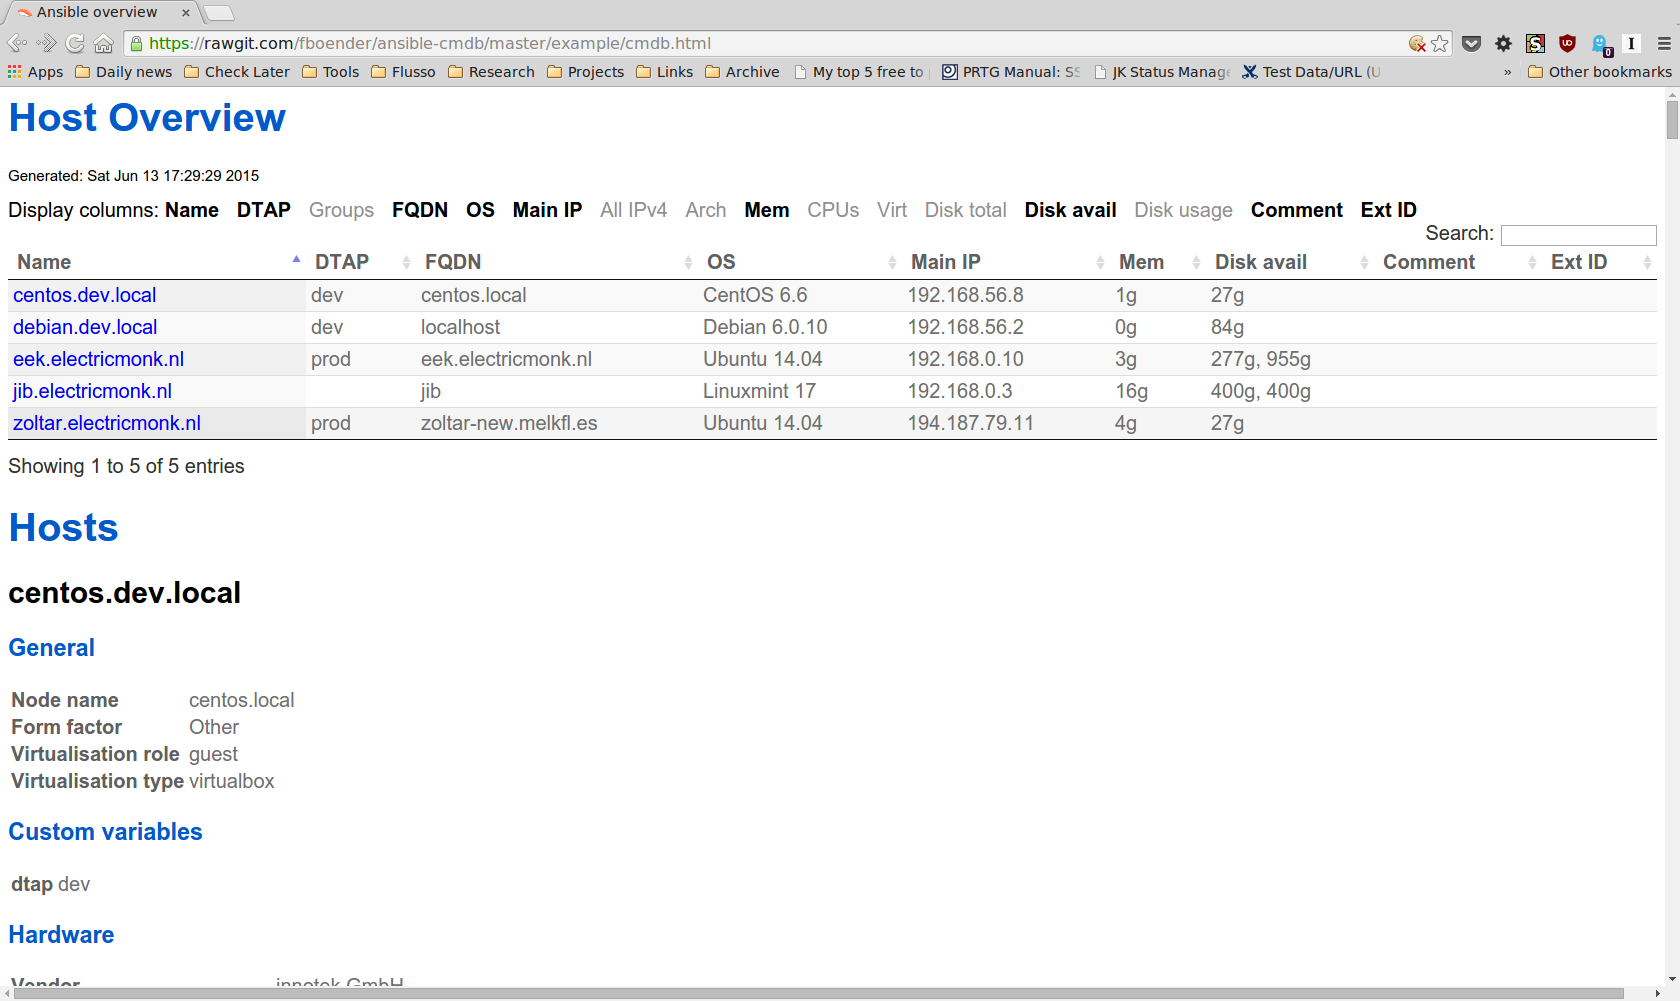
Here’s an example of what it produces.
And here’s a screenshot:
It can read your hosts inventory and gather variable values from it, which can be used in the templates that produce the output. You can also extend the gathered facts easily with your own facts by manually creating or generating additional output directories containing JSON files. This even allows you to manually define hosts which are not managed by Ansible.
Ansible-cmdb is template-driven, which means it’s rather easy to modify the output. The output is generated using Mako templates.
I’ve just released v1.2. Packages are available in source, Debian/Ubuntu and Redhat/Centos formats.
For more information, see the Github page. I hope you like it!
The text of all posts on this blog, unless specificly mentioned otherwise, are licensed under this license.