Friday, July 18th, 2025
The problem
I have some custom bash auto completions configured in my .bashrc. For example, one for completing SSH hosts:
_complete_ssh ()
{
    cur="${COMP_WORDS[COMP_CWORD]}"
    comp_words="(cat ~/.ssh/config | grep "^Host " | awk '{print $2}')"
    COMPREPLY=($(compgen -W "${comp_words}" -- $cur))
    return 0
}

complete -F _complete_ssh ssh scp sftp sshfs
This extracts hostnames from ~/.ssh/config and when I use any of the ssh, scp, etc commands I can press to complete the hostname. This is really nice, however this breaks normal path completion. Not so much a problem for the ssh command, but very annoying when using scp.
I’ve looked around on the internet, and tried some things myself, but no solution seemed to work.
I think I’ve finally found one.
How completion works in bash
First let me explain a bit how the above code snippet works.
We define a bash function _complete_ssh(). We then tell the complete command that if I’m trying to run any of the ssh, scp, etc commands, it should attempt completion using the function (-F).
We manually generate a list of all possible completions ($comp_words). We then feed that to the compgen program, along with the currently (partially) typed command by the user. An example of what this would look like:
$ compgen -W "foo foobar bar" fo
foo
foobar
complete received this output (via COMPREPLY) and shows it to the user. When only one option remains, bash completes to that.
Now you can see the problem: $comp_words doesn’t contain files and directories, so they’re not included in the completion options.
Failed attempt
At first, very naively, I tried to include the contents of the current dir in $comp_words simply by including output of ls -a in the completion words:
comp_words="(cat ~/.ssh/config | grep "^Host " | awk '{print $2}')"
comp_words="$comp_words ls -a"
That kinda works, but it’s not true path completion. For one thing, given a directory like this (where “foo” is a directory with a file “bar”):
$ ls
foo
$ ls foo/
bar
It’ll complete foo, but it’ll never complete foo/bar for obvious reasons.
I tried fiddling around with the way I generate completion words, but fundamentally bash completion just doesn’t work this way. I needed a different solution.
Solution
The solution lies in extra command line options for both the compgen and complete commands. Some relevant parts from their manual pages:
compgen [-V varname] [option] [word]

Generate possible completion matches for word according to the
options, which may be any option accepted by the complete builtin
with the exceptions of [...]
The complete command has these relevant options:
-o comp-option

    The comp-option controls several aspects of the compspec’s
    behavior beyond the simple generation of completions.
    comp-option may be one of:

    filenames

        Tell Readline that the compspec generates filenames, so
        it can perform any filename-specific processing (such as
        adding a slash to directory names, quoting special characters,
        or suppressing trailing spaces). This option is intended to
        be used with shell functions specified with -F.
and:
-A action

    The action may be one of the following to generate a list of
    possible completions:

    file

        File and directory names, similar to Readline’s filename
        completion. May also be specified as -f.
When we use that -A option on compgen, we get this:
$ touch some_file
$ mkdir some_dir

$ compgen -A file -W "foo foobar bar" fo
foo
foobar


$ compgen -A file -W "foo foobar bar" so
some_dir
some_file
As we can see, it now includes both our custom words, as well as files and directories in the possible completions.
Now all we need is for the complete command to understand that some of these are file or directory names, which we can do with the -o filenames parameter.
The final code looks like this:
_complete_ssh ()
{
    COMPREPLY=()
    cur="${COMP_WORDS[COMP_CWORD]}"
    comp_words="(cat ~/.ssh/config | grep "^Host " | awk '{print $2}')"
    COMPREPLY=($(compgen -A file -W "${comp_words}" -- $cur))
    return 0
}

complete -o filenames -F _complete_ssh ssh scp sftp sshfs
This has been something that’s been bugging me for a long time, so I’m glad I finally managed to fix it.
Thursday, May 23rd, 2024
The problem
I’m using LXD (https://linuxcontainers.org/) to run some local containers for development on my desktop. This is mostly for security reasons, to prevent all kinds of supply chain attacks. You know, the whole well-known and near impossible “Don’t run untrusted code on your computer” thing.
After creating a fair amount of containers, I got a No space left on device error in the containers on startup.
I googled a bunch of suff, found a whole lot of posts on the Linuxcontainers.org forums, but there was a lot of misinformation and none of the solutions posted worked for me. So I decided to write up here what I did to fix this problem.
My setup
I’ve got a fairly simple setup on Ubuntu. Unfortunately, since I wanted to use LXD v4.0+, I had to use the Snap package for LXD.
I’m using a single storage volume with btrfs:
<host> $ lxc storage list
+---------+-------------+--------+--------------------------------------------+---------+
| NAME    | DESCRIPTION | DRIVER | SOURCE                                     | USED BY |
+---------+-------------+--------+--------------------------------------------+---------+
| default |             | btrfs  | /var/snap/lxd/common/lxd/disks/default.img | 24      |
+---------+-------------+--------+--------------------------------------------+---------+
The instructions here probably don’t work as-is with other setups so your millage may vary. I’ll try to explain each step so you can adapt the instructions as needed.
Resizing
The first step is to find the loopback device and image. In a container, execute:
<container> $ df /
Filesystem 1K-blocks Used Available Use% Mounted on
/dev/loop25 92211432 28580028 62952180 32% /
So our loopback device is /dev/loop25. Yes, it’s kinda weird that the loopback device is the same on the host as in the container, but remember that these are not virtual machines, they’re containers, so the share a certain part of the kernel space with the host.
Next, stop all the containers using lxc stop. I had some problems stopping them, as they would just hang while shutting down. I assume this was caused to low diskspace because after the resize the problem disappeared. You can force-shutdown a container using:
<host> $ lxc stop <CONTAINER_NAME> --force
On the host system, outside the container, find out which image the loopback device is configured to use using losetup:
<host> $ losetup /dev/loop25
/dev/loop25: [64769]:8781881 (/var/snap/lxd/common/lxd/disks/default.img)
This gives you the path to the disk image on the host.
Resize that image (on the host) using the truncate and losetup command. Don’t worry about the truncate usage here, it only adds space to the end of the image, kind of like increasing a harddrive partition size. Here we add 20 Gb of space to the image and let the loopback know about the change too:
<host> $ truncate -s +20GB /var/snap/lxd/common/lxd/disks/default.img
<host> $ losetup -c /dev/loop25
Finally, we need to resize the filesystem stored in the image. I did this on the host, but I guess it would also work from within the container? At any rate, btrfs needs the filesystem to be mounted. First we need to install the btrfs-progs package on the host, which has the btrfs binary.
<host> $ apt install btrfs-progs
Then we mount the image via the loopback device we found earlier, and use btrfs to resize the filesystem on it.
<host> $ mount /dev/loop25 /mnt/loop25
<host> $ btrfs filesystem resize max /mnt/loop25
<host> $ umount /mnt/loop25
Both the image and filesystem should now be resized, and you can start your container(s) again.
Tuesday, August 1st, 2023
I saw an interesting article on The Universe of Discourse about The shell and its crappy handling of whitespace.
I’m about thirty-five years into Unix shell programming now, and I continue to despise it. The shell’s treatment of whitespace is a constant problem. The fact that
for i in *.jpg; do
  cp $i /tmp
done
doesn’t work is a constant pain. The problem here is that if one of the filenames is bite me.jpg then the cp command will turn into
cp bite me.jpg /tmp
and fail, saying
  cp: cannot stat 'bite': No such file or directory
  cp: cannot stat 'me.jpg': No such file or directory
or worse there is a file named bite that is copied even though you did not want to copy it, maybe overwriting /tmp/bite that you wanted to keep.
To make it work properly you have to say
for i in *; do
  cp "$i" /tmp
done
with the quotes around the $i.
The article then goes on:
Suppose I want to change the names of all the .jpeg files to the corresponding names with .jpg instead. I can do it like this:
for i in *.jpeg; do
  mv $i $(suf $i).jpg
done
Ha ha, no,some of the files might have spaces in their names. […]
before finally settling on the quote-hell version:
for i in *.jpeg; do
  mv "$i" "$(suf "$i")".jpg  # three sets of quotes
done
This sparked some interesting discussions on Lobste.rs and Hacker News, and several people suggested that other shells do this properly, suggesting that there is no proper solution for this in standard shells such as bash.
A proper solution
However, this problem has long been solved and is in fact part of the POSIX standard. That solution is called the IFS, or the Internal Field Separator:
The shell shall treat each character of the IFS as a delimiter and use the delimiters as field terminators to split the results of parameter expansion, command substitution, and arithmetic expansion into fields.
I’m quite surprised that noone on the Hacker News of Lobste.rs discussions mentioned it. You can simply set the IFS to an empty value, and things work a lot saner. For example, to achieve the post’s example:
Suppose I want to change the names of all the .jpeg files to the corresponding names with .jpg instead.
You can simply do something like:
# Create some test files
echo "foo" > "foo.jpg"
echo "bar" > "bar.jpg"
echo "baz quux" > "baz cuux.jpg"

# Store old IFS and set it to empty value
OLD_IFS="$IFS"; IFS=""
for I in *; do
    # No need to quote anything at all!
    mv $I $(basename $I .txt).jpeg
done
# Reset IFS to previous value
IFS="$OLD_IFS"

ls -l
Which results in:
-rw-r--r-- 1 Gebruiker Geen   0 Aug  1 10:07  bar.jpeg
-rw-r--r-- 1 Gebruiker Geen   0 Aug  1 10:07 'baz cuux.jpeg'
-rw-r--r-- 1 Gebruiker Geen   0 Aug  1 10:07  foo.jpeg
Sure, it feels a little bit uncomfortable, but it’s a perfectly fine solution nonetheless.
Monday, July 18th, 2022
At my work, we use ansible to provision all kinds of things, from servers to monitoring. Ansible is very powerful, but with great power comes great responsibility. One downside of automating many things with ansible is that you could also accidentally destroy a lot of things with a single wrong command.
In a perfect world where everything is managed by ansible, this wouldn’t be much of a problem. However we rarely, if ever, live in a perfect world. and real deployments can drift from what is configured in ansible. The platforms we manage are not always fully under our control and can get pretty non-homogenous.
So we were looking for something like a safeguard to protect us from ourselves; to prevent us from accidentally invoking ansible in a destructive way. This article describes our solution to this problem.
Our Ansible setup
First, a little bit about how our ansible is set up. The safeguard in this article may not work for setups that differ from ours.
We have a single, overarching, site.yml playbook that determines which tasks to run for which machines, tags, etc. I’m not going to show the whole thing, but the gist of it looks like this:
- hosts: all
  roles:
    - role: common
      tags: ["common"]

    - role: firewall
      tags: ["firewall"]

    - role: certificate
      tags: ["certificate", "webserver"]
      when: "'certificate' in group_names"
Basically this says to apply the common and firewall roles to all machines and only apply the certificate role if it’s in the certificate group. We then have a hosts file that looks a little like this:
db1.example.com
web1.example.com

[certificate]
web1.example.com
So db1 and web1 will get the common and firewall roles and web1 will get the certificate role in addition.
We then execute ansible like so:
$ ansible-playbook -b -K site.yml -t certificate -l web1.example.com
I’m not entirely sure, but I think this is a pretty common setup.
The potentially dangerous problems
We have a few roles that are potentially dangerous. For example, the webserver role will deploy a webserver. However, as time progresses, the actually deployed configuration of the webserver in production can drift from what is configured in ansible. Yes, this is something that, in theory, should never happen. Unfortunately, we live in the real world where things are not always perfect for various reasons. In our situation, we can’t always be fully in control, and it’s something we just have to be pragmatic about.
There are also roles and tags that are just inherently dangerous. For instance, we have a few tags that always require restarts of services, which may cause disruptions if done during office hours.
Then there’s the problem of overly broad host specifications. For example, if we accidentally forget to specify a host limit or a tag, or we make a typo, we may inadvertently role out way too many changes.
We wanted a way to prevent us from accidentally making these mistakes, but still allow us to overrule any safeguards if we were sure it was the right thing to do.
Our solution
What we came up with is a special task at the top of site.yml that always runs, regardless of what tags or limits you specify:
- name: Safeguard
  # Always run regardless of what tags or limits the the user specifies.
  hosts: all

  connection: local
  become: no
  gather_facts: false

  tasks:
    # Call a local script in the repo that will perform some safety checks.
    - name: Check hosts and tags
      ansible.builtin.shell:
        cmd: tools/safeguard.py
      delegate_to: localhost
      run_once: true

      # Pass some information off this ansible run to the script via the
      # environment.
      environment:
        safeguard_limit: "{{ ansible_limit|default('') }}"
        safeguard_hosts: "{{ ansible_play_hosts }}"
        safeguard_tags: "{{ ansible_run_tags }}"

        # The user can override safety guards by setting these variables
        # using '-e sg_nolimit=yes'
        sg_nolimit: "{{ sg_nolimit|default('BREAKBAD') }}"
        sg_notag: "{{ sg_notag|default('BREAKBAD') }}"
        sg_dangertag: "{{ sg_dangertag|default('BREAKBAD') }}"
        sg_manyhosts: "{{ sg_manyhosts|default('BREAKBAD') }}"

      # The 'always' tag is special in ansible and will always match regardless
      # of which tags you specify (including none at all).
      tags:
        - always

      changed_when: False
I’m not going to explain this task in detail, you can read the comments in it to fully understand it. Basically, it passes some of the current ansible run information such as the user-specified tags and limits to a script, which will check for potentially dangerous things, such as not specifying a limit. The user can override these checks by setting various variables using -e sg_XXXX.
So, for example, the user must specify a host limit using -l. Otherwise, the playbook will execute on all hosts that match it, and that may not be what you intended. You can override this safeguard like so:
$ ansible-playbook -b -K site.yml -e sg_nolimit=yes -t certificate
This will probably also trigger the “manyhosts” safeguard, which checks that you’re not specifying too many hosts at the same time. So you’d also have to override that safeguard:
$ ansible-playbook -b -K site.yml -e sg_nolimit=yes -e sg_manyhosts=yes -t certificate
The safeguard script
The safeguard.py script looks like this:
#!/usr/bin/env python3

# Safeguard script, executed by the first task in site.yml.

import ast
import os
import sys


def check_constraint(cb, override, err_msg):
    """
    Wrapper function around constraint_ functions. Does some boilerplate such
    as checking for overrides.
    """
    if override in os.environ and os.environ[override] == 'yes':
        # User has overriden this constraint with an extra var.
        return

    # Call the callback. If it doesn't return True, abort.
    if cb() is not True:
        sys.stderr.write("{}. Override with '{}=yes'.\n".format(
            err_msg,
            override)
        )
        sys.exit(1)

def constraint_nolimit():
    """
    The user should specify a limit with '-l' or '--limit'. If not, this var
    will be empty.
    """
    # If this is not empty, it's fine
    if os.environ["safeguard_limit"] != "":
        return True

def constraint_notags():
    """
    The user should specify a tag. If not, the value here becomes 'all'. Stop
    if it is.
    """
    tags = ast.literal_eval(os.environ["safeguard_tags"])
    if len(tags) > 0 and "all" not in tags:
        return True

def constraint_dangertags():
    """
    Some tags are a bit dangerous
    """
    # FIXME: Hardcoded
    danger_tags = ["common", "webserver"]
    tags = ast.literal_eval(os.environ["safeguard_tags"])
    for tag in tags:
        if tag in danger_tags:
            return False

    return True

def constraint_manyhosts():
    """
    Executing stuff on many hosts may not be a good idea.
    """
    if os.environ["sg_nolimit"] == "yes":
        return True

    hosts = ast.literal_eval(os.environ["safeguard_hosts"])
    if len(hosts) < 4:
        return True

    return False


if __name__ == "__main__":
    check_constraint(constraint_nolimit, "sg_nolimit", "No limit specified")
    check_constraint(constraint_notags, "sg_notag", "No tag(s) specified")
    check_constraint(constraint_dangertags, "sg_dangertag", "Dangerous tags specified")
    check_constraint(constraint_manyhosts, "sg_manyhosts", "Too many hosts specified")
I've reduced the script a bit for clarity. Again, I'm not going to fully explain how it works. If you can read a little bit of Python, its workings should be self-evident. There's a bit of dynamic dispatch magic in it to call the various constraint_ methods. Not something I usually recommend as it can lead to unclear call stacks pretty quickly, but in such a small script it's not much of a problem.
Conclusion
This safeguard construction has been working well for us. While actually fixing the dangerous situations is always preferable, sometimes in real life things get messy and an extra hurdle can prevent accidental damage. This solution, coupled with --check and various protections in the roles themselves, have so far prevented us from creating accidental production disruptions.
Tuesday, May 17th, 2022
My dad had an issue with Firefox failing on certain sites with a “SEC_ERROR_OCSP_FUTURE_RESPONSE” error.
He recently replaced a dead battery in his desktop computer. These batteries are used to keep time when the PC is off. These days generally you won’t ever have to replace it, since computers are throwaway devices now. They’ll fail or become obsolete way before the battery ever dies.
However, if the battery dies, your computer will start to have some date / time problems. These can generally be fixed by setting the date and time manually when starting the computer.
The problem (OCSP)
OCSP is an Internet protocol used for obtaining the revocation status of an X.509 digital certificate. I won’t bore you with the details, but basically when you visit a site, it checks whether the encryption stuff is still valid and secure. According to the intertubes, SEC_ERROR_OCSP_FUTURE_RESPONSE” generally indicates that the computer’s system clock (the one that the battery keeps running when your computer is off) is set to a date / time in the past.
My dad tried fixing the date and time, but this didn’t fix the problem. Other things he tried:
- Restarting everything
- Verifying the bios date / time and the OS date / time (both correct).
- Setting some OCSP check setting in about:config to False (not a good idea)
- Removing all entries in the history
- Remove and reinstall Firefox
None of these fixed the problem.
The fix
The thing that finally fixed it was to create a new Firefox profile. For windows:
Start the Firefox profile manager by pressing Windows+R and typing in:
firefox.exe -P
Create a new profile and start firefox with this profile. With this new profile everything should be working again.
What I suspect was happening (but am not sure of) is that during a previous Firefox run, while the date / time were not set correctly, Firefox stored some caching data / timestamp in the profile, which then started causing issues when the date / time was set correctly. Reinstalling Firefox doesn’t help, because it doesn’t remove your profile.
A better solution would be to remove just that cached info from the current profile, but I couldn’t figure out where that info was stored in the profile, so creating a new one is the easiest solution.
Note: If you’re not using Firefox Sync, you’ll lose all your bookmarks, history, passwords, etc. You can do some exporting / importing of that stuff from the old profile (still accessible via the Firefox Profile Manager) to the new profile. Or just enable Firefox Sync in the old profile, wait a bit until it’s done syncing, and then switch to the new profile and repeat.
Sunday, August 8th, 2021
Last Tuesday my new Tuxedo Computers Pulse 14 laptop arrived. I’ve been running it as my daily driver since then (6 days) and this is my review of it.

Update after 2 years
I originally wrote this post in august of 2021. It is now august 2023, and I’ve been using this laptop as my daily driver for that time. Here are my findings since then:
- The keyboard remains pretty bad. It’s usable, but only barely. Multiple keys simply don’t register about 1/4th of the time. However, some of my coworkers have since also bought Tuxedo laptops (different models), and they haven’t had problems with the keyboard – or anything else for that matter – at all. So this seems to have been a one-off fluke. Since the Pulse 14 model has been discontinued anyway, this doesn’t appear to be problem anymore.
- I’ve experienced zero other problems with this laptop ever since. The battery is also still just as good as the day I got it.
- Coworkers of mine have also bought Tuxedo laptops since, and are very satisfied. While pricing for their models is a bit higher than it was for the Pulse 14, it remains a lot of bang for your buck.
- I don’t think I’ve ever managed to get even close to using half of the RAM in this thing, no matter what I throw at it (including having open a few hundred Firefox tabs) ;-)
- My next laptop will definitely be a Tuxedo again.
Background
First, some background about what I look for in a laptop and what my use-case is.
I’m a software developer and systems operator. While I don’t do any high-performance computing or heavy compiling, I do generally tend to run a lot of things in Virtual Machines and Docker stacks. My OS of choice is Xubuntu, which is a basic derivative of Ubuntu except it runs the XFCE desktop environment instead of Gnome.
I previously used a Dell XPS 15 with 8 Gb of memory and regularly ran out of memory on that machine, even without any VMs or Docker containers running. For example, starting a Google Meet while also having Slack and a few other browser windows open would generally OOM kill Slack or something else.
I used to game on Linux, which is why I previously went for the Dell XPS 15 with a dedicated NVIDIA Geforce card. However, I no longer game on Linux, so that’s not a requirement anymore. On a side-note, everybody seems really hyped for Proton, but I’ve had a terrible experience trying to run even the most basic non-native Linux games with Proton. Is it just me?
So what was I looking for in a laptop? First and foremost: excellent Linux support, preferably with Linux preinstalled. Second, memory and lots of it. It is by far the most limiting factor for me these days. 16 Gb was the absolute lowest limit for me. I don’t care too much about the CPU, but if I had to choose, I’d go for fast single core / thread performance. This is mostly because many programming language are still limited to a single core / thread. But honestly, it doesn’t matter that much. For a disk, SSD is the bare minimum. I value speed over storage space, although 256 Gb is the bare minimum.
I don’t require an ultra-mobile experience. I travel at most a few hours between locations where I can plug in the laptop so battery life isn’t especially important. I also don’t work extensively on the laptop itself, but generally plugin in an external monitor, keyboard and mouse. I also prefer a single external monitor with virtual desktops over multiple external monitors. That said, I do prefer smaller laptops over larger ones, so the Pulse’s 14″ display suited me just fine.
Configuration
This was the first time I’ve ever heard of, let alone ordered, a Tuxedo Computers product. That’s always a bit of a risk, but they presented enough technological information on their website to convince me that they knew what they were doing. Being a product from Germany (generally excellent engineering) with Ubuntu preinstalled (hardware compatibility with Xubuntu basically guaranteed), I decided to take the risk.
TUXEDO Pulse 14 – Gen1
I configured the following:
- Memory: 64 Gb 3200MHz CL22 Samsung (2 x 32 Gb)
- CPU: AMD Ryzen 7 4800H (8x 2.9-4.2GHz Eight-Core, 16 Threads, 12 MB Cache, 45 W TDP)
- Disk: M.2 SSD: 2000 GB Samsung 970 EVO Plus (NVMe PCIe)
That’s a bit of an overspecced powerhouse for my needs, but Tuxedo Computers’s prices are so extremely competitive that I couldn’t even max out my budget. For comparison, the above configuration clocked in at € 1.377,-. A similar configuration of a Dell XPS 13 (with only 32 Gb of memory) meanwhile costs € 2.119,-. Prices don’t include VAT btw.
Ordering and delivery
While ordering the laptop, Tuxedo Computers were very clear about a delay of a few weeks (up to about 7 weeks) due to a shortage in parts. Given the current market, that’s to be expected. I was kept up to date constantly about the current status of my order. I was also pleasantly surprised when the parts came in much sooner than I was expecting and the laptop was assembled and shipped a few days after the components came in.
Shipping from Germany to the Netherlands was handled by UPS with, again, excellent status updates about the whereabouts of my purchase and delivery date and time.
The laptop arrived well packaged and undamaged. I would feel comfortable shipping this laptop over longer distances if I had to. It came with a few goodies such as Tuxedo Computers pens and a Tux Crystal 1st revision (as shown in the image) Mousepad.

Initial impressions
While the laptop was charging, I took a good look at the hardware. Given the low cost of only € 1.377, I was kind of expecting some… compromises on the quality of the laptop housing or something. I was pleasantly surprised to find a beautifully slim, sturdy laptop. The chassis has no noticeable flexibility. The screen opens easily, yet the hinge feels solid. There is no wobble on the screen whatsoever when typing; a problem I’ve seen with some other cheap(er) laptops.
All the ports on the laptop are spaced out perfectly, which prevents cables and dongles from getting in each other’s way – a problem I ran into with the Dell XPS 15. The screen bevels at the sides and top are thin, which gives the display an impression that it’s bigger than it actually is. The camera is situated at the top. It’s something I didn’t even really think about when ordering the laptop, but it’s so much better than the Dell XPS 15’s camera positioning at the bottom of the screen, a.k.a. “The Nose Cam”.
The trackpad is large, but feels slightly worse to the fingers than the XPS 15’s trackpad. The keyboard feels pretty good to the touch and has large keys with a moderate amount of spacing in between. The arrow keys are large enough to be comfortable to use, although I would have preferred the up and down arrow keys to be as large as the left and right keys. Like many laptops these days, it doesn’t come with dedicated Page Up/Down and Home / End keys. Given the large size of the keys, it feels like they could have easily made room for another column on the right to facilitate those keys.
Xubuntu installation
The Pulse 14 came with Ubuntu preinstalled, but I did not test-drive it other than testing a few small things. I made a copy of the /etc directory and some PCI and kernel module outputs and then plugged in a USB stick with the Xubuntu installer. Because I did not test-drive the preinstalled Ubuntu, there’s a chance that some of my findings in the rest of this review are a consequence of my Xubuntu installation rather an actual problem with the Pulse 14, so keep that in mind.
Like the previous three laptops I installed Xubuntu on, the installation worked flawlessly and almost everything was working out of the box. Wifi, sound, networking, bluetooth and all the other Usual Suspects when installing Linux all just worked. That’s not something new, as the same was true for the previous two off-the-shelve Windows laptops that I installed Xubuntu on in the last year. For some reason I still expect at least something to not work properly though, but that wasn’t the case. I did choose the wrong keyboard layout, which caused some of the symbol keys such as “[” and “]” to output other characters, but a quick “dpkg-reconfigure keyboard” fixed that.
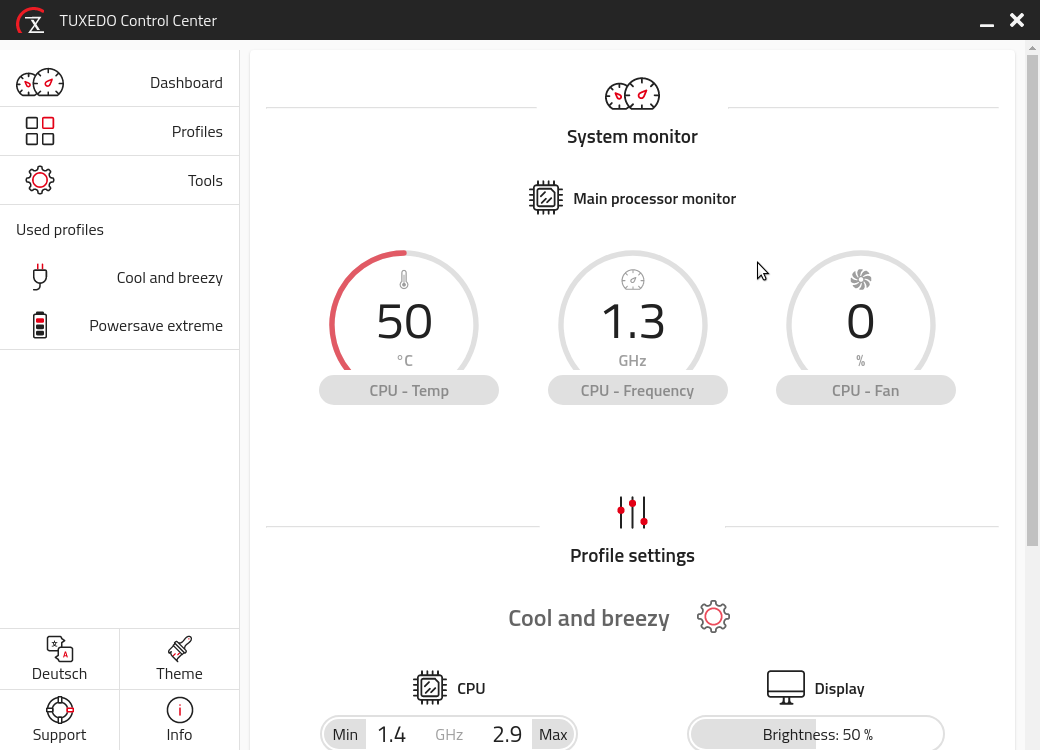
Tuxedo Computers offers some of their own software for Ubuntu such as the Tuxedo Control Center, which lets you easily change various hardware settings using profiles. These can automatically be applied when the power is plugged in or when you’re running on batteries. This is one of the few things I tried out while the original preinstalled Ubuntu was still on the laptop, and it seemed like a very nice addition to the usual power management options, so I decided to install it.

That’s also where my first critique of Tuxedo Computers comes in. The installation instructions for the Tuxedo Control Center were very unclear and even borked my apt configuration. That’s not a significant problem for me, because I know how apt works, so I could figure out what the instructions were actually trying to tell me. I assume that if you don’t have that knowledge, you’re also not very likely to install something other than the preinstalled Ubuntu, so I guess that’s not much of a problem.
And honestly, the fact that Tuxedo Computers bothers with writing such a tool at all is amazing. It’s what gave me the confidence to order this laptop in the first place.
The Tuxedo Control Center is really nice though. You can configure profiles to set the display brightness, number of CPU cores and their min / max performance, choose various settings for fan control from “Silent” (minimum fans) all the way up to “Freezy” (max fans). I recommend installing this piece of software.
Impressions after one week of daily usage
I’ve been using the Pulse 14 as a daily driver for a little under a week now. Obviously that’s too short to say much about long-term things such as hardware reliability and such, but so far I’ve been extremely impressed with this little power house. It’s basically everything I hoped it would be. There were a few issues I ran into in the first few hours of usage.
Keyboard layout issues
The first issue I ran into is the fact that the Insert and PrntScr keys are labelled wrong. The PrtScr button is actually the Insert key and the Insert key is actually the Delete key. This might be a keyboard layout configuration issue, but if it is, I’m actually glad things aren’t working properly, otherwise I would have no Delete key. It did cost me some time to figure out that pasting the primary clipboard buffer with Shift-Ins wasn’t working because the Insert key was actually the Delete key. It’s a minor thing and once you’ve figured this out, it’s not a problem at all.
Fans
The next thing I noticed are the fans. They were coming on even though I wasn’t even really doing anything remotely heavy. Just some light browsing and some “apt” install of a few tools such as Git. Now I’m kinda spoiled coming from the XPS 15 which had really quiet fans. Not so much with the Pulse 14. The fans are fairly loud and a little bit whiny. At low revs I also noticed a little bit of a “wobble” in the sound of the fan at one time, but I haven’t heard it since.
This had me a little bit worried because I really dislike fan noise. Even worse, there’s a tiny audible click when the fan goes from off to on at 20%. It sounds a lot like the click you’d hear from mechanical hard drives when they spun up from idle – just not as loud. Fortunately, I installed the Tuxedo Control Center, so I took a look at the current profile in use (“Default”) and the fan was set to “Balanced”. I switched to the “Cool and breezy” profile, which had the fan setting at “Quiet” and the problem has since gone mostly away.
At normal usage the fan hasn’t audibly come on since and the CPU sits at a decent 50°c. It does seem that occasionally the fan comes on with that tiny audible click. There’s an even quieter fan mode called “Silent” but I’m a bit afraid to set the profile to that since it would cool the CPU and such less. In daily life the laptop sits a little bit away from me anyway, which means I don’t hear the click anyway.
Battery life
The battery life is advertised as:
Endurance for up to 12 hour. For mobile use […] practical operation (1080p video streaming at ~150 cd/m2) endurance for up to 7 hours. In the energy-saving idle state, […] up to 12 hours.
As is always the case with laptop manufacturers, I’ve found these claims to be a little exaggerated. In the “Powersave extreme” profile, while being basically idle, the laptop reports about 6h45m of battery life. I assume, though haven’t tested, that under fairly normal loads, the battery will last about 3 to 4 hours. Do note that I’m not running the preinstalled Ubuntu, which might make a bit of a difference.
Performance
To be honest, I can’t tell you much about the performance CPU-wise. Xubuntu is a very light desktop environment, and I haven’t noticed any change whatsoever in its performance since I first started using it about 10 years ago. It’s always been extremely snappy. I haven’t really cared about CPU performance for a long long time. I did notice a huge improvement in the startup of Gimp, but I’ve got no idea whether that’s due to changes in Gimp or the specs of the Pulse 14.
The biggest impact on performance for me has always been memory. Even the slightest amount of memory pressure on Linux means it’s going to free up buffered and cached content to make room for other programs, and that is generally noticeable in the performance. Once memory really runs out and linux starts to swap, it’s basically over for your performance until something gets OOM killed.
You can imagine that with 64 Gb of memory, I haven’t found any performance problems whatsoever.
With the “Cool and breezy” profile enabled, I performed various stress testing with “stress-ng” over a one-minute time period to see if it impacted performance at all:
$ stress-ng --cpu 4 --io 2 --vm 1 --vm-bytes 1G --timeout 60s
stress-ng: info: [44275] dispatching hogs: 4 cpu, 2 io, 1 vm
stress-ng: info: [44275] successful run completed in 60.08s (1 min, 0.08 secs)
During this minute of working I browsed some (heavy) websites while watching a video. I didn’t notice any degradation in the performance. The fan also didn’t come on and the CPU temperature reached 58°c, while the CPU topped out at 2.4 Ghz.
The same stress test with the “Default” profile (max performance basically) took the CPU up to 3.3 Ghz, the CPU temperature to 75°c (with a tiny spike to 90°c before the fans kicked in fully) and the fan speed to about 60%.
I did some very basic benchmarking of the disk’s read / write speed:
fboender @ eek ~ $ sudo dd if=/dev/zero of=writetest bs=4096 count=5000000
5000000+0 records in
5000000+0 records out
20480000000 bytes (20 GB, 19 GiB) copied, 19.5588 s, 1.0 GB/s


fboender @ eek ~ $ sudo dd if=writetest of=/dev/null bs=4096 count=5000000
5000000+0 records in
5000000+0 records out
20480000000 bytes (20 GB, 19 GiB) copied, 3.75467 s, 5.5 GB/s
Obviously, dd is not a decent read / write performance test, but it’s good enough. 1 GB/s sustained write speed and 5.5 GB/s read speed. Not bad.
Touchpad
I’ve got little to complain about the touchpad, but mostly because I haven’t used it much. The hardware left and right click of the touchpad feel reasonable, but why would you use hardware clicking on a touchpad when you can tap for left click and two-finger tap for right click?
It suffers from the same problems as all touchpads under Linux though. They get in the way when you type and randomly warp the mouse cursor all over the place. This isn’t a problem with the touchpad hardware or anything. It’s just one of those quality-of-life things that just aren’t there in Linux on the desktop yet. I’ve gotten used to this and don’t even bother trying to tweak this anymore. Rather I just have a keybinding that turns the touchpad on and off manually using “xinput”. See this link for more info.
There are the usual tips for tweaking the touchpad on Tuxedo Computer’s website, but it’s the same stuff you already know probably. Disabling the Touchpad for a few moments after typing a key helps a little. I found 0.3 to be a reasonable compromise, but touchpad usage on Linux remains a problem and Tuxedo Computers did not manage to improve this unfortunately. Again, it’s possible this is an issue with Xubuntu though.
Keyboard
Now we come to the first and only real problem with this laptop: the keyboard. I don’t know whether this is a software or hardware problem, but I very strongly suspect it’s a hardware problem. The issue is that sometimes keys don’t register. This is mostly noticeable with keys further away from the center of the keyboard, such as ‘q’, ‘a’, ‘z’ and ‘p’ and such. It also happens very frequently when needing to type the same key twice, such as the ‘e’ in “needing”.
Now I regularly switch keyboards to prevent RSI and in the last year I’ve typed on at least four different laptop keyboards and three standalone keyboards and I’ve never had this problem before. Sure, sometimes you have to get a little used to a new keyboard and you might make some typo’s, but keys sometimes not registering is something I’ve simply never encountered before. It’s not that I’m not pressing the keys properly. I can feel the key going through the resistance just fine and it feels like I’ve typed the key, it just doesn’t register.
Over the course of a few days I’ve tested this a few times. I’d use the keyboard for a bit; say half an hour. Then I’d write a few paragraphs of the same text each time without looking at the output, to prevent my brain from automatically correcting typing mistakes. In each test I noticed the same pattern of missing characters as mentioned above.
This is a fairly major blemish on an otherwise fantastic product. It’s possible that this is a software problem, but I highly doubt it. I’ve tried the solution to “Keyboard not working properly” given on Tuxedo’s website, to no avail. A review on Reddit notices the same problem, but only with the Return key:
Feedback is good on the most part, the stroke is firm but not stiff, with quick return and quiet actuation. The only key I’ve had issues with so far is (maybe most unfortunately) the carriage return. I thought perhaps it was a matter of not hitting it square on, but I think it actually just feels like it’s bottoming out prematurely before registering the input.
This sounds exactly like my problem, except I have it with multiple keys.
Does this make the laptop entirely unusable? Well, not for me. I generally don’t like typing on laptop keyboards, and would rather use a standalone keyboard. I’ve got a compact Logitech K380 Bluetooth keyboard which I take with me when I know I’m going to need to type for longer periods. if, however, I was planning on using this laptop a lot on the go, it would certainly be a big disappointment.
TUXEDO Office Hub
Because I had some extra budget, I decided to get a TUXEDO Office Hub, which set me back €230. The store page looked promising with a good deal of USB ports, HDMI and DisplayPort outputs, headphone / microphone jacks, etc. It seemed to be compatible with the Pulse 14:
In general, all notebooks with USB ports are compatible with our Office Hub. The connection of the hub via USB-C is enabled by a so-called DisplayLink driver. It provides basic functions of image signals via USB. This is very suitable for working and surfing, but only conditionally for gaming and graphics-intensive applications.
Mice and keyboards connected via USB as well as Gigabit LAN and audio always work. The native HDMI port works as soon as your notebook includes USB-C with DisplayPort. Otherwise, you have to use the included DisplayPort to HDMI adapter.
The Pulse 14 has no support for DisplayPort over USB-C, but that didn’t seem to be a problem given that it says that: “Otherwise, you have to use the included DisplayPort to HDMI adapter”.
There was another compatibility issue mentioned:
Devices with AMD Ryzen CPU have the following restrictions due to the necessary DisplayLink driver:
- Slight delays during movements, e.g. when moving windows
- Monitors with 4K resolution cannot be addressed properly
Unfortunately, that “slight delay” means “utterly unusable screen lag of multiple seconds”. I’m not exaggerating when I say that this isn’t usable in any setting whatsoever. I have not been able to find any way of getting a monitor to work properly via the Office Hub. The DisplayPort to HDMI adapter suffers from exactly the same problems. There are plenty of bug reports on the internet about this problem, with all kinds of potential solutions, but the ones I’ve tried so far haven’t worked out.
This isn’t a huge problem for me personally. I only use one external screen, and that works fine with the native HDMI port on the laptop itself. However, if you want to attach multiple external monitors to the Pulse 14, you may be in for a disappointment. It’s possible that it can be fixed with one of the solutions on the internet, or perhaps AMD / DisplayLink or whoever will fix this problem in the future. Until then, I’d be very wary. I’ll update this page if I find a solution (but don’t count on it cause I don’t care that much).
It’s worth noting that I’ve had plenty of similar problems with DisplayLink on the Dell XPS 15. For me, it never worked. Some other people I know managed to get it to work properly. This isn’t a problem with the Pulse 14 really, nor is it the fault of Tuxedo Computers.
Anyway, for me right now it’s a glorified USB hub. Fortunately this purchase come out of the extra budget I had left due to the competitive price of the Pulse 14 itself, so it didn’t cost me anything extra. Otherwise, I would have been a bit more disappointed having bought a USB hub at €230.
Conclusion
The Pulse 14 is amazing bang for your buck. It’s very powerful, lightweight and looks fantastic. The build feels sturdy and of decent quality. It has better specs than a Dell XPS 13, but it’s €742 cheaper. I have no idea how Tuxedo Computers are managing that extremely competitive price-point, especially given the current chip shortages. This allowed me to max out the memory to 64 Gb, which is the most limiting factor in performance for me these days.
All the hardware works straight away on a clean install of Xubuntu. Once power management and fan control are configured properly using Tuxedo Control Center, the laptop is quiet and runs cooler than a Dell XPS 15. The performance feels amazing, but that’s normal for Xubuntu even on slower hardware. I don’t run many CPU or IO heavy workloads, so I can’t really comment too much on that otherwise. From some benchmarks I ran, everything looks fantastic, but that’s just theory.
The Pulse 14 suffers from the usual Linux-on-the-desktop problems. The touchpad seems fine hardware-wise, but gets in the way as is normal under Linux. DisplayLink is a drama – especially on AMD – which means the Office Hub is useless for attaching to external screens. I suspect the same is true for attaching an external screen over anything other than the built-in HDMI port. Beware if you want to hook up more than one monitor.
For me personally, the only real downside is the laptop’s keyboard. It regularly misses key presses and the characters just don’t show up. This has never happened to me before. I strongly suspect this is problem with the keyboard itself, and not some settings, configuration or me just needing to get used to it. It doesn’t make the keyboard entirely unusable, just frustrating. Again, this is not a deal breaker for me. I don’t like working on a laptop directly and prefer external screens, keyboards and mice.
All in all, I’m extremely impressed with the Pulse 14, as well as with Tuxedo Computers. It’s the first time I heard of them, the first time I’ve ever ordered one of their products and at the price-point of € 1.377,- I got much much more than I expected. Tuxedo Computers seems like a company that truly cares about Linux on the desktop. They got various support pages and github repositories for fixing hardware / software compatibility problems, but so far I haven’t needed them. The addition of the Tuxedo Control Center is a very nice touch.
I will definitively buy from then again. Most likely a new NUC-like media center or a new Gaming PC.
Tuesday, April 13th, 2021
Since the start of Corona, my company has been mostly working remote. That means more video conference meetings. A lot more. So much in fact, that I decided to automate the process of setting everything up correctly for that and other audio video profiles.
For example, my webcam is in my laptop, whose screen I don’t normally use (because virtual desktops == infinite screens right in front of you). Since I’d like people to see me looking at them when we’re conferencing, I want Google Meet to be on the laptop screen. Also, I need to activate my headset.
Switching the internal screen on, switching to the headset, opening Google Meet, dragging it to the laptop’s screen and making the window sticky so it doesn’t disappear when I switch virtual desktops on my main screen… is a bit of a hassle. And since I’m lazy, I decided I need an Audio Video profile switcher.
No such thing existed, so I cobbled together a script, that you can find in a Gist on Github.
The script is reasonably documented I think. It relies heavily on xdotool, wmctrl and pacmd. At the top are some profile definitions for screen layouts, screen coordinates (to move a window to a different screen), and some sound output profiles:
# Use arandr to setup your displays and then export the profile
SCREEN_LAYOUTS[external_only]="
    --output HDMI-2 --off
    --output DP-1 --off
    --output DP-2 --off
    --output eDP-1 --off
    --output HDMI-1 --primary --mode 1920x1080 --pos 0x0 --rotate normal
"
SCREEN_LAYOUTS[external_left]="
    --output HDMI-2 --off
    --output DP-1 --off
    --output DP-2 --off
    --output HDMI-1 --primary --mode 1920x1080 --pos 0x0 --rotate normal
    --output eDP-1 --mode 1920x1080 --pos 1920x0 --rotate normal
"

# Screen coordinates for moving windows to a different screen. These are
# coordinates on a virtual desktop that is stretched over all monitors; either
# vertically or horizontally, depending on the screen layout.
SCREEN_COORDS[laptop]="0,1920,0,500,500"
SCREEN_COORDS[external]="0,0,0,500,500"

# This requires a bit of a PhD in pulse audio. There has to be a better way
# Mike!
SOUND_OUTPUTS[headphones]="
    pacmd set-card-profile alsa_card.usb-Logitech_Logitech_USB_Headset-00 output:analog-stereo+input:analog-mono;
    pacmd set-card-profile 0 output:analog-stereo+input:analog-stereo;
    pacmd set-default-sink alsa_output.usb-Logitech_Logitech_USB_Headset-00.analog-stereo;
"
SOUND_OUTPUTS[external_monitor]="
    pacmd set-card-profile alsa_card.usb-Logitech_Logitech_USB_Headset-00 off;
    pacmd set-card-profile 0 output:hdmi-stereo;
    pacmd set-default-sink alsa_output.pci-0000_00_1f.3.hdmi-stereo;
"
Then there’s a bunch of helper functions to do various things such as:
- Change the monitor layout
- Change the audio output profile
- Manipulate windows such as moving them around
Finally, the actual audio video profiles are defined in a big “if, then” statement. I also throw in the launching of some applications just to make things easier. For example, the forementioned “conference” profile:
elif [ "$PROFILE" = "conference" ]; then
   sound_output "headphones"
   screen_layout "external_left"
   firefox --new-window https://meet.google.com/landing?authuser=1
   sleep 1 # give firefox a moment
   win_to_screen "Google Meet" "laptop"
   win_sticky "Google Meet"
   win_focus "Google Meet"
I hook all of this up in my Lurch launcher, so that I can just hit Ctrl-alt-semicolon and type the partial name of a profile to switch to it:
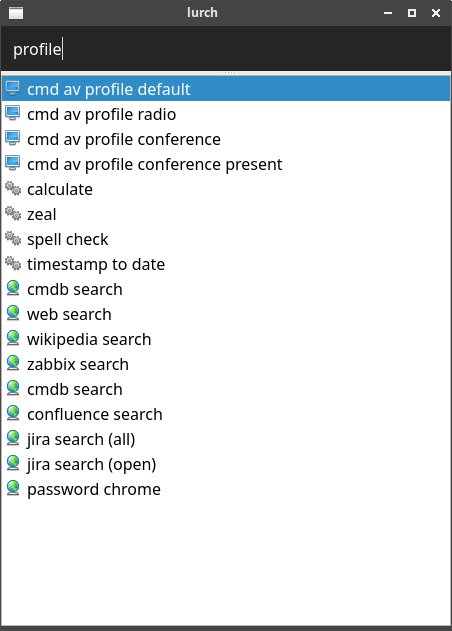
I thought I’d share it, since it might be useful for other people. Note that the script may require tweaking to suit your needs, as it’s written for XFCE and other Window Manager might work slightly different.
Saturday, April 10th, 2021
Update: Oh, look, right in the nick of time: “Valve Steam through 2021-04-10, when a Source engine game is installed, allows remote authenticated users to execute arbitrary code because of a buffer overflow that occurs for a Steam invite after one click”
As part of my big spring cleaning, as well as given all the recent supply chain attacks, I’ve decided that I will no longer run any software from third-party repositories directly on my Linux desktop. The most pressing issues is with packages from PyPi, NPM, Docker Hub and other repositories that don’t support cryptographically signed packages. I now run those in Virtual Machines, but that’s a topic for another blog post.
I also wanted to get rid of all the cruft I’ve installed on my Linux desktop over the last years from third-party Ubuntu repositories. I often tend to try things out, but then forget to clean up after myself, which leaves quite a bit of software lingering around that I never use anyway:
root @ jib /etc/apt/sources.list.d $ ls
000-mailpile.list slack.list
000-mailpile.list.save slack.list.save
crystal.list spotify.list
crystal.list.save spotify.list.save
google-chrome.list steam.list
google-chrome.list.save steam.list.save
google-cloud-sdk.list taskcoach-developers-ubuntu-ppa-bionic.list
google-cloud-sdk.list.save taskcoach-developers-ubuntu-ppa-bionic.list.save
gregory-hainaut-ubuntu-pcsx2_official_ppa-bionic.list teams.list
gregory-hainaut-ubuntu-pcsx2_official_ppa-bionic.list.save teams.list.save
nodesource.list teamviewer.list.save
nodesource.list.save ultradvorka-ubuntu-productivity-bionic.list
peek-developers-ubuntu-stable-bionic.list ultradvorka-ubuntu-productivity-bionic.list.save
peek-developers-ubuntu-stable-bionic.list.save vscode.list
signal-xenial.list vscode.list.save
I mean, I don’t even know what some of that stuff is anymore. Time to clean things up!
First, how do I figure out which packages are in those repositories? The web gives us plenty of tips, but they seem to revolve mostly around aptitude, which I don’t have installed. And the whole idea is to clean things up, not install additional cruft!
Let’s look at /var/lib/apt/lists:
$ cd /var/lib/apt/lists
$ ls | head -n5
deb.nodesource.com_node%5f12.x_dists_bionic_InRelease
deb.nodesource.com_node%5f12.x_dists_bionic_main_binary-amd64_Packages
dist.crystal-lang.org_apt_dists_crystal_InRelease
dist.crystal-lang.org_apt_dists_crystal_main_binary-amd64_Packages
dist.crystal-lang.org_apt_dists_crystal_main_binary-i386_Packages
Okay, that looks promising..
$ cat deb.nodesource.com_node%5f12.x_dists_bionic_main_binary-amd64_Packages | head -n5
Package: nodejs
Version: 12.22.1-1nodesource1
Architecture: amd64
Maintainer: Ivan Iguaran <ivan@nodesource.com>
Installed-Size: 91389
Ah, just what we need. So we can get a list of all the packages in a repo using some grep magic. Note that these are not necessarily packages that have actually been installed, but rather they’re all the packages that are available in the repository.
$ grep '^Package:' deb.nodesource.com*
lists/deb.nodesource.com_node%5f12.x_dists_bionic_main_binary-amd64_Packages:Package: nodejs
For a repo with multiple packages, the output looks like this:
$ grep '^Package:' repository.spotify.com*
lists/repository.spotify.com_dists_stable_non-free_binary-amd64_Packages:Package: spotify-client
lists/repository.spotify.com_dists_stable_non-free_binary-amd64_Packages:Package: spotify-client-0.9.17
lists/repository.spotify.com_dists_stable_non-free_binary-amd64_Packages:Package: spotify-client-gnome-support
lists/repository.spotify.com_dists_stable_non-free_binary-amd64_Packages:Package: spotify-client-qt
lists/repository.spotify.com_dists_stable_non-free_binary-i386_Packages:Package: spotify-client
lists/repository.spotify.com_dists_stable_non-free_binary-i386_Packages:Package: spotify-client-gnome-support
lists/repository.spotify.com_dists_stable_non-free_binary-i386_Packages:Package: spotify-client-qt
Fix that output up a little bit so we only get the package name:
$ grep '^Package:' repository.spotify.com* | sed "s/.*Package: //" | sort | uniq
spotify-client
spotify-client-0.9.17
spotify-client-gnome-support
spotify-client-qt
There we go. We can now use apt to see if any of those packages are installed:
$ apt -qq list $(grep '^Package:' repository.spotify.com* | sed "s/.*Package: //" | sort | uniq) | grep installed
spotify-client/stable,now 1:1.1.55.498.gf9a83c60 amd64 [installed]
Okay, so Spotify has been installed with the spotify-client package. Now, we could purge that package manually, but for some of the repositories there are many installed packages. An easier (but slightly more dangerous) method is to just purge all of the packages mentioned in the repo, whether they’re installed or not:
$ apt purge $(grep '^Package:' repository.spotify.com* | sed "s/.*Package: //" | sort | uniq)
Package 'spotify-client-0.9.17' is not installed, so not removed
Package 'spotify-client-gnome-support' is not installed, so not removed
Package 'spotify-client-qt' is not installed, so not removed
The following packages will be REMOVED:
spotify-client*
0 upgraded, 0 newly installed, 1 to remove and 13 not upgraded.
After this operation, 305 MB disk space will be freed.
Do you want to continue? [Y/n]
Finally, we can remove the source list from our system:
$ rm /etc/apt/sources.list.d/spotify.list*
Rinse and repeat for the other repositories, and soon we’ll have rid our system of not just a bunch of cruft that increases our attack surface, but also of a bunch of closed source, proprietary garbage that I never used in the first place.
Update: Don’t forget to also remove any lingering configuration or data from your home directory or the system in general. How to go about doing that differs per application, so I can’t give any instructions for that. I just did a “find -type d” in my home dir, grepped out a bunch of irrelevant stuff and then went through the entire list and did a “rm -rf” on anything I didn’t think was worth keeping around. Freed up about 90 Gb of disk space too! (mostly due to steam). Make backups before you do this!
Also, when you’re done removing the source lists, you can just wipe the entire contents of /var/lib/apt/lists. It’ll get rebuild when you do an apt update:
$ rm /var/lib/apt/lists/*
$ apt update
Now, I’m pretty sure that there is some arcane apt, dpkg, apt-get or add-apt-repository command to make this easier. The thing is that finding out which command does exactly what I wanted was taking up more time than just going ahead and cobble some shell oneliners myself.
Stay tuned for a blog post on how I use VirtualBox with linked clones and a little shell script wrapper to super easily spin up a sandboxes virtual machine for each of my development projects!
Friday, February 26th, 2021
In an Ubuntu 18.04 virtual machine in VirtualBox, I could define a Shared Folder like so:
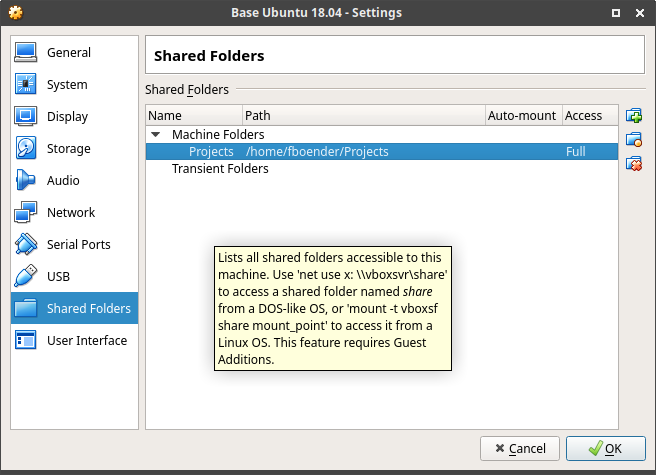
And then mount it like this:
mount -t vboxsf Projects -o uid=1000,gid=1000 /home/fboender/Projects/
Or with the equivalent fstab entry like this:
Projects /home/fboender/Projects/ vboxsf defaults,uid=1000,gid=1000 0 0
This fails on an Ubuntu 20.04 guest with the following error:
/sbin/mount.vboxsf: mounting failed with the error: No such device or address
Some combinations I tried:
mount -t vboxsf /media/sf_Projects -o uid=1000,gid=1000 /home/fboender/Projects/
mount -t vboxsf Projects -o uid=1000,gid=1000 /home/fboender/Projects/
mount -t vboxsf sf_Projects -o uid=1000,gid=1000 /home/fboender/Projects/
None of it worked. It turns out that somehow, things got case-(in?)sensitive, and you need to specify the lower-case version of the Shared Folder name:
mount -t vboxsf projects -o uid=1000,gid=1000 /home/fboender/Projects/
Hope this saves someone somewhere some headaches, cause I couldn’t find anything about it on the Googles.
Saturday, September 26th, 2020
Version 1.1 of the Simple Little Automator adds the ability to have long descriptions for build rules. For example:
install () {
    # Install sla
    # Install sla to $PREFIX (/usr/local by default).
    #
    # You can specify the prefix with an environment variable:
    #
    # $ PREFIX=/usr sla install

    # Set the prefix
    PREFIX=${PREFIX:-/usr/local}
    DEST="$PREFIX/bin/sla"
    env install -m 755 ./sla "$DEST"
    echo "sla installed in $DEST"
}
This documentation can then be access using sla <rule> --help. E.g.:
$ sla install --help
install: Install sla

    Install sla to $PREFIX (/usr/local by default).

    You can specify the prefix with an environment variable:

        $ PREFIX=/usr sla install
Get the release from the Github releases page.
The text of all posts on this blog, unless specificly mentioned otherwise, are licensed under this license.