Tuesday, December 6th, 2016
I bought an Intel NUC Kit NUC5CPYH as a replacement for my Raspberry Pi 2b media center and file server. One of the main advantages of the NUC over the Raspberry is that it has USB v3 ports, which greatly increases the throughput speeds to the external USB disks and doesn’t require me to have external power on some of them.
I use a radio-controlled keyboard as my remote control my media center. When I plugged it into the NUC, I suddenly found the range of the keyboard greatly reduced. Even when I placed it in exactly the same place as the Raspberry Pi, the range was still horrible further than about 1.5 meters.
Turns out USB 3.x ports interfere with 2.4 GHz devices, which the radio-controlled wireless keyboard operates on.
The solution was to plug in a USB extension cord and putting the RC receiver in that and placing it about 30 cm from the NUC.
On a side-note: Disable UEFI boot if you can’t seem to install any Linux distro on your NUC.
Sunday, November 6th, 2016
Most online tutorials for setting up a slave replication database involve dumping and loading the database on the master with mysqldump. Unfortunately, loading data with mysqldump can be very slow. My friend Cris suggest a much faster method using rsync.
Benefits
The benefits of this method are:
- Very fast setup of a slave by avoiding having to load a logical dump into MySQL.
- Virtually no downtime for the master. There is a small window (seconds, usually) during which writes are temporary blocked.
- If the slave was already set up and has become corrupt for whatever reason, rsync will ensure we won’t have to copy all the data again that’s already on the slave.
In this article I’m going to assume you’ve already correctly configured the master and slave for replication. If not, please see this guide on how to configure MySQL. You can skip the step where they perform a mysqldump, since that’s what this article is replacing with rsync in the first place.
How it works
Roughly speaking, we’ll be doing the following steps:
- Stop the slave
- Rsync the binary files from the master to the slave while the master is running.
- Set a write lock on the master, record the master log position and do another rsync from the master to the slave.
- Unlock the master write lock.
- On the slave, we change the master log position and start replication again.
The benefits are obvious. Since we first do a sync to the slave without a write lock, the master can keep receiving writes. However, this leaves the slave in a potentially corrupt state, since we might have copied the master data in the middle of a transaction. That’s why, after the initial bulk sync, we set a write lock on the master and perform another sync. This only needs to synchronize the new data since the last sync, so it should be fast. The master will only need to be write-locked for a short amount of time. Meanwhile, we record the master log position for the slave.
Do note that this will only work if your master and slave database are the architecture and run the same MySQL version. If not, this will end in disaster.
Walkthrough
Let’s see a practical example:
On the SLAVE, stop MySQL:
root@slave# sudo /etc/init.d/mysql stop
Configure the SLAVE not to automatically start replication on startup. We need this so we can modify the master log pos after starting the slave. Add the ‘skip-slave-start’ setting to the [mysqld] section:
root@slave# vi /etc/mysql/my.cnf

[mysqld]
skip-slave-start
Now we rsync the MASTER binary data to the SLAVE. For this you’ll need to have root ssh access enabled. Depending on your setup, there are a few files you’ll have to exclude. For example, if you don’t want to overwrite the users on your slave, you’ll have to exclude the ‘mysql’ directory. You should experiment a bit with what you should and shouldn’t exclude.
root@master# rsync -Sa --progress --delete --exclude=mastername* --exclude=master.info --exclude=relay-log.info /var/lib/mysql root@192.168.57.3:/var/lib
We’ve now synchronized the bulk of the master data to the slave. Now we need another sync to put the slave in a valid state. We do this by locking the MASTER to prevent write actions:
root@master# mysql
mysql> flush tables with read lock;
mysql> show master status;
+------------------+----------+--------------+---------------------------------------------+
| File             | Position | Binlog_Do_DB | Binlog_Ignore_DB                            |
+------------------+----------+--------------+---------------------------------------------+
| mysql-bin.000001 |    16242 |              | mysql information_schema performance_schema |
+------------------+----------+--------------+---------------------------------------------+
Record the value of the Position field, since we’ll need it later on the slave. The master is now locked against writes.
Keep this MySQL session open and run the next rsync in a different terminal:
root@master# rsync -Sa --progress --exclude=mastername* --exclude=master.info --exclude=relay-log.info /var/lib/mysql root@192.168.57.3:/var/lib
As soon as the final rsync is done, we can unlock the master. Go back to the terminal containing your MySQL session and unlock the tables:
mysql> unlock tables;
The master can now receive writes again. Time to start the SLAVE:
root@slave# /etc/init.d/mysql start
On the slave, we’ll change the master log position and start replication:
root@slave# mysql
mysql> change master to master_log_pos=16242;
mysql> start slave;
Verify that the slave is working properly:
mysql> show slave status\G
That’s it, your slave is now up and running!
Disclaimer
And now for the big disclaimer:
Copying binary files is always more risky than doing a logical dump and load. By necessity, there are differences between a master and a slave and how the handle the binary files. While in theory the above method should work, I have to caution against using this method if your slave is going to be vital to your setup. If your slave has been set up with the method above, be extra careful when relying on that slave for making logical backups and such.
Saturday, October 8th, 2016
I’ve just released ansible-cmdb v1.17. Ansible-cmdb takes the output of Ansible’s fact gathering and converts it into a static HTML overview page containing system configuration information. It supports multiple templates (fancy html, txt, markdown, json and sql) and extending information gathered by Ansible with custom data.
This release includes the following bugfixes;:
- A bug that caused whitespace to be added each time a character was typed into the search box was fixed.
- Fix for HP-UX missing netmask (patch by Randy Rasmussen)
- SQL template improvements for BSD.
As always, packages are available for Debian, Ubuntu, Redhat, Centos and other systems. Get the new release from the Github releases page.
Monday, August 15th, 2016
We have our Ubuntu machines set up to mail us the output of cron jobs like so:
$ cat /etc/crontab
SHELL=/bin/sh
PATH=/usr/local/sbin:/usr/local/bin:/sbin:/bin:/usr/sbin:/usr/bin
MAILTO=admin@example.com

# m h dom mon dow user    command
This is encrible useful, since cronjobs should never output anything unless something is wrong.
Unfortunately, this means we also get emails like this:
/etc/cron.weekly/update-notifier-common:
New release '16.04.1 LTS' available.
Run 'do-release-upgrade' to upgrade to it.
You can fairly easily disable these by modifying the corresponding cronjob /etc/cron.weekly/update-notifier-common:
 #!/bin/sh

 set -e

 [ -x /usr/lib/ubuntu-release-upgrader/release-upgrade-motd ] || exit 0

 # Check to see whether there is a new version of Ubuntu available
-/usr/lib/ubuntu-release-upgrader/release-upgrade-motd
+/usr/lib/ubuntu-release-upgrader/release-upgrade-motd > /dev/null
Now you’ll no longer receive these emails. It’s also possible to remove the cronjob entirely, but then an upgrade is likely to put it back, and I have no idea if the cronjob has any other side effects besides emailing.
Update: Raf Czlonka emailed me with the following addendum:
I wanted to let you know that there’s still one place which makes you see the annoying prompt:
/etc/update-motd.d/91-release-upgrade
an easier way to get rid if the “issue” is simply to run this:
# sed -i 's/^Prompt.*/Prompt=never/' /etc/update-manager/release-upgrades
Thanks Raf!
Thursday, July 28th, 2016
I’ve just released ansible-cmdb v1.15. Ansible-cmdb takes the output of Ansible’s fact gathering and converts it into a static HTML overview page containing system configuration information. It supports multiple templates and extending information gathered by Ansible with custom data.
This release includes the following bugfixes and feature improvements:
- Improvements to the resilience against wrong, unsupported and missing data.
- SQL template. Generates SQL for use with SQLite and MySQL.
- Minor bugfixes.
As always, packages are available for Debian, Ubuntu, Redhat, Centos and other systems. Get the new release from the Github releases page.
Tuesday, July 5th, 2016
Sometimes other people change configurations on machines that I help administer. Unfortunately, I wouldn’t know when they changed something or what they changed. There are many tools available to track configuration changes, but most are way overpowered. As a result they require too much time to set up and configure properly. All I want is a notification when things have changed, and a Unified Diff of what changes were made. I don’t even care who made the changes.
So I wrote cfgtrack:
cfgtrack tracks and reports diffs in files between invocations.
It lets you add directories and files to a tracking list by keeping a separate copy of the file in a tracking directory. When invoked with the ‘compare’ command, it outputs a Diff of any changes made in the configuration file since the last time you invoked with the ‘compare’ command. It then automatically updates the tracked file. It can also send an email with the diff attached.
It’s super simple to install and use. There are packages for:
- Debian
- Ubuntu
- Other Debian-derivatives
- Redhat CentOs and other Redhat-derived systems
- Platform independant tarbals and zipfiles.
Install one of the packages (see the README for instructions).
Specify something to track:
$ sudo cfgtrack /etc/
Now tracking /etc/
Show difference between the last compare, put those difference in the archive (/var/lib/cfgtrack/archive) and send an email to the admin with the diff attached:
$ sudo cfgtrack -a -m admin@example.com compare
For more info, see the project page on github.
Tuesday, July 5th, 2016

UPnP stands for Universal Plug and Play. It’s a standard for discovering and interacting with services offered by various devices on a network. Common examples include:
- Discovering, listing and streaming media from media servers
- Controlling home network routers: e.g. automatic configuration of port forwarding to an internal device such as your Playstation or XBox.
In this article we’ll explore the client side (usually referred to as the Control Point side) of UPnP using Python. I’ll explain the different protocols used in UPnP and show how to write some basic Python code to discover and interact with devices. There’s lots of information on UPnP on the Internet, but a lot of it is fragmented, discusses only certain aspects of UPnP or is vague on whether we’re dealing with the client or a server. The UPnP standard itself is quite an easy read though.
Disclaimer: The code in this article is rather hacky and not particularly robust. Do not use it as a basis for any real projects.
Protocols
UPnP uses a variety of different protocols to accomplish its goals:
- SSDP: Simple Service Discovery Protocol, for discovering UPnP devices on the local network.
- SCPD: Service Control Point Definition, for defining the actions offered by the various services.
- SOAP: Simple Object Access Protocol, for actually calling actions.
Here’s a schematic overview of the flow of a UPnP session and where the different protocols come into play.
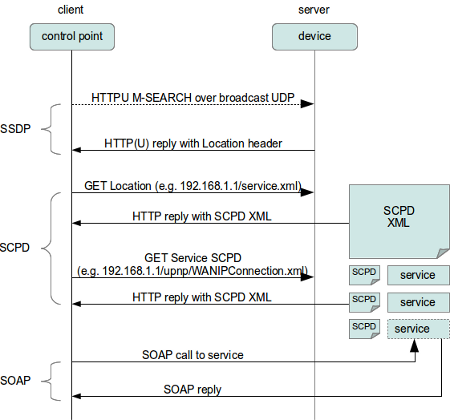
The standard flow of operations in UPnP is to first use SSDP to discover which UPnP devices are available on the network. Those devices return the location of an XML file which defines the various services offered by each device. Next we use SCPD on each service to discover the various actions offered by each service. Essentially, SCPD is an XML-based protocol which describes SOAP APIs, much like WSDL. Finally we use SOAP calls to interact with the services.
SSDP: Service Discovery
Lets take a closer look at SSDP, the Simple Service Discovery Protocol. SSDP operates over UDP rather than TCP. While TCP is a statefull protocol, meaning both end-points of the connection are aware of whom they’re talking too, UDP is stateless. This means we can just throw UDP packets over the line, and we don’t care much whether they are received properly or even received at all. UDP is often used in situations where missing a few packets is not a problem, such as streaming media.
SSDP uses HTTP over UDP (called HTTPU) in broadcasting mode. This allows all UPnP devices on the network to receive the requests regardless of whether we know where they are located. Here’s a very simple example of how to perform an HTTPU query using Python:
import socket

msg = \
    'M-SEARCH * HTTP/1.1\r\n' \
    'HOST:239.255.255.250:1900\r\n' \
    'ST:upnp:rootdevice\r\n' \
    'MX:2\r\n' \
    'MAN:"ssdp:discover"\r\n' \
    '\r\n'

# Set up UDP socket
s = socket.socket(socket.AF_INET, socket.SOCK_DGRAM, socket.IPPROTO_UDP)
s.settimeout(2)
s.sendto(msg, ('239.255.255.250', 1900) )

try:
    while True:
        data, addr = s.recvfrom(65507)
        print addr, data
except socket.timeout:
    pass
This little snippet of code creates a HTTP message using the M-SEARCH HTTP method, which is specific to UPnP. It then sets up a UDP socket, and sends out the HTTPU message to IP address 239.255.255.250, port 1900. That IP is a special broadcast IP address. It is not actually tied to any specific server, like normal IPs. Port 1900 is the one which UPnP servers will listen on for broadcasts.
Next, we listen on the socket for any replies. The socket has a timeout of 2 seconds. This means that after not receiving any data on the socket after two seconds, the s.recvfrom() call times out, which raises an exception. The exception is caught, and the program continues.
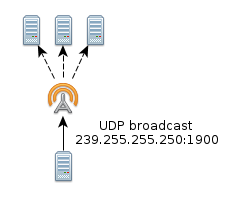
You will recall that we don’t know how many devices might be on the network. We also don’t know where they are nor do we have any idea how fast they will respond. This means we can’t be certain about the number of seconds we must wait for replies. This is the reason why so many UPnP control points (clients) are so slow when they scan for devices on the network.
In general all devices should be able to respond in less than 2 seconds. It seems that manufacturers would rather be on the safe side and sometimes wait up to 10 seconds for replies. A better approach would be to cache previously found devices and immediately check their availability upon startup. A full device search could then be done asynchronous in the background. Then again, many uPNP devices set the cache validaty timeout extremely low, so clients (if they properly implement the standard) are forced to rediscover them every time.
Anyway, here’s the output of the M-SEARCH on my home network. I’ve stripped some of the headers for brevity:
('192.168.0.1', 1900) HTTP/1.1 200 OK
USN: uuid:2b2561a3-a6c3-4506-a4ae-247efe0defec::upnp:rootdevice
SERVER: Linux/2.6.18_pro500 UPnP/1.0 MiniUPnPd/1.5
LOCATION: http://192.168.0.1:40833/rootDesc.xml

('192.168.0.2', 53375) HTTP/1.1 200 OK
LOCATION: http://192.168.0.2:1025/description.xml
SERVER: Linux/2.6.35-31-generic, UPnP/1.0, Free UPnP Entertainment Service/0.655
USN: uuid:60c251f1-51c6-46ae-93dd-0a3fb55a316d::upnp:rootdevice
Two devices responded to our M-SEARCH query within the specified number of seconds. One is a cable internet router, the other is Fuppes, a UPnP media server. The most interesting things in these replies are the LOCATION headers, which point us to an SCPD XML file: http://192.168.0.1:40833/rootDesc.xml.
SCPD, Phase I: Fetching and parsing the root SCPD file
The SCPD XML file (http://192.168.0.1:40833/rootDesc.xml) contains information on the UPnP server such as the manufacturer, the services offered by the device, etc. The XML file is rather big and complicated. You can see the full version, but here’s a grealy reduced one from my router:
<?xml version="1.0" encoding="UTF-8"?>
<root xmlns="urn:schemas-upnp-org:device-1-0">
  <device>
    <deviceType>urn:schemas-upnp-org:device:InternetGatewayDevice:1</deviceType>
    <friendlyName>Ubee EVW3226</friendlyName>
    <serviceList>
      <service>
        <serviceType>urn:schemas-upnp-org:service:Layer3Forwarding:1</serviceType>
        <controlURL>/ctl/L3F</controlURL>
        <eventSubURL>/evt/L3F</eventSubURL>
        <SCPDURL>/L3F.xml</SCPDURL>
      </service>
    </serviceList>
    <deviceList>
      <device>
        <deviceType>urn:schemas-upnp-org:device:WANDevice:1</deviceType>
        <friendlyName>WANDevice</friendlyName>
        <serviceList>
          <service>
            <serviceType>urn:schemas-upnp-org:service:WANCommonInterfaceConfig:1</serviceType>
            <serviceId>urn:upnp-org:serviceId:WANCommonIFC1</serviceId>
            <controlURL>/ctl/CmnIfCfg</controlURL>
            <eventSubURL>/evt/CmnIfCfg</eventSubURL>
            <SCPDURL>/WANCfg.xml</SCPDURL>
          </service>
        </serviceList>
        <deviceList>
          <device>
            <deviceType>urn:schemas-upnp-org:device:WANConnectionDevice:1</deviceType>
            <friendlyName>WANConnectionDevice</friendlyName>
            <serviceList>
              <service>
                <serviceType>urn:schemas-upnp-org:service:WANIPConnection:1</serviceType>
                <controlURL>/ctl/IPConn</controlURL>
                <eventSubURL>/evt/IPConn</eventSubURL>
                <SCPDURL>/WANIPCn.xml</SCPDURL>
              </service>
            </serviceList>
          </device>
        </deviceList>
      </device>
    </deviceList>
  </device>
</root>
It consists of basically three important things:
- The URLBase
- Virtual Devices
- Services
URLBase
Not all SCPD XML files contain an URLBase (the one above from my router doesn’t), but if they do, it looks like this:
<URLBase>http://192.168.1.254:80</URLBase>
This is the base URL for the SOAP requests. If the SCPD XML does not contain an URLBase element, the LOCATION header from the server’s discovery response may be used as the base URL. Any paths should be stripped off, leaving only the protocol, IP and port. In the case of my internet router that would be: http://192.168.0.1:40833/
Devices
The XML file then specifies devices, which are virtual devices that the physical device contains. These devices can contain a list of services in the <ServiceList> tag. A list of sub-devices can be found in the <DeviceList> tag. The Devices in the deviceList can themselves contain a list of services and devices. Thus, devices can recursively contain sub-devices, as shown in the following diagram:
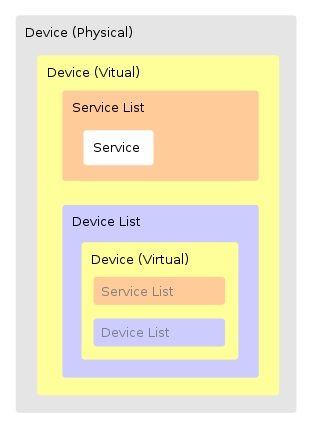
As you can see, a virtual Device can contain a Device List, which can contain a virtual Device, etc. We are most interested in the <Service> elements from the <ServiceList>. They look like this:
<service>
  <serviceType>urn:schemas-upnp-org:service:WANCommonInterfaceConfig:1</serviceType>
  <serviceId>urn:upnp-org:serviceId:WANCommonIFC1</serviceId>
  <controlURL>/ctl/CmnIfCfg</controlURL>
  <eventSubURL>/evt/CmnIfCfg</eventSubURL>
  <SCPDURL>/WANCfg.xml</SCPDURL>
</service>
...
<service>
  <serviceType>urn:schemas-upnp-org:service:WANIPConnection:1</serviceType>
  <controlURL>/ctl/IPConn</controlURL>
  <eventSubURL>/evt/IPConn</eventSubURL>
  <SCPDURL>/WANIPCn.xml</SCPDURL>
</service>
The <URLBase> in combination with the <controlURL> gives us the URL to the SOAP server where we can send our requests. The URLBase in combination with the <SCPDURL> points us to a SCPD (Service Control Point Definition) XML file which contains a description of the SOAP calls.
The following Python code extracts the URLBase, ControlURL and SCPDURL information:
import urllib2
import urlparse
from xml.dom import minidom

def XMLGetNodeText(node):
    """
    Return text contents of an XML node.
    """
    text = []
    for childNode in node.childNodes:
        if childNode.nodeType == node.TEXT_NODE:
            text.append(childNode.data)
    return(''.join(text))

location = 'http://192.168.0.1:40833/rootDesc.xml'

# Fetch SCPD
response = urllib2.urlopen(location)
root_xml = minidom.parseString(response.read())
response.close()

# Construct BaseURL
base_url_elem = root_xml.getElementsByTagName('URLBase')
if base_url_elem:
    base_url = XMLGetNodeText(base_url_elem[0]).rstrip('/')
else:
    url = urlparse.urlparse(location)
    base_url = '%s://%s' % (url.scheme, url.netloc)

# Output Service info
for node in root_xml.getElementsByTagName('service'):
    service_type = XMLGetNodeText(node.getElementsByTagName('serviceType')[0])
    control_url = '%s%s' % (
        base_url,
        XMLGetNodeText(node.getElementsByTagName('controlURL')[0])
    )
    scpd_url = '%s%s' % (
        base_url,
        XMLGetNodeText(node.getElementsByTagName('SCPDURL')[0])
    )
    print '%s:\n  SCPD_URL: %s\n  CTRL_URL: %s\n' % (service_type,
                                                     scpd_url,
                                                     control_url)
Output:
urn:schemas-upnp-org:service:Layer3Forwarding:1:
  SCPD_URL: http://192.168.0.1:40833/L3F.xml
  CTRL_URL: http://192.168.0.1:40833/ctl/L3F

urn:schemas-upnp-org:service:WANCommonInterfaceConfig:1:
  SCPD_URL: http://192.168.0.1:40833/WANCfg.xml
  CTRL_URL: http://192.168.0.1:40833/ctl/CmnIfCfg

urn:schemas-upnp-org:service:WANIPConnection:1:
  SCPD_URL: http://192.168.0.1:40833/WANIPCn.xml
  CTRL_URL: http://192.168.0.1:40833/ctl/IPConn
SCPD, Phase II: Service SCPD files
Let’s look at the WANIPConnection service. We have an SCPD XML file for it at http://192.168.0.1:40833/WANIPCn.xml and a SOAP URL at http://192.168.0.1:40833/ctl/IPConn. We must find out which SOAP calls we can make, and which parameters they take. Normally SOAP would use a WSDL file to define its API. With UPnp however this information is contained in the SCPD XML file for the service. Here’s an example of the full version of the WANIPCn.xml file. There are two interesting things in the XML file:
- The <ActionList> element contains a list of actions understood by the SOAP server.
- The
<serviceStateTable> element contains metadata about the arguments we can send to SOAP actions, such as the type and allowed values.
ActionList
The <ActionList> tag contains a list of actions understood by the SOAP server. It looks like this:
<actionList>
  <action>
    <name>SetConnectionType</name>
    <argumentList>
      <argument>
        <name>NewConnectionType</name>
        <direction>in</direction>
        <relatedStateVariable>ConnectionType</relatedStateVariable>
      </argument>
    </argumentList>
  </action>
  <action>
    [... etc ...]
  </action>
</actionList>
In this example, we discover an action called SetConnectionType. It takes one incoming argument: NewConnectionType. The relatedStateVariable specifies which StateVariable this argument should adhere to.
serviceStateTable
Looking at the <serviceStateTable> section later on in the XML file, we see:
<serviceStateTable>
  <stateVariable sendEvents="no">
    <name>ConnectionType</name>
    <dataType>string</dataType>
  </stateVariable>
  <stateVariable>
  [... etc ...]
  </stateVariable>
</serviceStateTable>
From this we conclude that we need to send an argument with name “ConnectionType” and type “string” to the SetConnectionType SOAP call.
Another example is the GetExternalIPAddress action. It takes no incoming arguments, but does return a value with the name “NewExternalIPAddress“. The action will return the external IP address of your router. That is, the IP address you use to connect to the internet.
<action>
  <name>GetExternalIPAddress</name>
  <argumentList>
    <argument>
      <name>NewExternalIPAddress</name>
      <direction>out</direction>
      <relatedStateVariable>ExternalIPAddress</relatedStateVariable>
    </argument>
  </argumentList>
</action>
Let’s make a SOAP call to that action and find out what our external IP is.
SOAP: Calling an action
Normally we would use a SOAP library to create a call to a SOAP service. In this article I’m going to cheat a little and build a SOAP request from scratch.
import urllib2

soap_encoding = "http://schemas.xmlsoap.org/soap/encoding/"
soap_env = "http://schemas.xmlsoap.org/soap/envelope"
service_ns = "urn:schemas-upnp-org:service:WANIPConnection:1"
soap_body = """


""" % (soap_encoding, service_ns, soap_env)

soap_action = "urn:schemas-upnp-org:service:WANIPConnection:1#GetExternalIPAddress"
headers = {
    'SOAPAction': u'"%s"' % (soap_action),
    'Host': u'192.168.0.1:40833',
    'Content-Type': 'text/xml',
    'Content-Length': len(soap_body),
}

ctrl_url = "http://192.168.0.1:40833/ctl/IPConn"

request = urllib2.Request(ctrl_url, soap_body, headers)
response = urllib2.urlopen(request)

print response.read()
The SOAP server returns a response with our external IP in it. I’ve pretty-printed it for your convenience and removed some XML namespaces for brevity:
<?xml version="1.0"?>
<s:Envelope xmlns:s=".." s:encodingStyle="..">
  <s:Body>
    <u:GetExternalIPAddressResponse xmlns:u="urn:schemas-upnp-org:service:WANIPConnection:1">
      <NewExternalIPAddress>212.100.28.66</NewExternalIPAddress>
    </u:GetExternalIPAddressResponse>
  </s:Body>
</s:Envelope>
We can now put the response through an XML parser and combine it with the SCPD XML’s <argumentList> and <serviceStateTable> to figure out which output parameters we can expect and what type they are. Doing this is beyond the scope of this article, since it’s rather straight-forward yet takes a reasonable amount of code. Suffice to say that our extenal IP is 212.100.28.66.
Summary
To summarise, these are the steps we take to actually do something useful with a UPnP service:
- Broadcast a HTTP-over-UDP (HTTPU) message to the network asking for UPnP devices to respond.
- Listen for incoming UDP replies and extract the LOCATION header.
- Send a WGET to fetch a SCPD XML file from the LOCATION.
- Extract services and/or devices from the SCPD XML file.
- For each service, extract the Control and SCDP urls.
- Combine the BaseURL (or if it was not present in the SCPD XML, use the LOCATION header) with the Control and SCDP url’s.
- Send a WGET to fetch the service’s SCPD XML file that describes the actions it supports.
- Send a SOAP POST request to the service’s Control URL to call one of the actions that it supports.
- Receive and parse reply.
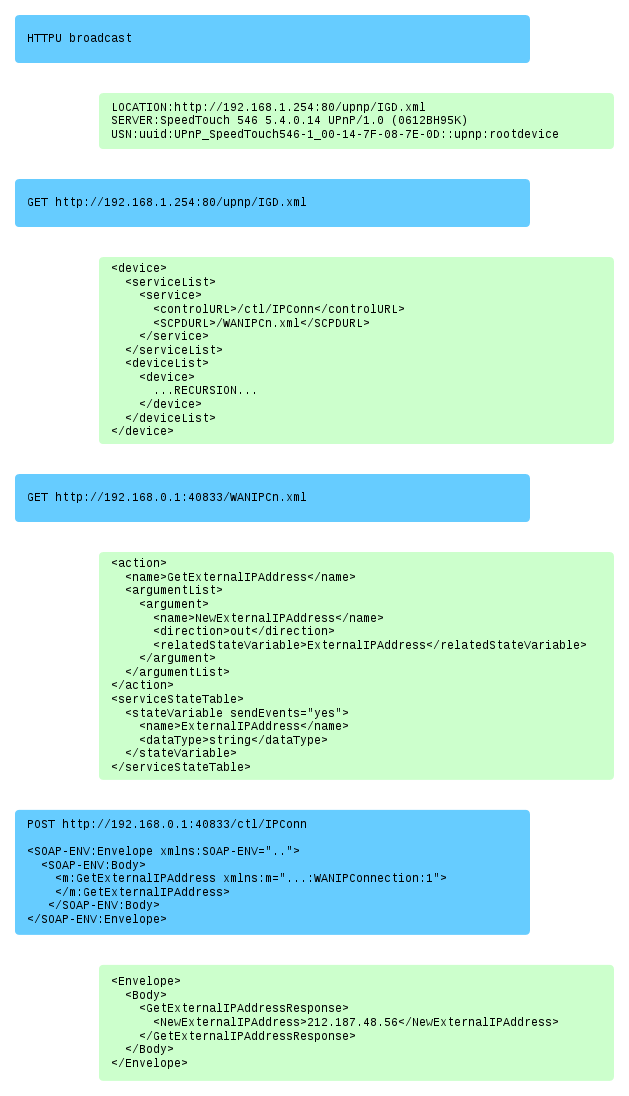
An example with Requests on the left and Responses on the right. Like all other examples in this article, the XML has been heavily stripped of redundant or unimportant information:
Conclusion
I underwent this whole journey of UPnP because I wanted a way transparently support connections from externals networks to my locally-running application. While UPnP allows me to do that, I feel that UPnP is needlessly complicated. The standard, while readable, feels like it’s designed by committee. The indirectness of having to fetch multiple SCPD files, the use of non-standard protocols, the nestable virtual sub-devices… it all feels slightly unnecesarry. Then again, it could be a lot worse. One only needs to take a quick look at SAML v2 to see that UPnP isn’t all that bad.
All in all, it let me do what I needed, and it didn’t take too long to figure out how it worked. As a kind of exercise I partially implemented a high-level simple to use UPnP client for python, which is available on Github. Take a look at the source for more insights on how to deal with UPnP.
Tuesday, June 7th, 2016
TL;DR: Run alien under the script tool.
I was trying to get my build server to build packages for one of my projects. One step involves converting a Debian package to a RPM by means of the Alien tool. Unfortunately it failed with the following error:
alien -r -g ansible-cmdb-9.99.deb
Warning: alien is not running as root!
Warning: Ownerships of files in the generated packages will probably be wrong.
Use of uninitialized value in split at /usr/share/perl5/Alien/Package/Deb.pm line 52.
no entry data.tar.gz in archive

gzip: stdin: unexpected end of file
tar: This does not look like a tar archive
tar: Exiting with failure status due to previous errors
Error executing "ar -p 'ansible-cmdb-9.99.deb' data.tar.gz | gzip -dc | tar tf -":  at /usr/share/perl5/Alien/Package.pm line 481.
make: *** [release_rpm] Error 2
The same process ran fine manually from the commandline, so I suspected something related with the controlling terminal. One often trick is to pretend to a script we actually have a working interactive TTY using the script tool. Here’s how that looks:
script -c "sh ansible-cmdb-tests.sh"
The job now runs fine:
alien -r -g ansible-cmdb-9.99.deb
Warning: alien is not running as root!
Warning: Ownerships of files in the generated packages will probably be wrong.
Directory ansible-cmdb-9.99 prepared.
sed -i '\:%dir "/":d' ansible-cmdb-9.99/ansible-cmdb-9.99-2.spec
sed -i '\:%dir "/usr/":d' ansible-cmdb-9.99/ansible-cmdb-9.99-2.spec
sed -i '\:%dir "/usr/share/":d' ansible-cmdb-9.99/ansible-cmdb-9.99-2.spec
sed -i '\:%dir "/usr/share/man/":d' ansible-cmdb-9.99/ansible-cmdb-9.99-2.spec
sed -i '\:%dir "/usr/share/man/man1/":d' ansible-cmdb-9.99/ansible-cmdb-9.99-2.spec
sed -i '\:%dir "/usr/lib/":d' ansible-cmdb-9.99/ansible-cmdb-9.99-2.spec
sed -i '\:%dir "/usr/bin/":d' ansible-cmdb-9.99/ansible-cmdb-9.99-2.spec
cd ansible-cmdb-9.99 && rpmbuild --buildroot='/home/builder/workspace/ansible-cmdb/ansible-cmdb-9.99/' -bb --target noarch 'ansible-cmdb-9.99-2.spec'
Building target platforms: noarch
Building for target noarch
Processing files: ansible-cmdb-9.99-2.noarch
Provides: ansible-cmdb = 9.99-2
Requires(rpmlib): rpmlib(CompressedFileNames) <= 3.0.4-1 rpmlib(PayloadFilesHavePrefix) <= 4.0-1
Requires: /usr/bin/env
Checking for unpackaged file(s): /usr/lib/rpm/check-files /home/builder/workspace/ansible-cmdb/ansible-cmdb-9.99
warning: Installed (but unpackaged) file(s) found:
   /ansible-cmdb-9.99-2.spec
Wrote: ../ansible-cmdb-9.99-2.noarch.rpm
Executing(%clean): /bin/sh -e /var/tmp/rpm-tmp.3ssxv0
+ umask 022
+ cd /home/builder/rpmbuild/BUILD
+ /bin/rm -rf /home/builder/workspace/ansible-cmdb/ansible-cmdb-9.99
+ exit 0
Hope that helps someone out there.
Tuesday, April 26th, 2016
I’ve just released ansible-cmdb v1.14. Ansible-cmdb takes the output of Ansible’s fact gathering and converts it into a static HTML overview page containing system configuration information. It supports multiple templates and extending information gathered by Ansible with custom data.
This release includes the following bugfixes and feature improvements:
- Look for ansible.cfg and use hostfile setting.
- html_fancy: Properly sort vcpu and ram columns.
- html_fancy: Remember which columns the user has toggled.
- html_fancy: display groups and hostvars even if no host information was collected.
- html_fancy: support for facter and custom facts.
- html_fancy: Hide sections if there are no items for it.
- html_fancy: Improvements in the rendering of custom variables.
- Apply Dynamic Inventory vars to all hostnames in the group.
- Many minor bugfixes.
As always, packages are available for Debian, Ubuntu, Redhat, Centos and other systems. Get the new release from the Github releases page.
Monday, March 14th, 2016
For a while I’ve noticed that Virtualbox has terrible performance when install Debian / Ubuntu packages. A little top, iotop and atop research later, and it turns out the culprit is the disk I/O, which is just ludicrously slow. The cause is the fact that Virtualbox doesn’t have “Use host IO cache” turned on by default for SATA controllers.Turning that option on gives a massive improvement to speed.
To turn “Host IO cache” on:
- Open the Virtual Machine’s Settings dialog
- Go to “Storage”
- Click on the “Controller: SATA” controller
- Enable the “Host I/O Cache” setting.
- You may also want to check any other controllers and / or disks to see if this option is on there.
- Save the settings and start the VM and you’ll see a big improvement.
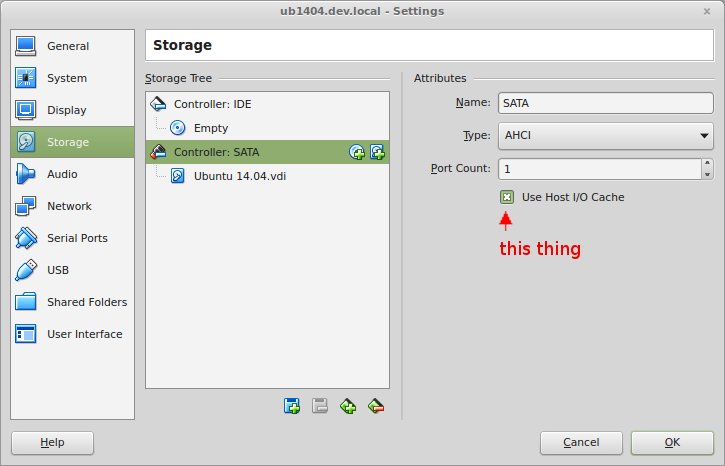
Update:
Craig Gill was kind enough to mail me with the reasoning behind why the “Host I/O cache” setting is off by default:
Hello, thanks for the blog post, I just wanted to comment on it below:
In your blog post “Terrible Virtualbox disk performance”, you mention
that the ‘use host i/o cache’ is off by default.
In the VirtualBox help it explains why it is off by default, and it
basically boils down to safety over performance.
Here are the disadvantages of having that setting on (which these
points may not apply to you):
1. Delayed writing through the host OS cache is less secure. When the
guest OS writes data, it considers the data written even though it has
not yet arrived on a physical disk. If for some reason the write does
not happen (power failure, host crash), the likelihood of data loss
increases.
2. Disk image files tend to be very large. Caching them can therefore
quickly use up the entire host OS cache. Depending on the efficiency
of the host OS caching, this may slow down the host immensely,
especially if several VMs run at the same time. For example, on Linux
hosts, host caching may result in Linux delaying all writes until the
host cache is nearly full and then writing out all these changes at
once, possibly stalling VM execution for minutes. This can result in
I/O errors in the guest as I/O requests time out there.
3. Physical memory is often wasted as guest operating systems
typically have their own I/O caches, which may result in the data
being cached twice (in both the guest and the host caches) for little
effect.
“If you decide to disable host I/O caching for the above reasons,
VirtualBox uses its own small cache to buffer writes, but no read
caching since this is typically already performed by the guest OS. In
addition, VirtualBox fully supports asynchronous I/O for its virtual
SATA, SCSI and SAS controllers through multiple I/O threads.”
Thanks,
Craig
That’s important information to keep in mind. Thanks Craig!
My reply:
Thanks for the heads up!
For what it’s worth, I already wanted to write the article a few weeks ago, and have been running with all my VirtualBox hosts with Host I/O cache set to “on”, and I haven’t noticed any problems. I haven’t lost any data in databases running on Virtualbox (even though they’ve crashed a few times; or actually I killed them with ctrl-alt-backspace), the host is actually more responsive if VirtualBoxes are under heavy disk load. I do have 16 Gb of memory, which may make the difference.
The speedups in the guests is more than worth any other drawbacks though. The gitlab omnibus package now installs in 4 minutes rather than 5+ hours (yes, hours).
I’ll keep this blog post updates in case I run into any weird problems.
Update: I’ve been running with Host I/O caching on for almost 6 months now. I’ve noticed no performance degradations on the host or other Virtual Machines. I regularly (about 3 times a week) have to hard power-cycle my laptop due to a kernel bug for my Wifi driver. I’ve noticed no data loss in my VMs. Then again, I don’t use them for mission critical applications, nor do they do a lot of write disk I/O. The performance increase on disk I/O in the VM remains extremely high.
The text of all posts on this blog, unless specificly mentioned otherwise, are licensed under this license.


